Hello my friends! Please bare with me as I try to explain (in tutorial form) how to make this awesome Stationary Set that my friend, Lana Edwards shared with me and let me copy. Here is Lana's set in closed form (isn't it cool) now I'll try to step you through the directions to make your very own and I'll show you my "finished project" at the end of this post.
This Stationary Set is made from a rectangular placemat purchased at WalMart. I purchase the exact same mat as Lana has here but I also purchased a few others with are 2-sided and a little bit longer to make my sample + additional gifts. Lana's style mat is by Home Trends, sells for $1.00 and measures 19 x 13 1/4. The placement I used is a little more expensive ($3.00), double sided, by Better Homes & Gardens and measures 19 1/2 x 13 1/4.
The items you will need for this Stationary Set are:
1. placemat
2. sewing machine
3. ruler
4. seamstress chalk or other means of marking
5. straight pins
6. ribbon
7. scissors
8. paper, envelopes & pen
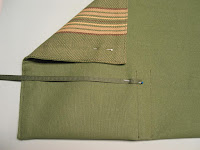
Step 1: Lay your placemat flat then turn the bottom upward 3-1/2" and pin to hold in place. Matching seams on left & right sides, sew closed running your stitch down the existing stitch line.
Step 2: Coming in 6" from each side, place a "mark" then stitch at the mark. From the RIGHT side, stitch another line at 6-3/4" (this will give you a slot for a narrow pen).


Step 3: Turn your mat over and fold each side top portion in from the side and "tack" in the corner to hold the flap in place.


Step 4: Add ribbon for closure by cutting 2 strips 8-10" long. Stitch one tie on the "INSIDE" seam of the left side and then stitch the second tie to the "OUTSIDE" seam of the right side at the 6" stitch line.


Step 5: You can make you own stationary by cutting 8 1/2 x 11 paper in half, border punching one end and adding a small stamped figure to the left or right side. Also add the same image to the back flap of your envelopes.


Step 6: To complete your project, you can add a charm, flower or whatever you wish to decorate the front closed flap. Here I have used a metal butterfly charm (purchased in the beading dept. of JoAnn's) to tie in with the butterfly theme on the stationary. It's adhered with a brad.
I hope you like this little project and could understand my tutorial well enough to try it yourself. If you find I have made a mistake in the directions, PLEASE contact me so I can edit this post and not confuse anyone.
Thanks so much for stopping by today and thanks so much to my friend LANA for letting me share this great idea. Please stop back again.

This is sooooo neat Darlene. I love it. I will have to give this a try. It looks easy. My MIL would love this. She sends me a letter every week. Thanks for the directions..
ReplyDeleteHugs.
What a fabulous idea! thanks for sharing a tutorial! You've been so busy since I last visited you! I can't believe how much you've created in a week! I don't know if I have the time to comment on each and every one, but I did look at each and every one.
ReplyDeleteGreat step-by-step directions!
ReplyDeleteDarlene, this tutorial is wonderful!! I love this,and I think it will make a beautiful gift!! I can't believe how perfectly you got the strips lined up!
ReplyDeleteGreat tutorial Mom. Very clear and the pics are great. I agree with Carla...the stripes are sooo perfectly lined up.
ReplyDeleteThis is such a super-sweet idea, I love the fact you start with a placemat so it's quick too!
ReplyDeleteWhat an awesome tutorial! You did a fabulous job on it, and this is a wonderful project! I remember making things with placemats in Jr. High home ec (many, many years ago!) I'll have to give this a try!
ReplyDeleteOMG - a placemat! From Wally World! I absolutely love it! Thank you for posting this - the tutorial is wonderful!
ReplyDelete