

Thursday, February 14, 2013
Wednesday, February 13, 2013
FRAME IT challenge . . .
. . . at Cheery Lynn Designs Blog.

I've really been trying to play along in the weekly challenges over at Cheery Lynn Designs ... if for no other reason than to utilize my dies more often! I actually thought I had my card finished ... took the photo and everything ... then decided it needed a little bit more so added the olive branches and little red hearts. I really like the finished product and hope you do too.
Here's the recipe:
Papers: red cs, white cs, Bazzill pink cs, SU old olive cs, Crafty Secrets digital (Vintage Valentine) design paper, scrap of Paper Pizazz dp
Cheery Lynn Designs Dies: B117 Fanciful Flourish, B147 Olive Branches, DL102 French Pastry Doily Die
Stamp: Paper Inspirations G10277 Brushed Rose
Accessories: Wild Orchid paper flower, Tim Holtz distress markers (peeled paint and barn door), Tim Holtz distress ink (tea dye) & applicator, Spellbinder circle dies, Offray satin ribbon, red Stickles,

The little red hearts were what popped out from the Spellbinder Heart Circles die that I cut for a different project! (can't let anything go to waste you know, LOL!) Besides ... they look cute!
Here are a few other challenges that qualify:
A and T Emerald Faeries - Love
Celebrate the Occasion - Valentine Anything Goes
Loves Rubberstamps - All About Love
Vickie's Challenge - Anything Goes
* * * * * * * * * * *
NEXT ...
here's a peek at a few Valentine cards I put in the mail today ... yes today! I know ... what was I waiting for? Time just has a way of getting away from me! Better late then never they say! Grrrrr ...
All three cards were created using tags from the Vintage Valentine Digital Kit available at Crafty Secrets new store front Crafty Vintage Girl.


How do you like the pink ribbon heart at the top of the tag?
It was actually a fluke! I was trying to move the ribbon out of the way to do something else and all of a sudden I realized it looked like a heart so I quickly pierced a hole through it and added the heart brad. I just love it when those type of accidents happen!

here's a peek at the inside:

I was also able to use up the scraps of Valentine papers I had laying on my crafting table for these creations. If you haven't checked out all the new 'digital' products available through Crafty Secrets ... please do yourself a favor and click on the link above and take a peek! Their CDs are jam packed full of vintage deliciousness. And, how wonderful to have the ability to modify the colors, sizes and so much more to accommodate any project you have in mind to make!
Well, it's almost time to go relax and watch a little TV with hubby!
Thanks so much for stopping by and please come back soon!
Have a fabulous week and as always . . .

The Sisterhood of Crafters Challenge
Hello blogging friends and welcome back to my blog!
It's time once again for a new challenge at The Sisterhood of Crafters! Today's theme is ...
THANK YOU
My 'sistahs' have created some beautiful creations to inspire you so please be sure to pop over and check them out! Here's a couple of things I created . . .

Recipe for this card:
Papers: Pink Bazzill, White, Black cardstock
Stamps: Penny Black ' flower gallery'
Inks: Versafine Onyx
Accessories: Sizzix Swiss Dot EF, Offray ribbon, Spectrum Noir markers, Fiskars swivel craft knife,


My focus image is from the Crafty Secrets Victorian Floral Easter Egg Style 2 set. So many beautiful images on this 2 page printable set that you can create until your hearts content! And with a ticket price of $2.95 ... you can't go wrong! Be sure to check it out!

After hand cutting the egg I chose from the printed sheet, I ran it through my Vagabond using 2 coordinating size dies from my Spellbinder classic oval set. Then popped up the inner oval with one layer of dimensional tape and TWO layers of dimensional tape on the center oval. The corners were created with the Cheery Lynn Designs B165 Lace Corner Deco E die set and the stamp is from Hero Arts.


This final card creation is TOTALLY digital. The paper and images are all from Crafty Secrets. The background papers are from the Radiant digital paper collection and the lace, flower & sentiment are from the Creating with Vintage Patterns CD. So QUICK & EASY!!! I did print it twice so I could do a bit of fussy cutting and pop up the lace/flower panel at the bottom. I think it just helps to add another dimension to the card.
Thanks so much for stopping by today and I look forward to seeing you again soon!
Until then ...

Tuesday, February 12, 2013
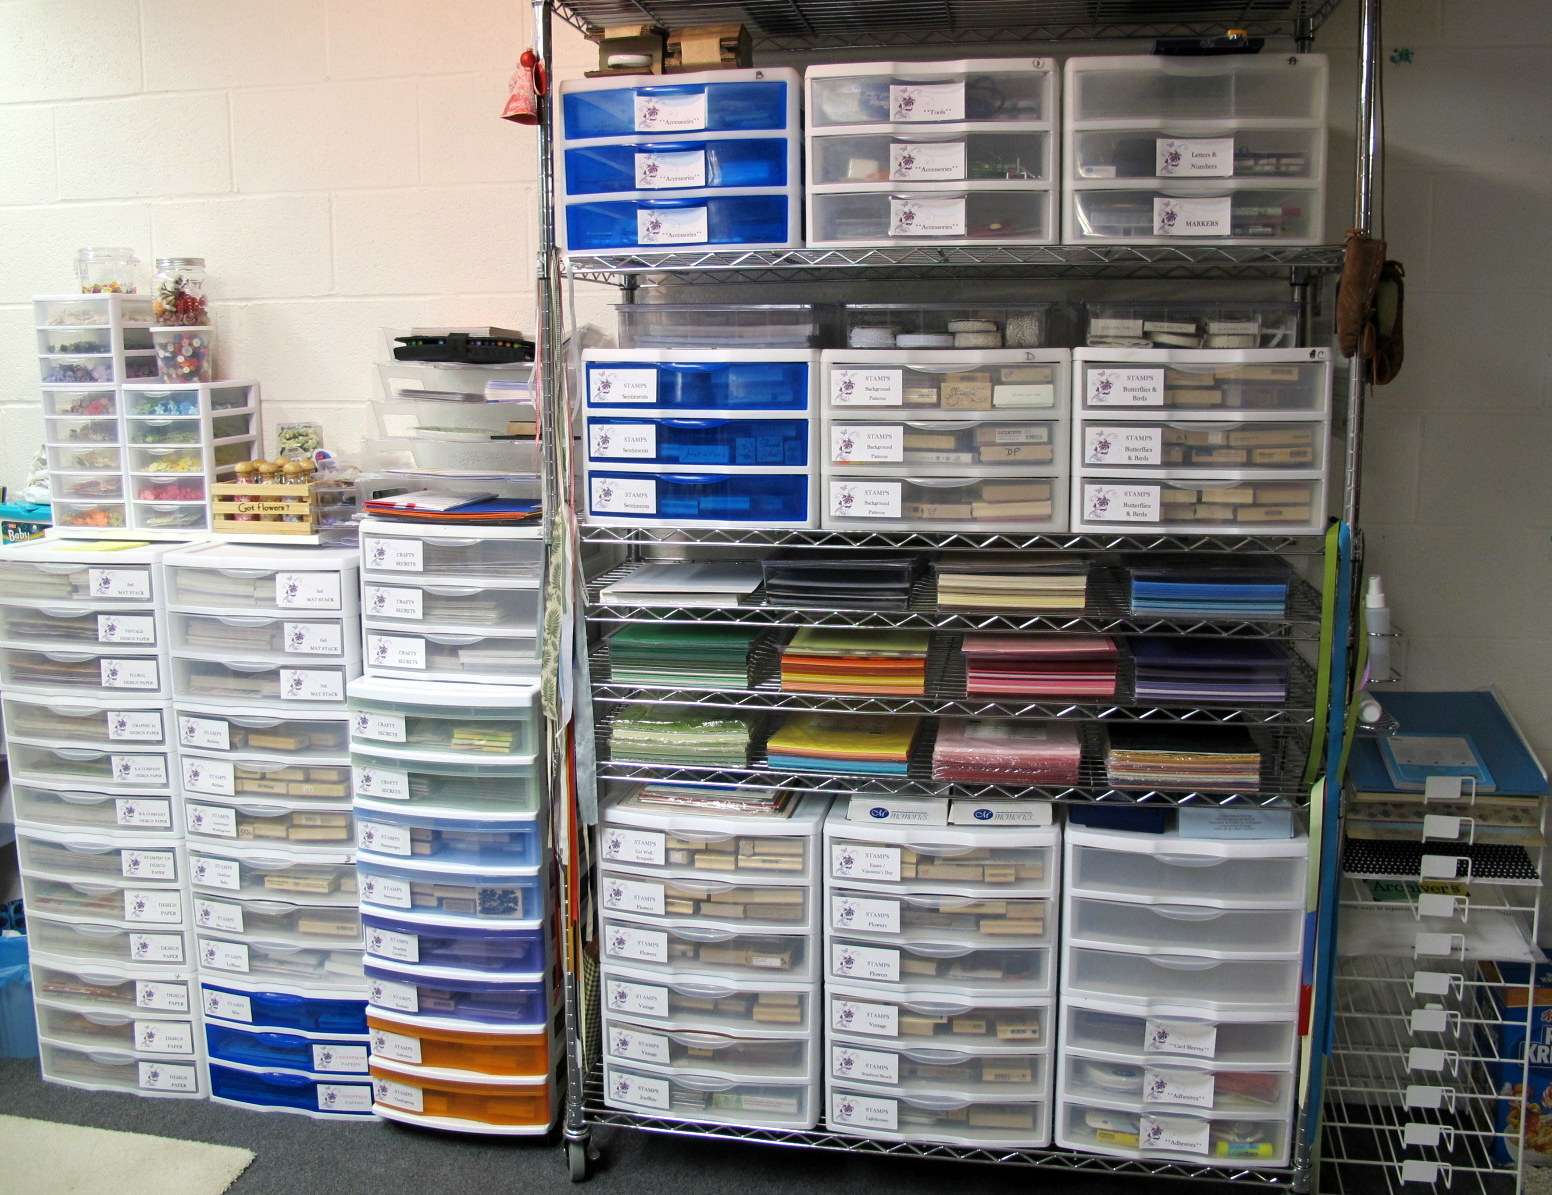
Time to RE-ORGANIZE
Hello Blogging Friends!
After the holidays, my crafting cave was a MESS and so I decided it was time to revamp, reorganize & remove (a few things, lol). I know I have a LOT of STUFF and know that for myself ... if it's better labelled and organized I will either 1) use it more or 2) get rid of it. So that was my mission!
What do you think?
Paper/Stamp Storage
BEFORE

AFTER
Embellishment Board
BEFORE

AFTER

Standing Workstation (Punches, Ribbons, Inks)
BEFORE

AFTER

Close Up of Punches Section
Back rows consist of two3-tiered spice shelves

One more section to clean out & reorganize and then it's ALL done. But, it will have to wait for another day/ another time ... NOW it's time to create!
Hope you enjoyed a peek into my 'CRAFTING CAVE' and hope you'll stop by tomorrow when I will have creations to share with you for the new challenge at The Sisterhood of Crafters!
Till then ... stay warm, stay happy and as always . . .

Hope you enjoyed a peek into my 'CRAFTING CAVE' and hope you'll stop by tomorrow when I will have creations to share with you for the new challenge at The Sisterhood of Crafters!
Till then ... stay warm, stay happy and as always . . .

Friday, February 8, 2013
A 'Sassy' fun challenge . . .
Happy Friday Everyone!
Unfortunately I got so involved with my Crafting Cave Cleanup that I missed out on a couple of my favorite challenges last week ... so I'm hopping on them right away this week!
First is the fun challenge at Sassy Studio Designs. It's Dare to be Sassy time and this week's theme is "HAVE A HEART" and I have used last week's Friday Freebie image from their Paper Craft Planet group as my focus.


 | |
| Inside View |
I just started learning how to color with my new Spectrum Noir alcohol markers so this was my first try. Not too bad but I'm sure will improve with practice. I used Baby Blue Liquid Pearls on her wings for added dimension. The corner punch is from Creative Memories and the hearts are from the Martha Stewart large heart punch.
Here are a few other challenges I'd like to enter this card into:
Crafts 4 Eternity - Be My Valentine
ATCs & Cards with Attitude #33 - Be My Valentine/Anything Goes
Broken Box Stock #19 - Be My Valentine
Card Crafter's Circle #61 - Love Is In The Air/Valentine
Card Makin' Mamas - Love
Digi Haven - Love / Valentine
Polka Doodles - Lots of Layers/Pink & Red
Card Crafter's Circle #61 - Love Is In The Air/Valentine
Card Makin' Mamas - Love
Digi Haven - Love / Valentine
Polka Doodles - Lots of Layers/Pink & Red
* * * * *
Another challenge I always enjoy participating in is the one at Joan's Gardens (every Thursday). This week Joan & Selma have challenged us to:
- Use Blue, White and Green
- Use a Flower that has a pattern
- Use an Oval
- Use a stamped sentimentI haven't made a paper flower in awhile now ... I was grateful to have the PUSH with this challenge to get back into making a few homemade flowers.

 |
| Inside view |
Products used on this card are:
Paper: Medium blue cs, DCWV Winter Matstack dp
Accessories: Spellbinder classic ovals & beaded ovals, McGill Floral Petals P/N 64503 punch, McGill black forming mat, PunchBunch Flower Kit, Martha Stewart 6 point snowflake punch, Cheery Lynn Designs B117 Fanciful Flourish die, Impression Obsession CL114 Sympathy Sentiments clear stamp set, Versafine Onxy ink, SU river rock ink, DRS Designs G510 Crosses rubber stamp.
I hope you have enjoyed my cards today and I truly hope you find inspiration in my work. If ever you have a question that I might be able to help you with ... PLEASE do not hesitate to ask! I will do my best to get you an answer.
Time to make dinner! Friday ... that means Fish & French Fries ... guess I'd better get to the kitchen! Thanks for stopping by today, have a fabulous weekend ahead and as always . . .

Time to make dinner! Friday ... that means Fish & French Fries ... guess I'd better get to the kitchen! Thanks for stopping by today, have a fabulous weekend ahead and as always . . .

Thursday, February 7, 2013
Shelly's Images Challenge
Hello my friends and Happy Thursday!
It's time for another fun challenge at Shelly's Images and today's theme is:
Neutrals with a POP of Color
(Your Choice of Color)
Our featured image today is "Key To My Heart Set". Just click on the name to take you right where you need to be to get this set for your very own!

I love a white on white card creation so that is what I chose as my 'neutral' today. (Doesn't get much more neutral that that! LOL!) Of course RED was my choice for color to add that POP and I love how it looks! I decided a 'Gate Fold' card style was appropriate for today creation.

Here's a peek at the inside. The sentiment is part of this lovely digi stamp set.
Other products used on this card:
Paper - White cardstock
Accessories - Red Prismacolor Marker, Gold Prisma Pencil, Gamsol, Kaiser red pearls, Offray 1/4" white satin ribbon, Provocraft Swiss Dot EF, Cheery Lynn Designs B117S Fanciful Flourish Small die, Wilton paper doily, Fiskars postage stamp scissors
Here are a few addition challenges my card qualifies for:
Fab 'n' Funky - Valentines/Hearts
Fresh Brewed Challenge - Hearts & Dots
Inky Impressions - Love
Jen's Digi Stamps - It's All About Love
Paper Pretties Challenge - Valentines
Digital Tuesday Challenge - Hearts
Party Time Tuesday - Love & Romance
I hope you'll come join in the challenge fun at Shelly's Images. You have TWO weeks to play ... lots of time! See you there!
And as always ... thanks SO MUCH for taking the time to stop by!

Monday, February 4, 2013
Crafty Secrets Linky Party & DT Challenge
Well here we are at the beginning of another month and you know what that means!
Yep, it's time for another Crafty Secrets Linky Party and DT Challenge over on the Heartwarming Vintage Blog. I hope you'll come join in the fun ... YOU could be the winner of a $50 Crafty Secrets prize package!
February's Linky Party theme for the DT is LOVE!
FOR YOUR ENTRY ... It doesn't have to be a love theme, it just needs to use a Crafty Secrets product. A random.org winner will be announced next Mon, Feb 11/13 to recieve a $50.00 Crafty Secrets Gift Certificate and everyone that enters will win our New Easter Egg Tags Printable Sheet - Here's a peek at 2 of the sheets and I will come back and post the aged 'back side greeting side' later today. Sug retail $2.95

Of course me being the over achiever that I am (LOL), created something with all three of the themes I mentioned. First I made a Valentine Goodie Box using the D-117 Vintage Valentine Digital Kit. The images & pattern papers are from this kit.
Other items used are pink cs, white cs, Martha Stewart doily lace border punch, diamond Stickles, Spellbinder Heart Circles die, Cheery Lynn Designs B117S Fanciful Flourish small, DL112 Exotic Butterfly small, B147 Olive Branches, Michaels Celebrate It paper flowers, dimensional tape


Next is an Anniversary card which was created using digital papers & images from the Creating with Vintage Patterns CD-1. Additional items used on this creation are red cardstock, Kaiser pearls, Stickles, dimension tape, JustRite sentiment stamp & Gold Pilot marker for edging on main image. After designing my card front in Word using these digital papers and
images, I printed it twice giving me the option of cutting out one of the
images and one of the lacy strips to pop up for added dimension.


 | |
| Inside view |
And lastly is a card of LOVE which could be used for a variety of occasions! For this card I have used the Crafty Secrets Clear Art Stamp set DAS-S11 "Message on a Bottle". The pink printed background paper is from the Vintage Valentine Digital Kit mentioned on my first project.

While talking with a friend from Illinois on the phone Friday night (waving Hi to Bette!), she mentioned a 3-step stamping technique. As she was described it, I made a few mental notes and thought it would be perfect for this card. I first cut one piece of white cardstock 2" x 3" ... another at 2 1/2 " x 3 1/2" and a third piece at 3" x 4". I stacked them together using removable tape and started my stamping. Once the stamping was done, I matted each panel with red cardstock and adhered them together to make my focus panel.

Other items used on this creation are: Kaiser pearls, paper flowers, Sticles, Prismacolor marker, red cs, black cs, Michaels Celebrate It ribbon, Versafine Onxy black ink.
A few other challenges I would like to enter are:
Broken Box Stock - Be My Valentine
Brown Sugar Challenge - Go Red/Hearts
Card Makin Mamas - LOVE (cards only)
Crafts 4 Eternity - Romance
Creative Corner Challenge - Love and Hearts
QKR Stampede - Love is in the Air
Simply Create Too - Valentine's Day or Hearts
Cheery Lynn Designs - Add A Flourish
613 Avenue Create - Anything Goes LOVE
Anything But A Card Challenge - Share the Love
Dream Valley Challenges - Valentines
Eclectic Ellapu - Wedding Anniversary
Gingerloft - Love Is In the Air
Glitter n Sparkle Challenge - Valentines/Love
Great Impressions - Have A Heart
Anything But A Card Challenge - Share the Love
Dream Valley Challenges - Valentines
Eclectic Ellapu - Wedding Anniversary
Gingerloft - Love Is In the Air
Glitter n Sparkle Challenge - Valentines/Love
Great Impressions - Have A Heart
Well, that's it for me today (bet you're glad of that! LOL!).
I hope you will come join in the fun at Crafty Secrets ... here are the simple rules:
1. Sample must use some type of Crafty Secrets product.
2. Photo added must link to a Blog, Website or Online Gallery
2. No links to Etsy Stores or Shopping Carts please
2. Photo added must link to a Blog, Website or Online Gallery
2. No links to Etsy Stores or Shopping Carts please
Please Visit Our Design Team Blogs for more inspiration!
AS ALWAYS . . .

Sunday, February 3, 2013
Are you ready for some football?
YES I AM!!
It's almost time for Super Bowl 47 and I thought I'd share with you our traditional Super Bowl dinner. Sometimes we wait for halftime to indulge but in the last few years we've decided to make it our dinner since halftime isn't until around 8-8:30 pm ... too late to be eating for us!
It's called "PAVLICK SUPREME"! It's similar to nacho supreme but hubby puts his own twist on it. And that twist is the yummy good chili that he makes. He doesn't even give me the actual recipe but I know it has: Cube Steak cut into 1/2" cubes, Green Pepper, a couple of yellow onions, Garlic, a can of chopped tomatoes with jalapeno peppers, a jar of our homemade hot salsa and spices ???
Mark makes the chili ... I do the assembly ... we both ENJOY!
Step 1: Arrange a layer of your favorite Tortilla Chips in the bottom of a 9 x 13 pan ...

Step 2: Spoon on a layer of your homemade chili (while it's still hot) . . .

Step 3: Sprinkle on your favorite cheese topping ... we used Sargento 4 Cheese Mexican

Step 4: Prepare your toppings by ...
Chopping the tomatoes ... shred the lettuce ... chop green onions (optional) ... open your sour cream
(also have additional nacho's available)

Step 5: Now it's time to place your 'supreme' under the broiler for a few minutes until cheese is melted.

NOW COMES THE BEST PART . . .

TIME TO EAT!!!
(Yes that's a beer ... Crystal Lite Lemonade just doesn't go very well with this meal ... LOL!)
Enjoy the game! I'll be back tomorrow with some crafting creations to share with you!
As always . . .

Subscribe to:
Posts (Atom)