Thursday, November 13, 2014

Holiday Tags

Hello Everyone!
Are you as busy as I am?  Whew!  
I'm trying to get enough prepared for my last two craft fairs for the year and even though I'm making good headway, there's always something else I want to do besides what has been depleted from the past 3 shows!  LOL!  Stay focused Darlene!!
  Anyways, today I'm working on some TAGS and thought I'd share a peek with you.


 This is a FABULOUS way to use up those scraps (of which I have accumulated a mountain of)!  The tag base is cut from the white & ivory off cuts from my A-6 size cards and the decorative holiday papers are also off cuts from previous projects.  Some I've added holiday die cuts to the front others I've simply added a sentiment.  ALL have a To: and From: stamped on the back.

 Here are a few challenge to share in today:
Crafty Ribbon Challenge - Christmas Creations with Ribbon
 
 NEXT UP ... Tissue Box Covers!
Here you see I have some cut/scored and ready to start assembling.  I sold ALL my holiday tissue box covers at the show a couple weeks ago so need to get hopin' on these!  Hopefully I'll remember to snap a few photos to share with you when they are completed.


Okay ... break time is over!  Back to crafting & creating!
I hope you'll stop back tomorrow when I have a FABULOUS PROJECT to share with you using the new KITCHEN digi sets from Crafty Secrets!  I think you're going to love it as much as I do!
Till then and as always ...

Wednesday, November 12, 2014

Sisterhood - 'Thanks'

Happy Day my friends!
Today I have a card to share that was created for the new challenge over at The Sisterhood of Crafters.  Our theme today is

THANKS
(use the word THANK on your card ... i.e. Thankful, Give Thanks, Thank You, etc.)

Terri is today's hostess and we are happy to welcome THREE new Step Sisters for our November challenges.  Please pop over, show them some love and come play along!!

 For today's card, I found this ADORABLE Ruth Morehead image over on Pinterest and felt it was just perfect to express thanks.  After printing, I did a little fussy cutting around these cutie pies and popped it up just a bit with dimensionals.  The sentiment was computer generated below the image before printing and this fabric pumpkin ribbon was a gift from a friend.

We at the Sisterhood are certainly THANKFUL for all the wonderful inspiration YOU have shared with us this past year and look forward to having you join us as often as you possibly can.

I would like to share my card in the following challenges:
{PIN}spirational Challenges - Photo Inspiration
http://www.pinterest.com/pin/141581982011016620/

DREAM it UP! Challenge - Thankful and Thoughtful

THANKS again for taking the time to stop by my blog and as always . . .


Recipe:
Papers:  SU Really Rust cs, Graphic45 'Domestic Goddess' dp
Accessories:  Fiskars swivel craft knife, SU dimensionals,  Pumpkin ribbon


Tuesday, November 11, 2014

Sparkle and Shine with Dies R Us


Good Day my Friends and Welcome Back!
It's Tuesday and that means it is time once again for me to share a card I have made to hopefully inspire you using various dies from our Dies R Us store.
Today I'm creating with the traditional Christmas colors of Red, White & Green as well as a very simple, yet elegant design.  We all love that little touch of sparkle, so I thought a dab of Stickles and Diamond Dust was in order to help highlight these gorgeous dies.


Dies used are:

Remember, if by chance the die you are looking for is out of stock ... simply click on the 'Put Me On The Waiting List' tab, add your information and you'll be notified as soon as it's once again available (which usually isn't very long at all!). 


This card is SO pretty IRL ... I wish you could see all the sparkle and shine in my photos.  Either way, it will be so much faster making my holiday cards this year with the help of the gorgeous holiday dies available at our Dies R Us Store.

With the holiday's quickly approaching, you'll be seeing a lot of Christmas inspirational cards from me over the next several weeks!  Otherwise I'll never get them all done!  LOL!  If you are in need of inspiration in using die cuts ... the Dies R Us Inspiration Blog is the place for you!  Each day Monday - Friday our team members share with you THEIR style and inspiration.  Please come check us out!

A few challenges to share in:
Card Mania #59 - Use your dies
Dream Valley Challenges - Christmas
Get Creative Challenges #1 - Anything Goes (twist-stitching)
 Love To Create Challenge - Anything Goes
My Craft Creations - Anything Goes
Not Just Cards Challenge #6 -  Anything Goes
Through the Purple Haze - Use Punch or Die

Don't forget about the fun we are also having at our DIES R US CHALLENGE BLOG?  A new challenge goes live on the 1st and 15th of each month with one lucky winner receiving a gift prize to the Dies R Us Store.   The current challenge is THANKFUL and runs through Thursday, the 13th.  New upcoming challenge (15th) will be ANYTHING GOES - CHRISTMAS!! I hope you'll come join in the fun!

Thanks again for stopping by today and as always . . .

Sunday, November 9, 2014

A Random Act of Kindness Challenge

Welcome my friends!
Today I have a fun creation to share with you that I created as my DT inspiration for the new challenge at 613 Avenue Create Challenge #97.  
Yes, we are an ANYTHING GOES challenge, but each time we have a TWIST theme.
It's to your advantage to use the twist when you can!
Today's TWIST THEME is:
RANDOM ACT OF KINDNESS
card/project
(Make Someone Smile today!!!)

We have THREE amazing sponsors for today's challenge!  Be sure to pop over to the challenge blog and check 'em out!  Of course you'll see samples created by Team A for each of these wonderful sponsors!  Today I have the pleasure of creating with an image from QKR STAMPEDE!


I've decided to create a Gift Card holding Side Step Card for my favorite waitress at a local restaurant.  She is always cheerful and gets our order in lickity split!!  Of course, it helps that we always order the same thing every time ... LOL!  But even so, when she seeing us come in the door our order is in and hot coffee is on it's way!


For my creation I have used this adorable Santa image called Santa's List (digi24240) from QKR Stampede.  I've colored him with my Spectrum Noir PENCILS and used scraps of holiday design paper for the background.


Recipe:
Papers:  White cs, Black cs, the Paper Studio design paper
Accessories:  Cheery Lynn Designs 'Merry Christmas' # B186, Memory Box 'Snowflake Corner' #98238, Spectrum Noir pencils, Fiskars swivel craft knife (fussy cutting), SU pot dots

A few challenges I'd like to share in today are:
MilkCoffee Challenge - Hand Color Image
Addicted to Stamps & More Challenge - Photo Inspiration (I used the colors)

Scrapy Land Challenge #5 - Anything Goes using dies available at their store.
A Random Fan Challenge Blog Challenge #18 - Red, White & Green
Craft Room Challenge - A Vintage Christmas
Crafty Calender November Challenge - All About Christmas
Kit and Clowder November Challenge - Christmas

Please come join in our challenge fun at 613 Avenue Create!
Thanks for stopping by!  Till next time . . .

Thursday, November 6, 2014

Masculine cards . . .

Hello my friends!
I hope you're having a fabulous week!
I have SO MUCH to do in my cave between my DT obligations and getting enough cards/goodies ready for yet another show coming up on the 21st but instead I've been having fun and enjoying a surprise visit from crafting friends who popped in from Illinois (more on that at the end of this post!).

Oh, and for those of you who have asked ... last weekend's craft show at our local high school was FABULOUS!  I sold LOTS of just about everything ... cards, tissue box covers, Hershey pouches, Nugget boxes, Emery Board covers ... yep it was AWESOME!!!

Now, even though I've been playing outside my cave,  I did take time to create some much needed MASCULINE cards for my stash the other day and thought I'd share a few with you today.  I always get such a great response from cards I've created using my Stampscapes Stamps and I think they are the perfect images for the guys.  At last week's show I actually had a compliment on the fabulous array of masculine Birthday cards I offer ... but was asked to make more masculine GET WELL cards too since they are so hard to find!


These cards really didn't take me any time at all!  That's just one of the things about Stampscapes that I LOVE!  You can create a scene so quickly ... looks so complex but it's really so easy! 
 I've had this big stack of 6x6 Stampin' Up papers that one of my SU suppliers was selling for $5 a pack a few years back and I had totally forgotten about them.  Several I thought would work great for today's cards and since they are double sided, I simply scored and folded the back side forward to create my coordinating decorative panel.

A few challenges to share in are:
Craft a Scene Challenge - Trees, Trees, Trees
Little Red Wagon Challenge #262 - Home is Where Your Heart Is
Paper Shelter Challenge #181 - For the Man in your Life

NOW ABOUT MY CRAFTING ABSENCE!!

Yep ... crafting friend Bette Henson [on the left] (one of the ladies I met at Joan's Gardens workshops out in Indiana several years ago) surprised me with making a trip to Ohio along with her good friend Sharri.  Their actual destination was Amish Country (southern Ohio) but 'since they were in my neck of the woods', took the time to come visit my home, meet the hubby and do dinner together.  
 That was on Monday and they were headed to Berlin, Ohio for the remainder of the week to take in the Amish sights.  THEN ... a text invitation on Tuesday led me down to link up with the ladies once again for a day of unique experiences and fun!  Here's a few peeks at our day:


 Yes, the Amish were out if large numbers for today's auction of Hay, Livestock, Fresh Produce as well as the Flea Market.

Here's Sharri and Bette waiting for the Livestock Auction to being.  Under advice from the guys sitting in the row behind us ... we moved out of the 'splash zone' to a higher (and safer) location before it began.

Bette had her registered number all ready JUST IN CASE she decided to bid on something!   I wasn't sure how she was going to get it all back to Illinois but I'm sure she had a plan!  LOL!

We were a bit disappointed since the Chicken Auction wasn't until 1:00 and there was only going to be standing room ... so we had to skip that one!

I wish I would have gotten a photo down at the HAY ROLLS auction ... that was really WELL ATTENDED!  Of course with winter coming on and everyone having horses & cows to feed ... I'm sure it was an important time!

If you follow me on my FB page, you already know about this adventure as I did take the time to post a little about it there too.

Mrs. Yoder's Kitchen was our lunchtime destination.  I simply enjoyed the salad bar (trying to be good ya know!) ... AND it left me room for that wonderful Amish Blackberry Pie!!  LOL!

On our way down to Walnut Creek Stores, we stopped by the Wendell August shop to check out their hand hammered items ... what beautiful works of art.  AND look at this ... claims to be the LARGEST AMISH BUGGY in the World!!  The wheels on this thing stand 5' high (and I'm only 5'2" ... yikes)

 Well had such a good time!  We laughed & laughed while driving through the different Amish towns as Bette wanted a photo of EVERYTHING and insisted she was going to tow one of these Amish buggies back home to Illinois behind her little Prius car!  LOL!

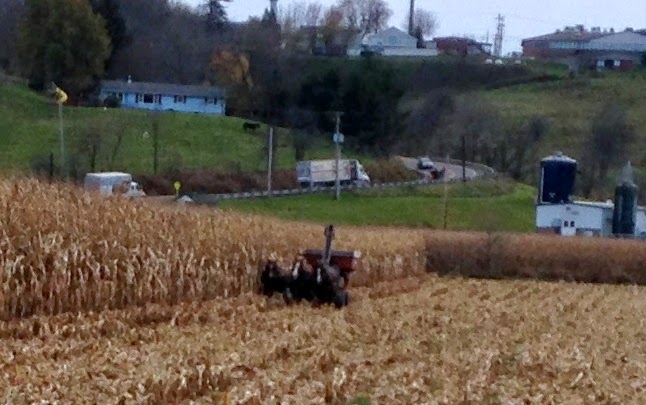
Along the road we spotted this Amish gentleman taking in the corn for the winter.  Of course with a horse drawn machine.  LOTS of work but he was doing a fabulous job!  And, God granted him another beautiful day to get it done!  Here's a larger view ... looks like he'd been at it all morning!


 Well as I said at the beginning of this long post, I have A LOT of crafting to get done so I'd better get busy!  Thanks so much for stopping by ... I can't tell you how much your support and comments mean to me!  Happy Day All!!

As always . . .
Recipe for cards:
Papers:  Very Vanilla cs, various SU design papers
Stamps:  Stampscapes Cabin - 140E, Cabin with Fence - 144F, Pin Row - 150E, Fence - 289D, Anita's birthday stamp
Accessories:  Spellbinder Classic and Scallop Circles and Ovals, Tim Holtz distress inks, sponge daubers, Spectrum Noir alcohol markers, Elizabeth Craft Get Well #790, Martha Stewart border punch

Tuesday, November 4, 2014

Dies R Us Inspiration Time . . .

Hello friends!
It's Tuesday and that means it is time once again to share with you, a card I have made to hopefully inspire you, using dies from our Dies R Us store.
 
I'm very busy creating for upcoming craft fairs so you will probably see a lot of 'holiday' type cards coming from me over the next few weeks!  Today I have showcased a beautiful Vintage Santa image I found over on Pinterest by using one of the many fabulous Creative Expressions Sue Wilson Collection die sets for my cards.


These die sets come with multiple coordinating dies in each set.  They can be used ALL together or independently depending on your crafting needs.  
Sue Wilson Designs - Austrian Collection - Innsbruck
I'm sharing two sample cards with you today using this same die set.  On the 1st card you can see I have added a decorative panel behind the opening in the die, where on my 2nd card I have simply let the background card panel show through the openings.
Dies used:
Creative Expressions Sue Wilson Austrian Collection 'CED2204'
Cheery Lynn Designs Merry Christmas 'B186'
 
Remember, if by chance the die you are looking for is out of stock ... simply click on the 'Put Me On The Waiting List' tab, add your information and you'll be notified as soon as it's once again available.
Have you come to join in the fun at our DIES R US CHALLENGE BLOG?  A new challenge goes live on the 1st and 15th of each month with one lucky winner receiving a gift prize to the Dies R Us Store.

 Thanks so much for stopping by today and I hope you'll come back again soon!
As always . . .
 
 
Other items used on my card are:
Papers:  Red cs, White cs, Green cs, Christmas designer papers
Accessories:  Kaiser green pearls, Green Stickles, Holiday gold thread green organza ribbon, Craft-Dee Bows bow making tool

Monday, November 3, 2014

Crafty Secrets November Linky Party - DT Challenge

Hello Dear Friends!
Here we are at the start of yet another month which means it's time once again for a new 

This month the design team is inspiring you with their Crafty Secrets Christmas/Winter projects.

REMEMBER, your entry qualifies for a prize AS LONG AS YOU USE ANY CRAFTY SECRETS PRODUCTS ... you do not have to follow the theme ... that's for the DT only.  Of course you are more than welcome to if you'd like ... but it's NOT a requirement!

Today I have for you an UPRIGHT Z- FOLD Gift Card Holder.


I actually saw this card first created by Valerie Stangle for www.scor-pal.com.  I've modified it by turning it into a gift card holder.

One of my FAVORITE CD's by Crafty Secrets is the Vintage Christmas CD.  So many beautiful papers, images and ephemera for creating all your holiday cards and projects.  And, that's what I've chosen to create with today.

Before I share the instructions for this fun card, I'd like to welcome our November Linky Party Guest Designer, Birgit Norton 'Crafting While I Wait'.  Birgit has shared some wonderful inspiration through our challenges over the last several months and we're so glad to have her guest designing with us today!  Welcome Birgit!


Upright Z-Fold Gift Card Holder Tutorial

 I wasn't exactly sure which direction I wanted to go so I printed a couple papers from the CD & gathered a few images from the same CD that I had printed from past projects.  This Santa image is my ALL TIME FAVORITE!

 As you see by the above photo, your base card will be 4 1/4" x 11" and scored at the center (5 1/2").  Next you will flip your paper over, sit the left corner at the 1/8" mark on your score board then score it at 3".  Fold as shown to create your upright Z fold.


You will need two decorate panels for your card front.  The back panel is cut at 4 1/8" x 5 1/4".  
The front panel is cut at 4 1/8" x 2 1/2".

Your FOCUS IMAGE (Santa panel) total size will be 4 3/4" x 3 1/4".
My Santa image is 4" tall x 2 1/2" wide.  I left 1/16" white frame around the image when cutting then matted with a 1/8" red card stock before adhering it to my final green card stock mat (4 3/4" x 3 1/4").


You will need a 'LOCKING' mechanism to hold your Focus Panel upright to your Back Panel.
For this I have punched a 1-1/4" circle .. adhered JUST THE TOP PORTION of your circle to the center of my main cards back panel.  Then, I added a SU gromit to the top/center to hold my ribbon.


Now I found this next step to be a VERY CLEVER way to do the ribbon bow.
I cut 14" of red organza ribbon ... put the ends together and fed them through the gromit from the back ... THEN placed a small scrap of card stock through the back portion and pulled snug on the front ribbon ends.  This will keep your ribbon in place without bulk and it allows you to tie a nice bow in the front.  Pretty slick huh!  
 You can then cover that strip of card stock with a matching piece of your decorative paper.


For the GIFT CARD HOLDER portion of my card, I have cut a piece of the red card stock 4 1/4" x 2 1/2".  Using the same hole punch, I have cut a half circle from the top of my holder panel to make it easier to get ahold of the card/money you place inside.  I've adhered my holder panel on 3 sides using 1/8" scor-tape.


The last step is to adhere the LOWER PORTION of your FOCUS PANEL to the front/lower portion of your Z-fold card.  Making sure that it will lock under your 'locking mechanism'  in order to stand up.


Now you are ready to decorate your card as much or as little as you like.

I have chosen to keep it pretty simple so that the focus remains on this awesome Santa image.

I've added a few ephemera tickets to the front and inside gift card holder panel as well as gold Stickles for a touch of sparkle!

I hope you'll give this project a try!
Well there you have it!  Now don't forget to pop over and join in the fun at the Crafty Secrets November Linky Party.  Anytime over the next 2 weeks!   Each person who enters will win a Free Retro Kitchen Kit plus 1 lucky random.org winner gets a $40.00 Gift Card!  

OH! OH! OH!  And, be sure to check out the TWO GIVEAWAYS going on right now where YOU can enter to win either the Retro Kitchen Kit Download and Kitchen Queen Digital Stamps, or our Kitchen Memories Kit and Vintage Kitchen Digital Stamp Set.  Just leave a comment HERE and tell our notorious leader, Sandy, which you like best?  The 2 winners will be announced Friday, Nov 7, 2014.

If you are in need of inspiration, by all means please check out what my team mates have created.  They are a VERY CREATIVE GROUP of ladies!  Their creations & tutorials are sure to WOW you!
and of course don't forget our Guest Designer Birgit Norton 'Crafting While I Wait'

SEE YOU SOON I HOPE!
As always . . .

I couldn't help myself and made a second card ... here's a peek ... what fun!