First of all, I would like to wish a HAPPY FATHER'S DAY to any of the guys out there in blogland today! Hope your day is filled with fun & pleasant surprises!!
It's been such a busy couple of days for me so I don't have a card to share (at the moment) but will have something YUMMY to share with you throughout the day! Here's what I'm up to today . . .
YEP ... I'm going to make me some Fresh Strawberry Freezer Jam!
I was down with my kids yesterday enjoying a day at the race track ... watching my grandson race his dragster for the 1st time (BAD Nanna! what took so long?) And there are so many fresh produce markets in that area and all the signs read "FRESH PICKED STRAWBERRIES" so of course I just had to get a few quarts for myself. I've kept a few quarts for munching on and strawberry shortcake but decided I wanted to make myself some jam to have available since the season will be coming to an end soon. Hubby doesn't eat jam or jelly so I figure 2 qts. will make plenty for just me!
I'll be back a little later with photos of the process and end result . . .
I'M BACK!!!!
The jam is made and although it was a few berries shy of the recipe (had to eat a couple while I was cleaning them ... LOL) I'm very happy with the yield from just 2 quarts of strawberries and it is SO GOOD!!!!
Here's a quick step-by-step tutorial on how I made this yummy jam ... really VERY EASY!!
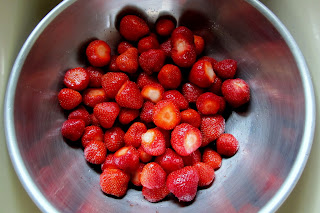
Step 1: Always wash your berries ...
Step 2: Remove stems
Step 3: Cut into quarters to make it easier to smash down.
Step 4: Smash the berries using a potato masher.
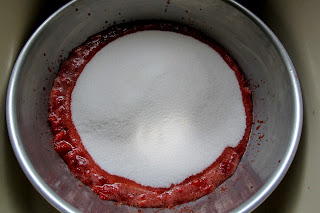
Step 5: Add the sugar (recipe at bottom of post).
Step 6: Stir in sugar and let stand for 10 minutes.
Step 7: While the berries are resting with the sugar you can get your jars ready.
Wash & Rinse in hot water.
I purchased these cute little jelly jars YEARS ago just waiting for the right time to make jam or jelly. I guess Today is the Day! (Won't they be awesome decorated for gift baskets!)
Step 8: I like to set my jars on a cookie sheet in case of any spillage plus it makes it easier to move them all at one time.
Step 9: (sorry forgot to take the picture) After the 10 minutes add your lemon juice and pectin. You will need to stir in the pectin into the mixture stirring constantly until sugar is completely dissolved and no longer grainy! (only about 3 minutes with the new liquid pectin)
Step 10: Time to fill the jars. Using a canning funnel and a ladle, fill your jar to 1/2" from the top ... leaving room for expansion once it starts to freeze.
Step 11: With a damp paper towel, be sure any 'dripage' is removed from the rim of the jar (as well as the outside of the jar) ... replace the lids and let stand for 24 hours to set before placing in the freezer.
Step 12: See this HALF FULL JAR? That is going into the refrigerator for IMMEDIATE consumption!
Anytime you don't have a FULL container, it's best to put that jar (whether you're canning tomatoes, peaches, pickles, ... whatever) directly into the refrigerator for immediate use.
So there ya go! Really EASY PEASY and tastes SO GOOD during those winter months when all the store bought produce just doesn't have that summertime taste!!
Here's what I used:
2 quarts strawberries
8 cups white sugar
(I know it's a lot but that's what homemade jam/jelly is all about!)
4 Tbsp. fresh (I used bottled) lemon juice
2 pouches SureJell Certo Liquid Fruit Pectin
FYI: Pectin is what creates the GEL from the fruit syrup in your berries.
When I was growing up we did a lot of home canning and we periodically would make jams/jellies. Now mind you, we didn't do the FREEZER style jams/jellies! The freezer was used for things like a SIDE OF BEEF or PORK ... not jars of jelly! So, most times our jams/jellies were the 'cooked version' which did take a lot longer to do. And, back then they didn't have the 'liquid' version of pectin, it was the 'granulated/powdered' form of pectin and it took a lot longer for it to dissolve in with your berries. That powdered pectin is still available in the stores but this liquid version is SO MUCH easier!
So there ya go ....
A little different type of CRAFTING from me today but I hope you enjoyed it and are inspired to give it a try! Well I can hear that english muffin w/homemade strawberry jam calling out to me so I'd better get going!
Hope you're having a fabulous day and thanks so much for stopping by!
As always . . .


OM Goodness Darlene this make me want to dive right into the strawberry's they look so good my mouth is watering. Thanks for the how to...
ReplyDeleteHugs, Patricia
YUM,YUM,YUM! Your strawberry jam looks delicious! I love to make jam. I usually get the low sugar sure-jell to make mine.
ReplyDeletePam
scrap-n-sewgranny.blogspot.com
Yum, yum and double yum!!! I am picking strawberries today...I know I can buy them already picked, but it's something I just want to do...am making freezer jam using your recipe, too!!
ReplyDelete