Wednesday, November 30, 2016

Dreaming of a White Christmas

WOW I need to hurry!
My friend Diane (Nellie's Nest) shared this challenge blog with me this
morning and I've been trying all day to get the time to finish 
my card and get it posted and now the challenge ends in 24 minutes!  YIKES!  

It's the Dreaming of a White Christmas over at Jingle Belles Challenge Blog.
Here's their beautiful mood board ...

I also saw the Monday challenge at Simon Says is 'O Christmas Tree' 
so I'll be joining in that fun too!

Here's what I've come up with ... and yes this was a quick card!


I love a white on white card but I just had to add  a touch of blue for the evening sky.  The Sparkle of snow was added by applying Nuvo glue to the die cut and sprinkling on Deco Art Glitter dust.  The background  frame was popped us as were the reindeer.


I'll be back with all the details but first I really need to get this
entered to the challenge before it ends or my rush with be for not!!  LOL

Okay I'm back ... whew! got it shared just in the nick of time.  All product used is listed below.  Most of my delay yesterday was the fact that hubby decided we were going to put up the Christmas tree and add a few more outside decorations since the weather here in Ohio was so pleasant .

Other challenges to share in:
Sweet Stampin' Christmas Challenge - Anything Goes Christmas
 Crafty Creations Challenge #329 - Christmas
Fab n Funky Challenge #329 - Christmas
A Snowflakes Promise Challenge #34 - Winter theme
Die Cuttin Divas Challenge #294 - Make it Sparkle
Holly Jolly Christmas Challenge #86 - Part One - Anything Goes Christmas

Thanks for stopping by and as always . . .

Recipe:
Papers:  White card stock
Dies:  Spellbinder 5x7 Holiday Frame #S6-040, Frantic Stamper Reindeer Duo #FRA-DIE-09083, Memory Box Fresh Pine Landscape #99507
Accessories:  Nuvo glue, Deco Art Glamour Dust, Tim Holtz distress inks, large sponge daubers, dimensional tape

Tuesday, November 29, 2016

Dies R Us - Pretty Packages

Hi Everyone!
Today I have a creation made for the Dies R Us Inspiration Blog!
The card I have made is designed using dies from the Dies R Us Store.  If you've not popped over to the Dies R Us Store recently, DO IT NOW!  So many newly released dies that you won't want to miss out on.  

And, OH MY GOODNESS the sales they've been having!!  Of course if you aren't already signed up for their newsletter, you'll want to do that because that's they only way you will be informed of the AWESOME unadvertised sales that you can participate in and get some amazing deals ... great for gift giving too!!!

Anyways onto today's card . . .


The dies I have used in the creation are:

Sue Wilson Frames & Tags - Stitched Flags - CED4317

Sue Wilson Designs - Frames & Tags - Stitched Flags

Memory Box - Gift Wrapped Poinsettia - #99478 which is unavailable at the present time but very similar to 
Memory Box - Poinsettia Ribbon - MBD-99182
 Memory Box - Dies - Poinsettia Ribbon

Cheery Lynn Designs - Poinsettia Strip - #B324

Cheery Lynn Designs - Poinsettia Strip


AND Cottage Cutz - Elegant Poinsettia Spray - CCE-036 which was purchased through one of those special Newsletter Sales I was telling you about at the start of this posting.

Sorry I have no photos of the 'process' in making this card!  Hubby was working on my computer when I was creating and I totally forgot to take some photos along the way ... so distracting when he's in my cave but sometimes it's necessary!  LOL

Here are a couple close ups that you might like to see . . .


Even though the Memory Box Poinsettia ribbon has the poinsettia as part of the die, I did two things ... I colored the pieces that cut out (petals) using Tim Holtz distress inks and reinserted them into the die cut ... but also die cut, sponged and shaped a poinsettia from the Cheery Lynn Designs die strip and placed on top to give it more texture and dimension.  

The little green viney pieces were cut from the Cottage Cuts die (didn't use the flower ... just the vines).


I used two of the stitched flags from the Sue Wilson set to create my 
sentiment panel.  A touch of gold stickles add the sparkle that is always necessary
for a holiday card!  

Challenges to share in:
Crafting from the Heart Challenge #138 - Anything Goes
Craft Your Passion Challenge #340 - Anything Goes
The Crazy Challenge #236 - Christmas
Use Your Stuff Challenge #243 - Christmas card or Scrapbook page
 613 Avenue Creates Challenge #191 - Anything Goes
Christmas Card Challenge #50 - Anything Goes Christmas

Please remember, each an every day of the month there's a new inspiration sample shared on the blog by this fabulous design team.  Please be sure to pop in regularly.

And, don't forget to come join in the fun at the Dies R Us Challenge Blog.  There's a new challenge theme offered on the 1st and 15th of each month and one lucky randomly drawn winner will receive a gift voucher prize to the Dies R Us Store.  For your convenience, all the important Dies R Us links are provided below.

click below for:

 
Thanks so much for stopping by today!
As always . . .


Sunday, November 27, 2016

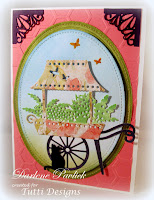
Tutti Designs - Flower Cart Fun

Happy Sunday Everyone!
Today it's my turn to share a new, inspirational creation using dies from the Tutti Designs Store.  Have you seen the Tutti Design October Release?  So many beautiful dies ... you'll want to check it out for yourself.  I'm using one of those newly released dies for today's creation.


Today's card was created with the October release die
Flower Cart - TUTTI-182

 I decided to do a little 'paper piecing' today.  A technique I don't do often but always love the outcome when I do.  Here's how it all began . . .

Typically when I receive my dies, I quickly die cut each one from white card stock.  Not only can I see how it looks once cut, but can also then decide if I want to color it with markers ... inks ... cut again from colored papers or use it as a base as I have done today.

Next I die cut the body of the die image from scrap designer paper.  A few snips here and there and I was ready to 'paper piece' over my white die cut panel.


 BUT BEFORE DOING THAT ...
I wanted to color the handles and wheel of the cart as well as the flowers using my markers.
You want to do that before you paper piece that way you can be sure
to get your color up 'under' the panels that will be paper pieced and
have a smoother look.


After getting my flower cart just the way I wanted it,
it was time to 'showcase it'.
By simply die cutting some ovals and doing a little
ink sponging for the sky and around the outside edge,
I was ready to compile my card onto my pink embossed background
panel and white base card.


Oh and I forgot to mention ... see those adorable little butterflies?
They pop out from the die cut and of course we can't waste them!
I simply colored them with whatever marker was laying on my work table
then added them into the sky on my finished product!
 VIOLA!


Please be sure to pop over to the Tutti Designs Store 
and check out all of these fabulous dies. 

Need inspiration?  
The team has something new to share here on the Tutti Designs Blog EACH and EVERY DAY!   Pop in often and see for yourself ... what a talented group of designers!!

I'll be back again next Sunday with a new Tutti Designs project.
In the meantime, here are all the Tutti Designs quick links you will need:


 Thanks for stopping by and as always . . . 

Recipe:
Papers:  White cs, Black cs, Purple cs, Scrap of designer paper
Dies:  Tutti Flower Cart #182, Lawn Fawn Stitched Ovals (large #LF910, Small #LF909), Impression Obsession - Cat #DIE083, Sue Wilson Scandinavian - Corners, Borders & Tag #CED4202
Accessories:  Cuttlebug Honey Comb embossing folder, Spectrum Noir alcohol markers, Memento Bamboo Leaves ink, Tim Holtz Broken China distress ink, Large sponge daubers, Dimensional Tape

Wednesday, November 23, 2016

Sisterhood of Crafters - Use Some Pearls

Hello Friends and welcome back!
Today is a new challenge at The Sisterhood of Crafters
and Agata is our hostess.  The theme she has asked us to follow is:

USE SOME PEARLS
 
 What an easy and fun theme  ... here's what I came up with:


I spotted a package of K&Co. embellishments hanging on my pegboard
and within this package were some beautiful blue acetate image that I thought
would work perfectly with my Melissa Francis 5th Avenue designer paper.

When I cut the end of my designer paper to fit my card base it left
this scallop edge design scrap so I simply fussy cut around the scallops
to create a panel that worked perfectly to adorn the top of my card.
 It was difficult to capture the color on these acetate panel
so here's another angle so you can hopefully see how pretty they really are.


I added dimensional tape to the back of my scallop top panel
to add a bit of dimension  ... the theme required pearls and VIOLA!
My card is ready to go postal.

I didn't add a sentiment yet because I think it could
be used from anything from a birthday to a simply note card.

Thanks so much for stopping by today and I hope
you'll come join in the challenge fun at

As always . . .

Tuesday, November 22, 2016

Love Vintage Santa's

Happy Tuesday Everyone!
Thanksgiving is nearly here and since I don't have to do all the cooking this year,  I'm busy creating holiday cards for friends and family.  I have found that the best way to get my mojo started is with a challenge ... whether it be a sketch ... color ... mood board ... there are so many wonderful blog challenges out there it's easy to find inspiration.

Today I'm going with the current Mojo Monday Sketch Challenge ...

I struggled a bit with what image to use but then I spotted this wonderful vintage Santa in one of the many Graphic45 paper packs I have and it was PERFECT!   Isn't he just fabulous?


The designer papers I used are Graphic45 and  Kaiser Craft.
My banner is from the Sue Wilson 'Pierced Flags' #CED4304 die set purchased from the Dies R Us store

Sue Wilson Designs - Pierced Flags

 and the snowflake is an old Spellbinder set I've had in my stash for awhile now.   I have covered it with glue using the Nuvo Large Glue Pen purchase from Sparkle & Sprinkle and Deco Art Glamour Dust.  So festive & pretty!


Did you notice the gold edge around my papers?  That was done freehand with a Gold Pilot Marker.  It has a large rounded tip and if you carefully run it down the edge of your paper, you get a beautiful look of a 'layer' without the bulk.  I learned this trick several years ago from a friend who was a retired art teacher and had a stamping store.  I use this method all the time ... especially during the holidays.

Challenges to share in:  
Simon Says Monday Challenge (ends 11/28) - Use 3 of something.
(3 Nuvo Pearl Drops)
Lil Patch of Crafty Friends Challenge #46 - Anything Goes
Artistic Inspirations Challenge #168 - Anything Goes
 Crafting From the Heart Challenge #137 - Anything Goes
Craft Your Passion Challenge #339 - Anything Goes
The Crazy Challenge #236 - Christmas

 Well I guess that does it for me today.
I hope you'll stop back tomorrow when I will have a creation to share for the new challenge at The Sisterhood of Crafters.  This will be their last challenge for 2016 ... and it's a fun one ... please come join us.


Recipe:
Papers:  White cs, Graphic45 dp, Kaiser Craft dp
Dies:  Spellbinder, Sue Wilson
Accessories:  Nuvo glue pen, Nuvo Crystal Drops, Deco Art Glamour Dust, Gold Pilot Marker, dimensional tape


Monday, November 21, 2016

OMG! Christmas is around the corner!!

Happy Monday Bloggers!
Well my 2016 craft shows are over!  Whew!
Now to concentrate on what is needed for the upcoming holidays.
We have an annual neighborhood party so I need to start thinking about the menu, cleaning the house, getting decorations put up, etc. etc, etc.   But first of course is Thanksgiving!  This year my sweet daughter it hosting (so my deep housecleaning can wait, lol) ... just need to provide the pies and cranberry relish ... NO PROBLEM!


But before the work in the kitchen begins I wanted to join in a few challenges.  
I will be needing MORE holiday cards for friends and family so while creating why not use some of the amazing challenges out there in blogland as inspiration!  The first challenge in mind is at the Mod Squad Blog ... did you see they are starting a NEW SITE ... what fun and looks great.  Their special challenge going on just until the end of this week (11/25) is CHRISTMAS & RIBBONS.  Well I think I have that covered with today's card.


I spotted a similar design over on Pinterest so that's where this card began.  Also the fact that I recently received a new die set (Sue Wilson 'Stitched Flags' #CED4317) from the Dies R Us store and just had to play with them!  This design also enabled me to use up some of those holiday scraps I have laying on the work table from craft show projects.
Sue Wilson Designs - Frames & Tags - Stitched Flags

The white satin ribbon was the last on the spool (using up more scraps) and the gold Stickles & gold sequins were all that was necessary to embellish today's holiday card.
My sentiment stamp is by Paper Inspirations and since the solid red background wasn't 'workin' for me' I decided to stamp some snowflakes using white dye ink and an old 3-part snowflake SU stamp set .

Challenges to share in:

Addicted to Stamps Challenge #136 - Die Cut  and/or Punches (with stamps)
A Gem of a Challenge #182 (ends 11/23) - Ribbon and Bling
Crafty Hazelnuts's Christmas Challenge #308 - Cute or ATG Christmas
Just Add Ink Challenge #337 (ends11/23) - Just Choose Two (dies and designer paper)
Aud Sentiments Challenge #168 (ends 11/21)- ATG + sentiment
C.R.A.F.T. Challenge #390 - Christmas


I hope you like today's creation!
Now I'd best get busy ... so much to do this time of year!
Thanks for stopping by ... hope you have a FABULOUS week ahead and as always . . .


Recipe:
Papers:  Red cs, Green cs, White cs, Various holiday paper scraps
Dies:  Sue Wilson
Stamps:  Paper Inspirations, Stampin' Up
Accessories:  White satin ribbon, gold Stickles, gold sequins, white dye ink

Sunday, November 20, 2016

Tutti Designs - Swirly Butterflies

Happy Sunday Everyone!
It's my turn once again to share a new, inspirational creation using dies from the Tutti Designs Store.  Tutti has come out with so many amazing dies recently!  Did you see their October release??   WOWZA!  If not, you really owe it to yourself to pop over and check it out!  AND there will be another release coming late November/early December ... wait until you see what they have up their sleeve!  LOL


Today I'm using the Swirly Butterfly Circles - Tutti-186
die for my creation.


I had such fun creating this pretty card and it could be used for a variety of occasions from encouragement to birthdays! 

Here's a few steps I took in the creation of this card.

After die cutting my Swirly Butterfly Circles from white card stock, I cut the varies butterfly sections using scraps of colored card stock I had laying on my work table.  Then fussy cut them and stacked them on top of those on the white card stock die cut.


Next I die cut another from pretty sparkly pink card stock, same as I used for my mat panel, and removed the butterflies for future use.


It was at that point that I decided to use the pink circles behind the white circle cut for a little added dimension and texture.  A pretty plaid background and a few cute little butterflies from a stamp set I've had for ages and my card is ready to go!!


Please be sure to pop over to the Tutti Designs Store 
and check out all of these fabulous dies. 

Need inspiration?  
The team has something new to share here on the Tutti Designs Blog EACH and EVERY DAY!   Pop in often and see for yourself ... what a talented group of designers!!

I'll be back again next Sunday with a new Tutti Designs project.
In the meantime, here are all the Tutti Designs quick links you will need:


 Thanks for stopping by and as always . . .


Recipe:
Papers:  DCWV 'The Dots, Stripes & Plaids' mat stack, Pink Glitter paper, Purple cs, Pink cs, Teal cs, Blue cs
Stamp:  Just Rite Botanical Butterflies
Dies:  Tutti Designs 'Swirly Butterfly Circles' #186, Lawn Fawn Criss Cross Rectangles


Saturday, November 19, 2016

Dies R Us - NOEL

Hi Everyone!
Today I have a creation made for the Dies R Us Inspiration Blog!
The card I have made is designed using dies from the Dies R Us Store.  If you've not popped over to the Dies R Us Store recently, DO IT NOW!  So many newly released dies that you won't want to miss out on.


Today I've created a festive holiday card using a Sue Wilson die set called 

Creative Expressions Die - Paper Cuts Collection - Christmas Tree

LOL ... this is what happens when you have one of those days that you 
JUST CAN'T MAKE UP YOUR MIND!

I die cut this beautiful die set from several different card stocks
before I actually settled on my design.  But it was well worth the effort and now I have other pieces and parts to create more holiday cards that won't take any time at all!!!  LOL

I've added small pieces of dimensional tape to the back of the 
focus die cut to achieve dimension and had fun adding sparkle
to my finished creation.  Here's a close up  . . .


Please remember, each an every day of the month there's a new inspiration sample shared on the blog by this fabulous design team.  Please be sure to pop in regularly.

Challenges to share in:
Brown Sugar Challenge - Anything Goes
 Crafty Catz Challenge #347 - ATG - Twist (use RED)
Creative Corner Challenge - Anything Goes
Daring Cardmakers Challenge - A Musical Christmas (NOEL or O CHRISTMAS TREE)
52 Christmas Card Throwdown Challenge - November - Old Fashion Christmas
Allsorts Challenge #390 - O Christmas Tree

And, don't forget to come join in the fun at the Dies R Us Challenge Blog.  There's a new challenge theme offered on the 1st and 15th of each month and one lucky randomly drawn winner will receive a gift voucher prize to the Dies R Us Store.  For your convenience, all the important Dies R Us links are provided below. 
click below for:

 
Thanks so much for stopping by today!
As always . . .


Recipe:
Papers:  White cs, Red cs, DCWV Foil dp, Basic Grey 'Jovial Paper Pad' dp
Accessories:  Various Stickles, Nuvo Pearl drops, fine tip black marker for faux stitching, dimensional tape