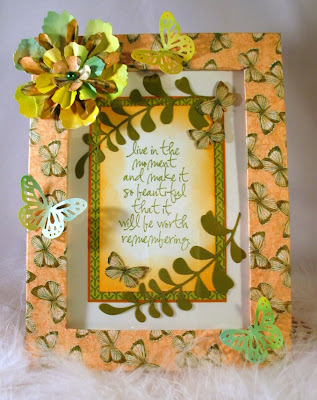
I'm thrilled to be today's Summertime Guest Designer at Joan's Gardens. I just came back from a workshop at Joan's and it was FABULOUS! More to come on that topic!
Today's challenge is to make an
ALTERED PICTURE FRAME.
(click image to enlarge)
Here is a list of items I used to create this 5x7 frame (items in bold can be purchased from Joan's Gardens):
- Unfinished 5x7 picture frame ($1.00 at dollar stores)
- 1 - 12x12 sheet of designer paper (I have used Graphic 45 Le' Romantique)
- Martha Stewart Lacy Butterfly Punch
- Tim Holtz 'tattered florals' die
- Glue (Art Glitter clear drying)
- Kaiser Pearl
- Punch Bunch Flower making kit
- McGill black foam mat
- bone folder
- 12x12 paper cutter
- scissors
- White, Pumpkin & Old Olive cardstock
- Scrap piece of green designer paper for sentiment backing
- Sentiment - Tim Holtz Collection - Stampers Anonymous 'Nature's Moments' (CMS001) ... sentiment is also available on the 'Urban Chic' (CMS086) stamp set
- Memento Cantaloupe & Bamboo Leaves Inks
- Cheery Lyn Designs (B118) Pair of Ferns dies
- Sponge Dauber
- craft knife (inside butterflies were cut from Graphic 45 designer paper used on frame)
STEP-BY-STEP INSTRUCTIONS
This is the sheet of 2 sided Graphic 45 Le' Romantique designer paper used.
Cut your 12x12 designer paper to 10" x 8 1/4"
Center your frame upside down on the REVERSE side of the paper and draw a pencil line on the inside diameter.
Now measure & draw a pencil line 1/2" INSIDE your original pencil measurement line ... then CUT OUT the center.
Next you will want to clip your corners (see dotted lines) then score as best you can on the outside lines that will be folded back on to the inside of the frame.
Using your favorite glue & a bone folder, start folding the inside flaps down to the inside edge of the frame and smooth with your bone folder
Here's how it should look once you have glued down your inside flaps to the inside ledge of the frame.
Now you are ready to do the OUTSIDE flaps. Cut your corners in the same manner as the inside. Using the 'diagonal corner cut' ... or 'square corner cut' as I have done for the outside flaps. Your choice ... then, fold in and glue down to your frame. Making sure the front of the frame is smooth by using your bone folder.
Below is a view of the finished BACK of the frame.
And, here is the finished FRONT view of the frame. Now we're ready to have fun decorating the front!
* * * * * * * * * *
The technique used to make the homemade paper & flower was shared on another Joan's Gardens project which you can find HERE. I also did a STEP-BY-STEP tutorial on making this paper & flower over on Shelly's Images Technique Tuesday. There you will find how to use the PunchBunch Flower Making Kit to create the dimension on these flowers.
* * * * * * * * * *
Here is another frame I covered recently ... using Graphic 45 designer paper and have created the inside image using a LeBlanche image from Joan's Gardens.
The ideas for these frames is ENDLESS and I can't wait to see what you come up with to inspire us all!
Have Fun!!


Great tutorial Mom! There's no reason to have boring brown frames any more...thanks for sharing.
ReplyDeleteDarlene your covered frames are just beautiful. Congratulations on being one of Joan's Summer Challenge Designers.
ReplyDeleteWow Darlene these are fabulous love the bright colors too and your tutorial is great!! Can't wait to see them in real life!! Congrats on being a summer time Guest Designer!! Great choice Joan!!!!LOL
ReplyDeleteFantastic job on these frames Darlene! I hope I can find time to play along.... love this!!! Great tutorial too!
ReplyDeletehugs,
Grace
Wonderful tutorial!
ReplyDelete