Thursday, March 9, 2017

Celebrate

Happy Thursday Afternoon All!
Last week I created a card using the sketch provided by the Watercooler Wednesday challenge and got a great response from it (thanks to all!).   I truly enjoyed the sketch so decided I would use it again (with a little twist of course) and create one of many more birthday cards needed for my sale boxes before the Spring show time is upon me.
The sketch & card I'm referring to can be seen HERE.

This is today's share . . .


I have so many 6x6 designer paper packs and 12x12 packs (can you say hoarder?  lol) so, I just opened one of my paper drawers and grabbed whatever pack was on the top.  

 ( and this is only half of it ... yikes I need therapy!  LOL)
 
Hence, my starting point today begins with coordinating papers from an OLD Basic Grey paper pack called 'Sugared'.


The floral die I chose today is the Tutti Designs #159 - Tulip Bunch.
Not thinking ahead of time that all the inside pieces pop out I lost a few ... but did manage to rescue most of them and reinserted them on my design.

I like that I was able to get my flags, flowers AND lower corner panel all cut from this one 6x6 piece of design paper.  And, the fact that it ends up going is different directions give it a nice artsy appearance I think.

Challenges to share in:
 In the Pink Challenge #114 - For a Special Lady (and PINK)
Seize the Birthday Challenge - Anything Goes (BIRTHDAY)

Anyways ... time is going fast and I want to get a few more cards started so best stop talking!

Thanks for stopping by!
Happy Weekend to you all!
They are calling for snow here in Ohio!
REALLY???????????  Where is Spring?  I want Spring!!!

As always . . .


Recipe:
Papers:  White cs, black cs, Basic Grey 'Sugared' dp
Stamps/Ink:  The Stamp Pad Co., Repeat Impressions, Inkadinkado  /  Versafine Onyx
Accessories:  Pink Satin Ribbon, dimensional tape


Wednesday, March 8, 2017

Sisterhood of Crafters - Celebrating Women

Hello friends!
Today I have a card to share for the Sisterhood of Crafters
where Agata is our hostess and we are
CELEBRATING WOMEN!

I've had this vintage bookmark laying on my computer desk
for over a year just waiting to be used on a creation!  Well, today's the day!!


I received this bookmark at a Vintage Clothing Event
held at one of the local country clubs a few years ago where I was a vendor sharing my
papercrafts.  I look forward to this event every year ... always an amazing program
filled with new & exciting information from years gone by.

I wasn't really sure where I was going with this image so I just kind of let it lead me!
However, I did know immediately what background paper I was wanting to use.
I purchased this Fab Scraps 'High Tea' 8x8 paper pack several years ago out in Indiana at Joan's Gardens.  I just love the colors and patterns in this pack.  Love how it matched her dress perfectly!!


The high society ladies of yesteryear were beautiful!
They dressed to 'the 9s', their skin was flawless and their posture was perfect!!
I've adorned my lovely lady with gems, lace, flowers and satin . . . 
everything a lady needs in her repertoire!

Challenges to share in:
Simon Says Wednesday Challenge - For a Special Lady / Girl
 Fab 'n' Funky Challenge #341 - Music or Song inspired (She's Always a Lady by Billy Joel)
 Mod Squad Challenge - Song Inspiration (She's Always a Lady by Billy Joel)
Scrapy Land Challenge #61 - ATG w/dies sold at store
Create and Makes Challenge #9 - ATG w/twist - Vintage

I hope you'll come join in our challenge to CELEBRATE WOMAN!
Whatever YOUR interpret may be ... we can't wait to see it!

Thanks for stopping by and as always . . .


Recipe:
Papers:  White cs, FabScraps 'High Tea' dp
Dies: Spellbinder 'Floral Oval' S4-356, Spellbinder 'Victoria Corners' S2-134, Poppystamps 'Stitched Main Street Tags' #1268
Stamps/Ink:  Penny Black 'Special Wishes', Versafine Onyx
Accessories:  Jambo Lace Roll Tape, Wild Orchid Pink Rose, Pink Satin Ribbon, Kaiser Craft 'Sparklets', Want 2 Scrap bling


Tuesday, March 7, 2017

A Note from Me to You!

Hello dear friends!
Today I once again am joining a few challenges together to create my card.


I started with the sketch from the current Mojo Monday Challenge.

Next came my color choice which came from the Cupcake Inspiration Challenge mood board.


The idea of Embossing came from the Ooh La La Challenge
I made my own background for the Simon Says Monday Challenge and
created Lots of Layers for the Dream Valley and Dare 2B Artzy March Challenges.

I love (when I have the time) to put a couple (or a few) challenges together like I have today to create a card.  It's always amazing to me how well they come together.  It's always a delight when I get to the finished product! 

I hope you're having a great day!
Remember to stop back tomorrow when I will have a new creation for the Sisterhood of Crafters.  We will have another UNIQUE & FUN challenge theme for you!!

Till then . . .


 Recipe:
Papers:  White cs,  Dark Brown cs, Rose cs, Teal cs
Stamps / Ink:  JustRite 'Botanical Butterflies' / SU Bermuda Bay, Tim Holtz 'Picked Raspberry', Memento 'Bamboo Leaves'
Dies:  Memory Box 'Climbing Vine' #99623, Memory Box 'Stitched Circle Layers' #30036, Tutti Designs 'Easter Frame' #268
Accessories:  Sizzix embossing folders, Prima flower, Nuvo Carribean Ocean crystal drops


Monday, March 6, 2017

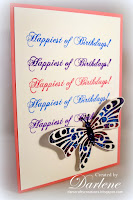
Sparkle for your birthday . . .

Happy Monday All!
It's been a slow start to my crafting day today but finally I got around to making a card that has been on my mind.  

A few weeks ago I spotted a CAS style card out in blogland that I thought I would like to case ... THEN my computer started messing up and before I could save the link to pop back to and give credit to, I had to shut my system down and lost the link.  So, now I only have my memory to rely on (not good!  lol).

Here is my card which is similar to the one that caught my attention.
I struggle with CAS design style but I think the butterfly helps ease my pain of 'too much white space' LOL.


The card I was inspired by had Happy Birthday stamped 3 times
with a smaller butterfly accent.  But after just watching a video and refreshing
my memory on this glitter inlay technique that was the direction I took.

I stamped the sentiment 3 times, but my butterfly was a bit large and covered (in my estimation)
too much of the last sentiment line so I added the stamp two more times at the top.
There ... that's better!!  LOL


If you know me at all, you know I DO NOT LIKE working with glitter!!
It always turns out SO PRETTY but yikes ... what a mess it makes ...
or should I say "I MAKE!"

A few challenges I'd like to share in today are:
Make It Monday Challenge #41 - Colors of the Rainbow
Simon Says Monday Challenge - Make your own background

Thanks so much for stopping by today and I hope you have a fabulous week ahead!
Meeting a couple girlfriends for breakfast tomorrow 
so I'm looking forward to that!

As always . . .

Recipe:
Papers:  White cs, Pink cs
Stamps/Ink:  Impression Obsession / Tim Holtz distress inks: 'Salty Ocean', 'Wilted Violet', 'Picked Raspberry'
Dies:  Elizabeth Craft 'Butterfly Silhouette' #704, 'Butterfly Overlay 1' #705
Accessories:  Gary's Ultra Fine Glitter: 'Burgundy, Royal Blue, Purple', Dimensional tape, Scor-Tape sheets


Sunday, March 5, 2017

Focus on the Geisha

Happy Sunday Everyone!
Have you seen our February Release dies that have an oriental theme?
They are FABULOUS!!
Today I'm sharing a creation using two of these dies
on one card ... focusing on the Geisha!


The two dies I've used today are the Oriental Screen #280

and the Geisha #277

No automatic alt text available.

When you die cut the Oriental Screen, all those little pieces fall out and and even though the screen minus all the little pieces is beautiful, I chose to reinsert a few panels here and there for my background panel.


This die is designed to fit an A2 card front perfectly ... but since I'm in the habit of making A6 size cards, I also used a couple of the popped out panels to complete my design at the bottom of my background red foil panel.

I wanted to bring full focus to the Geisha so after creating my background panel using Red and Gold Foiled card stock, I die cut ovals using the Tutti Designs 'Nesting Stitched Rectangles' for the matting behind my red foiled Geisha die cut and popped it up over the background panel using dimensional tape.


The white flower came from my stash and I felt it mimicked the one on the Geisha Girls robe so that was all the embellishment that was needed.  A quick 1/2" punch of gold foiled card stock became the center for my flower.

Please be sure to pop over to the Tutti Designs Store and check out all of the fabulous dies in this latest release.  And, of course, you'll want to browse through the store to see what other dies you need to have on hand.

Need inspiration? 
The team has something new to share on the Tutti Designs Blog EACH and EVERY DAY!   Pop in often and see for yourself ... what a talented group of designers!!

For your convenience, here are all the Tutti Designs quick links you will need:

 Thanks for stopping by and as always. . .


Saturday, March 4, 2017

Dancing Under the Stars . . .

Hello Dear Dies R Us Friends!!
Today I'm sharing a card for those upcoming Summer Weddings!


Today I've used the following dies that are carried at the Dies R Us Store.  IF by chance these exact dies are not available when you go to purchase them, DO NOT FEAR!  There are so many companies carried through the Dies R Us Store that I have do doubt you will be able to find something similar if not these exact same dies.

Tutti Designs - Dies - Spring Gate

Frantic Stamper - Dies - Dancing The Night Away

Let me share a few details on how this creation came together!
It was really quite simple!
I wanted extra dimension between the sky and the gate so I simply die cut Spring Gate panels.  One from white card stock and a second one from a 3mm foam sheet.  These dies cut SO WELL that I had NO problem die cutting through the foam ... all the little pieces came right out!  Remembering to save all the 'STARS' from the bottom of the Spring Gate die to use in the sky (medium blue card stock).


I wanted just a touch of color so added color to only the grass and vines on my card stock gate die cut using Spectrum Noir alcohol marker (LG2) before adhering it to my foam die cut panel.
After adhering just the bottom portion of my couple to the front of the gate,  I then added even more dimension by using strips of dimensional tape to the back of my gate panel before applying it to the blue sky panel.  
Lastly came the stars ... a combination of the foam stars, Nuvo crystal drop stars and even smaller stars from a white Gelly Roll pen.  A simple Mr. & Mrs. stamped sentiment and my card is ready for the happy couple!!

I hope you've enjoyed what I've shared today!  And, don't forget to come join in the fun at the Dies R Us Challenge Blog.  There's a new challenge theme offered on the 1st and 15th of each month and one lucky randomly drawn winner will receive a gift voucher prize to the Dies R Us Store.  For your convenience, all the important Dies R Us links are provided below.
click below for:


Thanks so much for stopping by today!

Challenges to share in:
Scrap and Craft March Challenge - Celebrations
 Di's Digi Designs Challenge - Die Cuts and/or Punches
 Crafty Purple Frog Challenge - Love is all Around
Creative Sketchy Girls Challenge #9 - Die Cuts
As always . . .

Thursday, March 2, 2017

Hello . . .

Happy Thursday Everyone!
Yesterday after getting all my computer work caught up,
I wanted to create a card using some of the fun challenges I spotted
out in blogland and here is the result . . .


I started out with the sketch challenge offered over on 


Next came the fun March challenge over at the Paper Sweeties Challenge Blog 
with this beautiful inspiration board.  Where I was inspired by the
pink tulips and the black & white sign board.


Last but not least was the March challenge at Outside the Box.   You are to share how you use RIBBONS on your creations PLUS at least one Memory Box items.
 Memory Box challenge badge
Here I've used the Memory Box 'Grosgrain Ribbon' die as well as made a pretty pink ribbon bow from satin ribbon purchased from Really Reasonable Ribbons.


Here's a close up so you can see there really are grosgrain
ribs on my paper die cut ribbons.  So realistic looking IRL!

After die cutting the Poppystamps Tulip Branch twice from scraps of different green designer papers, I die cut just the flower portion of the die using a scrap of hot pink card stock.  Then clipped off the flowers and glued them on top of the green ones.

I'm very pleased with the outcome and was able to
use up some scraps along the way!!

Challenges to share in:
Frilly and Funkie Challenge - Welcome Spring
Die Cut Divas Challenge #306 - Ribbons and Bows

Thanks so much for stopping by!
I hope your week is going well!

As always . . .


Recipe:
Papers:  White cs, Black cs, Hot Pink cs, the Paper Studio 'Harper's Boutique' dp, scraps of green designer paper for stems of flowers
Dies:  Memory Box 'Grosgrain Ribbon' #30077, Poppystamps 'Tulip Branch' #1146, Avery Elle 'Sentimental Dies' #D-16-01, Tutti Designs 'Nesting Stitched Rectangles' #217
Accessories:  Fine Tip black marker for faux stitching, CraftDee Bowz bow maker, liquid glue

Wednesday, March 1, 2017

Double D - Think Spring

Hello friends!
WOW can you believe it's March 1st already!
Spring is right around the corner 
and today Team Diane is getting an early start
with a new challenge at the Double D Challenge Blog
where the theme is

THINK SPRING

check out this beautiful mood board Diane
has created to inspire you.
Isn't it GORGEOUS!!


When I think of Spring, the first thing I think of is that first Robin I see in the yard.  To me, that is always the first signs of Spring.  Then of course all the beautiful spring flowers that start waking up and showing off their beautiful color!


Sue Wilson Designs - Finishing Touches - Trailing Ivy
Sue Wilson Designs - Greek Island Collection - Corner. Border & TagMy image is from the Crafty Secrets (sadly, no longer in business) Seasonal Booklet.  My ivy is from two dies at the Dies R Us Store ... Sue Wilson 'Greek Island Collection' Corner, Border & Tag #CED5102
and the
Sue Wilson 'Finishing Touches' Trailing Ivy #CED1423

After die cutting my ivy from SU Pear Pizazz card stock, I used a finger dauber and Memento 'Bamboo Leaves' ink to darken the edges for a more realistic look.

My corner flourish is from a We R Memory Keepers 'precious metals' Copper Swirls Rub-on sheet.  A few little Prima flowers with Nuvo Yellow crystal drop centers,  a hand written 'Spring' sentiment and VIOLA! my card is ready to mail.


I hope you will come join in our challenge fun and remember,
Diane has a prize up for grabs for one lucky random winner!
Here's a peek at today's prize ... this adorable Cottage Cutz Rabbit die!!
You need to play to win so what are you waiting for?????


Challenges to share in:
Paperminutes Challenge #476 - Spring
Tuesday Throwdown Challenge #332 - Things with Wings
Frilly and Funkie Challenge - Welcome Spring
Scrapy Land Challenge #61 - ATG with Dies
 
Thanks for stopping by and as always . . .

Do Al(l) Creative - SPRING

Hello dear friends!
If you recall, I recently shared the exciting news of a new challenge blog which I'm thrilled to be a member of the team, called Do-Al(l) Creatives.    This will be a MONTHLY themed challenge with sponsorship prizes offered.  I do hope you'll come check it out and join in the fun!  

Our Badge To Go

Today is the start of a new challenge at Do-Al(l) Creatives and the theme is:

SPRING

 Our sponsor this month is:
 Prize offering:

 For today's creation, I've chosen to design with 
a sweet image called Flower Power Daisy.
 Isn't she just adorable!!


To create a 'backdrop' for this adorable image,
I have created a grass panel by simply tearing a strip
of scrap green card stock.  And, I sponged the blue sky using Tim Holtz
Broken China distress ink and a large sponge dauber.

You can't have green grass and a blue sky without 
a tree ... so today I've die cut the Tutti Designs 
Spring Tree from white card stock then colored to my liking.

My coloring was done with a combination of Spectrum Noir Pencils
and Spectrum Noir alcohol markers.  After doing a bit of
fussy cutting with my Fiskars swivel craft knife,
I popped her up using dimensional tape.

Challenges to share in:
Inky Chicks Challenge #79 - Happy Birthday
Paperminutes Challenge #476 - Spring
Frilly and Funkie Challenge - Welcome Spring
Scrapy Land Challenge #61 - ATG with Dies 

 I hope you'll come join in our challenge fun at Do-Al(l) Creatives.
 Thanks for stopping by today!
As always . . .