Tuesday, June 18, 2013

Once Upon a Time . . .

Good afternoon my friends!

This is my second post for today but I just couldn't help myself!  LOL!  After finally getting outside (it rains everytime I head that direction) and getting the lawn mowed, I came back into my cave to complete a card I've been trying to get finished all week!

The challenge this week over at Sassy Studio Design is a DISNEY VACATION!
What fun and I've had Jasmine colored and ready for a card for a while now.  TODAY'S the day!!  I just love coloring these adorable images from Sassy Studio's!
Jasmine Pinup Sassy is from the Make A Wish Collection and can be found at the store HERE.


After checking out some of the sketch challenges that came up today, I decided upon this fun sketch over at Seems A Little Sketchy.


I really need to get back to playing more with some of the sketches out there ... it's always fascinating how quickly a card can come together once you have a design in mind!  Let's see if there are any other challenges I can share this fun creation with:
365 Cards - Fairy Tale Romance
The Cutie Pie Challenge - One for the Kids

Thanks so much for stopping by and I hope you've had a crafty afternoon too!
As always, tell those that you love how important they are to you and know I am send you . . .
Recipe for my card:

Papers:  DCWV Once Upon a Time & The Glitter Cardstock Stack
Accessories:  5/8" & 3/8" Teal satin ribbon by Celebrate-It purchased at Michaels, Express It High Tack Foam Mounting Tape, Spectrum Noir alcohol markers, Fiskars swivel craft knife, TH black distress marker, Bow Easy


Being "Krafty" . . .

Good Morning!  
How's your day going so far?  Mine is GREAT!

I'm here today to share with you a card that TRULY was a challenge for me!  Yep!  And when I tell you what caused me such grief, you're going to laugh!!

I'm trying to stay in the running to win the "eBosser" over at Cheery Lynn Designs this month and today's challenge made me GASP IN FEAR!!  Want to know what had me on the edge of my seat?  Are you ready ... this is really scarey stuff . . .


OMG ... this terrified me ... I have no clue what to do with kraft paper!  It just looks like a paper sack from the grocery store to me and I can't seem to visualize anything 'pretty' using it!  I know, I know ... that's crazy thinking so I just jumped in with both feet and here's what I came up with . . .

OMG ... I'm not sure what to think of this creation!  On one hand I think it's pretty "okay" and on the other hand I'm thinking ... "this is so plain"!  You know me ... I LOVE all those layers, flowers, flourishes, blah ... blah ... blah!   But honestly, this is really starting to grow on me!  What do you think?

You have to use at least one Cheery Lynn Designs product for the challenge ... GOT THAT COVERED!!  EVERYTHING on this card is Cheery Lynn Designs with the exception of the faux stitching which I used a Sakura Gell Pen and the cardstock.  I actually had to make a special trip to the craft store to purchase the Kraft paper!  REALLY!  I have $100's of dollars worth of paper in my crafting cave and NOT ONE sheet of Kraft paper!  (well I do now!!)

I would also like to enter this card into the current challenge over at Joan's Gardens.  The challenges at Joan's Gardens are always so much fun and sometimes kind of tricky ... but luckily, (while I'm still catching my breath), Joan has an easy one for us this week ...  
ANYTHING GOES ... BUT you must use a product sold at  Joan's Gardens!  
AGAIN, NO PROBLEM!  Other than the cardstock, everything was purchased from Joan's Gardens.

Here's a few other challenges I'd like to enter into:
Card Mania #23 - Use Kraft Paper
Cards in Envy - Stitching (faux or real)
Cupcake Craft Challenge - Let's Get Sentimental
Melonheadz Friends - Die Cuts
There She Goes - Anything Goes

BEFORE I GO ... Remember I said I FINALLY made it out to the race track to watch my grandson race his junior dragster (never did see granddaughter race ... BAD NANA!)  Well of course I forgot my camera so I attempted to grab a couple photos on my 'old' flip phone ...

 Here's granddaughter Morgan sitting in the stands with me explaining the whole 'drag racing' thing!  It was very exciting to see what all goes into this sport since my 'kids' are SO INVOLVED!


And here's a couple quick photos I grabbed before the light turned green and he was off like a flash!!
Things were moving so fast I never even got a photo of Jon & I together like I had hoped!
Next time for sure!  I will be back!


Thanks so much for stopping by today and I hope you've enjoyed your visit!
Have a fabulous day and as always . . .

Recipe for this card:

Paper:  Kraft cs, Black cs, Christmas Red cs
Accessories:  Cheery Lynn Designs B211 Happy Birthday die, B165 Lace Corner Deco E dies and B117 Fanciful Flourish
Sakura white gel pen
Technique:  faux stitching

Monday, June 17, 2013

SFC2413 - Squigglefly Challenge Time

Hello my friends ... hope your day is off to a FABULOUS start!
Can you believe it's MONDAY again ... ALREADY!!!

Anyways, it's time once again for a fun challenge over at Squigglefly, and we are celebrating with RED, WHITE & BLUE.  I have chosen this wonderful digi image by Cheryl Alger called "Honor The Flag" for my DT creation.  Isn't she adorable!!

I've kept my design pretty simple since I really wanted to bring attention to the theme!

Recipe for this card:
Papers:  Navy cs, Red cs, Reminisce design paper
Accessories:  Creative Memories star punch, Spectrum Noir alcohol markers

I hope you'll come join in our challenge fun!  It's hard to believe that the 4th of July is just around the corner!  Yikes ... I need to go on vacation before the summer slips away!

Here's a few other challenges I'd like to enter into:
Oozak Challenge - Blue, Stars & Stripes
Alphabet Challenge - I for Image
Charisma Cardz Challenge #23 - Digis Only
Scrapper's Delights - S is for (Stars & Stripes)
Creative Inspirations Paint - Red, White & Blue
That Craft Place Challenge - Independence Day
Craftin Desert Diva's - Red, White & Blue

Thanks so much for stopping by today ... Have a fabulous day ... and as always . . .

Sunday, June 16, 2013

June = STRAWBERRIES

First of all, I would like to wish a HAPPY FATHER'S DAY to any of the guys out there in blogland today!  Hope your day is filled with fun & pleasant surprises!!

It's been such a busy couple of days for me so I don't have a card to share (at the moment) but will have something YUMMY to share with you throughout the day!  Here's what I'm up to today . . .


YEP ... I'm going to make me some Fresh Strawberry Freezer Jam!  
I was down with my kids yesterday enjoying a day at the race track ... watching my grandson race his dragster for the 1st time (BAD Nanna! what took so long?)  And there are so many fresh produce markets in that area and all the signs read "FRESH PICKED STRAWBERRIES" so of course I just had to get a few quarts for myself.  I've kept a few quarts for munching on and strawberry shortcake but decided I wanted to make myself some jam to have available since the season will be coming to an end soon.  Hubby doesn't eat jam or jelly so I figure 2 qts. will make plenty for just me!  

I'll be back a little later with photos of the process and end result . . .

I'M BACK!!!!

The jam is made and although it was a few berries shy of the recipe (had to eat a couple while I was cleaning them ... LOL) I'm very happy with the yield from just 2 quarts of strawberries and it is SO GOOD!!!!

Here's a quick step-by-step tutorial on how I made this yummy jam ... really VERY EASY!!

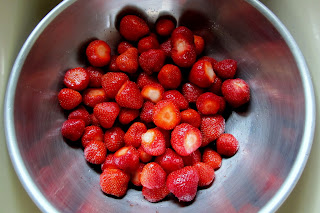
Step 1:  Always wash your berries ...

Step 2:  Remove stems

Step 3:  Cut into quarters to make it easier to smash down.

Step 4:  Smash the berries using a potato masher.

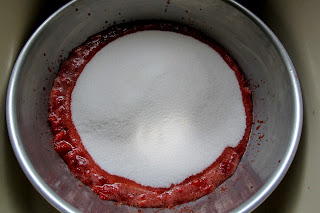
Step 5:  Add the sugar (recipe at bottom of post).

Step 6:  Stir in sugar and let stand for 10 minutes.

Step 7:  While the berries are resting with the sugar you can get your jars ready.
Wash & Rinse in hot water.
I purchased these cute little jelly jars YEARS ago just waiting for the right time to make jam or jelly.  I guess Today is the Day!   (Won't they be awesome decorated for gift baskets!)

Step 8:  I like to set my jars on a cookie sheet in case of any spillage plus it makes it easier to move them all at one time.

Step 9: (sorry forgot to take the picture)  After the 10 minutes add your lemon juice and pectin.  You will need to stir in the pectin into the mixture stirring constantly until sugar is completely dissolved  and no longer grainy!  (only about 3 minutes with the new liquid pectin)

Step 10:  Time to fill the jars.  Using a canning funnel and a ladle, fill your jar to 1/2" from the top ... leaving room for expansion once it starts to freeze.


Step 11:  With a damp paper towel, be sure any 'dripage' is removed from the rim of the jar (as well as the outside of the jar) ... replace the lids and let stand for 24 hours to set before placing in the freezer.


Step 12:  See this HALF FULL JAR?  That is going into the refrigerator for IMMEDIATE consumption!
Anytime you don't have a FULL container, it's best to put that jar (whether you're canning tomatoes, peaches, pickles, ... whatever) directly into the refrigerator for immediate use.

So there ya go!  Really EASY PEASY and tastes SO GOOD during those winter months when all the store bought produce just doesn't have that summertime taste!!

Here's what I used:

2 quarts strawberries
8 cups white sugar
(I know it's a lot but that's what homemade jam/jelly is all about!)
4 Tbsp. fresh (I used bottled) lemon juice
2 pouches SureJell Certo Liquid Fruit Pectin

FYI:  Pectin is what creates the GEL from the fruit syrup in your berries.

When I was growing up we did a lot of home canning and we periodically would make jams/jellies.  Now mind you, we didn't do the FREEZER style jams/jellies!  The freezer was used for things like a SIDE OF BEEF or PORK ... not jars of jelly!  So, most times our jams/jellies were the 'cooked version' which did take a lot longer to do.  And, back then they didn't have the 'liquid' version of pectin, it was the 'granulated/powdered' form of pectin and it took a lot longer for it to dissolve in with your berries.  That powdered pectin is still available in the stores but this liquid version is SO MUCH easier!

So there ya go ....
A little different type of CRAFTING from me today but I hope you enjoyed it and are inspired to give it a try!  Well I can hear that english muffin w/homemade strawberry jam calling out to me so I'd better get going!

Hope you're having a fabulous day and thanks so much for stopping by!
As always . . .

Thursday, June 13, 2013

A.R.T. Challenge #1

Hello Everyone!

TODAY is the big launch of a new challenge blog called A.R.T. (A Random Thursday) Challenge!  We have an easy one to get your started and hope you will join us EVERY THURSDAY for a new fun themed challenge.  Here's what we're looking for today:

SUMMERTIME
(what does summertime mean to you??)
To me summertime means beautiful flowers, green grass, birds and butterflies!  
As a child, my father had a huge flower garden within our semi-circle driveway and the circle was filled with various colors of Sweet Williams.  The butterflies came in 'groves' to draw in the sweet nectar of these sweet flowers and, just as this little girl is doing, I used to crouch down and watch the butterflies ... they were so beautiful and fascinating!

I hope you'll come join in the fun at this BRAND NEW challenge blog which I am so proud to be a member of the design team!  Please be sure to check out the beautiful creations from my team mates ... such a talented group of ladies!!  WOW!


I'd also like to enter this creation into the following challenges:
Little Red Wagon #189 - Three or more pattern papers
Scrapper's Delights Challenge #1 - "S" is for ... (Summertime Sunshine & Smiles)
Whimsical Designs - Summertime Fun
Bearly Mine Challenge #90 - Anything Goes
Craft-room Challenge - Here comes Summer
Deep Ocean Challenge - For a Girl
A and T Emerald Faeries - Punches and Dies
Card and Scrap Challenge #56 - Use Flowers
Country View Crafts #4 - Die Cuts
One Crazy Stamper Challenge - Summertime Fun
Scrap It Girl - Use your dies

Thanks SO MUCH for stopping by today and as always . . .
Recipe for this creation:

Papers:  White cs, My Mind's Eye 'Lime Twist' dp, Crafty Secrets 'Radiant' dp
Image:  Digi Darla's Butterfly Wonder
Accessories:  Spellbinder Gold Labels Four die, Cheery Lynn Designs DL112 & DL113 butterfly dies, Cheery Lynn Designs B117S Fanciful Flourish Small, Spectrum Noir alcohol markers, Prima flowers, Stampendous Diamond Dots


Wednesday, June 12, 2013

NEW IMAGE available at Shelly's Images ... SEAHORSE

Good Afternoon everyone!

I just wanted to quickly share with you a newly released image over at Shelly's Images Store and I was thrilled that she asked me to create a sample card using this adorable SEAHORSE ... check this out...

Isn't this image awesome!  
I actually have a friend who LOVES seahorses so guess where this card is headed!  LOL!   

Please be sure to pop on over to the Shelly's Images Challenge Blog where you could WIN THIS IMAGE just by leaving a comment on THIS POST at Shelly's Images.

You will be seeing some new changes coming up at Shelly's Images and I will tell you that THIS will be one of those new ideas.  As Shelly has new images created to share, she will be posting about them at the blog and periodically will be drawing the name of one lucky commenter to WIN THAT NEW IMAGE!
How cool is that!!  So please stop by often and join in the fun!

Thanks for poppin' in and AS ALWAYS . . .


Recipe for my card:

Papers:  Paper Pizazz dp, white cs, garden green cs

Accessories:  Cloud9 Design rub-on sentiment, Memory Box Valencia die, Cloud9 Design Rain Drops, Spectrum Noir alcohol markers

Image:  Shelly's Images SEAHORSE


Sisterhood of Crafters Challenge

Happy Over The Hump Day Everyone!

Today I'd like to share the creations I've made for the new challenge over at The Sisterhood of Crafters!  Being one of the 'founding' sisters, I feel blessed to be a part of this lovely group of ladies and when some of the girls have their hands full with children/jobs, etc. ... I feel obliged to create an extra inspirational piece for the challenge.  Today is one of those days so be aware, I don't have just ONE creation ... but THREE!

Our challenge this week is all about the MEN/BOYS in our lives especially with Father's Day coming up this weekend! (June 16th)   So, here's what I came up with:

 What do you think?  Is this little guy cute or what!  I think EVERY little boy (or girl) sometime in their childhood has put their dog (or cat) in their wagon and taken them for a ride!  
What FUN childhood memories!  

Recipe for this card:
Papers:  white cs, teal blue cs, Paper Pizazz dp
Images:  Vintage photo from TJ Designs Vintage Photograpy Collage Pack 
Stamp images: 2008 Rubber Cottage.com, Impression Obsession (sentiment)
Accessories:  Spectrum Noir alcohol markers, Prima flowers, Stampendous heart diamond dots, Fiskars swivel craft knife
 
 LOL ... if you are as old as me, you will remember this car!  My girlfriend (who is 7 years older than me) actually had a '57 Chevy just like this ... same color too!  This car is a CLASSIC and I thought it would make a perfect Father's Day card for that all those CLASSIC/PRICELESS Dad's out there!!

Inside Sentiment says:
"Just like this car ... your love is PRICELESS"
Happy Father's Day

Recipe for this card:
Papers: White cs, Black cs, Teal cs, 
HOMEMADE background paper using my Scor-Pal and matching teal marker
Stamp image:  Cornish Heritage Farms GM Series 1957 Family Bel Air
Accessories:  Spectrum Noir alcohol markers, Creative Memories black sticker letters, Darice Ohhh So Trendy Stars Satin Retro Seafoam ribbon, Spellbinder Scallop Oval dies, Joann's satin pearl centered bow, Fiskars swivel craft knife
Technique:  Scoring and Outside the Circle
 
 For my final card creation, I was playing around with DIGITAL elements and kept it VERY CAS 
(NOT my favorite style ... I like all those layers and do-dads!!)

I was thrilled last week when I was the winner over at Penny's Paper Crafty Challenge and won 5 digital images over at Eureka Stamps.  The sentiment and rock formation are two of the five images I chose from Eureka Stamps.  I actually had to do some playing around with the rock formation digi image in order to 'overlay' it onto my Crafty Secrets Barber Shop digital design paper without all the 'white' background ... because it was a .jpg file vs a .png.  YEAH, I'm happy to say I was successful (although there has to be an easier way than how I did it!) and love the dimension achieved on this creation.

I used my Spectrum Noir alcohol markers to color in the rocks/greenery and did a little doodling around the outside edge.  Like I said ... very CLEAN and SIMPLE!

Since I already had it up on my screen (in Word 2010), I figured I may as well print out two and jazz up the second image a bit more.  I guess this falls into the LESS and MORE category style of crafting.  And below is what I came up with but adding just a few more elements to the same basic design.  What do you think?
 
Aaahhh ... now that's better!!
A little touch of gingham ribbon, a few flowers/leaves & a butterfly ... VIOLA!  
Now it could be used for just about anyone's birthday card!

A few other challenges to enter:
Eureka Stamps - Father's Day
Amusing Challenges - Father's Day (Cards #1 or #2 - no digis)
Catered Crop - For the Boys/Masculine card
Glitter n Sparkle - Father's Day/ Male Cards
Hobby Cutz #8 - Masculine and/or Father's Day
Pile It On - For or From a Father
Anything Goes Challenge - Father's Day
City Crafter Challenge - All About Him
Crafty Sentiments Designs - For a Male
Creative Craft - We Love You Dad
Cuttin and Stampin #23 - Father's Day
LEJ Designs - Boys/Men
Loves Rubberstamps #56 - Masculine theme
Our Daily Bread - Masculine or Father's Day
Papertake Weekly - Hello Boys
Tuesday Throwdown - You're the Man
Use It Tuesday #57 - Masculine (Card #1 - stamp at least 6 yrs old and vintage image 3 yrs)
Twisted Tuesday - Clothes Make the Man
Artistic Stamper - Makes for Men
Simon Says Stamps - Transport


Well I hope I haven't bored you too much with my finger babbling and I truly hope you can find a little inspiration from these creations.  Thanks SO MUCH for stopping by my blog today and PLEASE, come join in our challenge fun at the Sisterhood of Crafters!  
I'll be watching for your creation(s) and promise to come by to take a peek (and leave some love)!!!

Until then ... and as always . . .

Tuesday, June 11, 2013

Totally Digital . . .

Hello my friends ...

Since Crafty Secrets has their new GARDEN PAPERS available in the store now, I wanted to share a couple of card creations with you that I made using these wonderful digital products and Microsoft Word 2010 software.  I'm sure you can use whatever version of Microsoft Word you have on your computer.


By simply using the INSERT, PICTURE functions from your toolbar in Word, you can bring in your background paper choice from the many 'garden' papers available in this new set called Garden Papers DP-08, then using the words/images from the coordinating Garden Memories, Flower Garden or Flower Girl sets overlay the words and/or images of your choice to create your card.  On this first card, I have even added a photo from the collection for the back of my card.

 
QUICK STEP-BY-STEP TUTORIAL

Step 1:  Using Microsoft Word 2010, select a NEW BLANK DOCUMENT, modifying the margins to be "0" on all sides so you are working with a full page blank sheet of 8 1/2 x 11 paper.

Step 2:  Click on INSERT ... PICTURE ... Then select your background paper choice from your files where you have your Crafty Secrets paper files saved.  It will be large when it comes into your document but we will take care of that in a moment.  Now you will want to  RIGHT CLICK ... go to WRAP and select SQUARE.  That will give you the availability of moving it around where ever you want on your page.

Step 3:  Next you will want to CHANGE THE SIZE to fit the top right side of your page (portrait orientation).  To do this ... RIGHT CLICK ... go to SIZE and POSITION ... UNCHECKMARK the LOCK ASPECT RATIO & RELATIVE TO ORIGINAL PICTURE SIZE boxes.  (You will only want to uncheck these for your background paper ... when modifying the size of images you will want to keep these checked  or you will distort the picture).  Next modify your Height to 5.5" & Width to 4.25".  Next you'll want to LEFT CLICK and DRAG your background paper over to have it positioned in the TOP RIGHT corner of your blank page.

Now you have your background paper in place and 
you can begin to choose how you want to decorate the front.

Step 4:  INSERT ... PICTURE ... again you will locate the sentiment or images you'd like to add to the front of your card.  Here I've selected this beautiful verse from the Flower Girl - DAS116 set. 


Using the same process as above: RIGHT CLICK ... go to WRAP and select SQUARE, giving you the option to move it around, LEFT CLICK and DRAG it over your background paper.


Of course, you can modify the size by dragging the image from the corner until it's the size you want it to be.


 You can continue this same process until you have your card decorated to your satisfaction.  Add more or less ... the options are endless with all the beautiful images/sentiments in the digital sets now available at the Crafty Vintage Girl store!

 Here is a screen shot of my cards before I printed them.

 I hope you'll give this a try.  It might take you a little extra time the first time you try ... but don't give up ... once you've used this method a few times and have it mastered, you can whip out those last minute cards in a flash and they will be GORGEOUS!!!!

If you have a question please feel free to leave a comment or email me (my email is in the sidebar).  I will help you as much as I can. And, remember you can click on any of the images for a larger view.

Thanks for stopping by ... now I must get back to the other new projects I'm working on to hopefully inspire you!  Hope you're having a beautiful day and as always . . .


Monday, June 10, 2013

It's JUNE WEDDING time!

Good Morning my friends and welcome to the 2nd week in June!  
I hope you had a fun weekend ... it sure was a beautiful one here in N.E. Ohio!

Today I have made a card with a number of my favorite challenges in mind.

First of all, since June is the official wedding month, I will start with the fun challenge over at Sassy Studio Designs  ... JUNE BRIDE.  I have used their image called BELLA BRIDE ... isn't she pretty!  You'll have to check out (and click to enlarge) the 'close-up' at the bottom of this post to see the sparkle I've added to her wedding dress.


 The next challenge is over at Joan's Gardens where she has asked us to:
  • Use an embossed background
  • Use Pink and black as your main colors
  • Use an Oval
  • You must use a product sold at Joan's Gardens.
OH DEAR ... I just realized I forgot to run my background panel through with the embossing folder!  It's laying here on the table and I was waiting until I was done doing the 'doodling' edging frame ... dang!  Oh well, I'm going to share it anyways!  Items purchased from Joan's Gardens will be listed at the end of this post.

Another challenge is over at Cheery Lynn Designs where they require you to use at least one of their products and this weeks theme is ... CREATIVE CORNERS (must have a corner embellishment).  Well, I decided the Cheery Lynn Designs B165 Lace Corner Deco E was the perfect corner embellishment for this delicate looking creation.  I love that it looks like a cluster of little hearts!

The final challenge blog I had in mind when creating this card is over at Di's Digi Stamps ... BEAUTIFUL BORDERS.  This is my first time 'doodling' a border around my card and I really like the outcome.  I actually saw it done on one of Di's DT member cards and thought it would be a delicate touch to my creation.  What do you think?  It was really easy since I simply 'linked' the corner embellishments using my Tim Holtz Black distress marker ... fine point end.

Let's see what other challenges I can share today's creation with:
In The Pink Challenge - Anything Goes (must have PINK)
 Crafting for all Seasons - Wedding/Anniversary
Catch The Bug - Going to the Chapel
The Hobby House - Anything Goes
Creative Corner - Going to the Chapel
Sister Act Card Challenge - Anything Goes
613 Avenue #23 - Anything Goes / Twist - Celebrations

 Thanks SO MUCH for stopping by today and I hope you are finding inspiration through my work.  I know I sure enjoy drawing inspiration from all you talented crafters out there in blogland!

Wishing you a fabulous week ahead and as always . . .

Recipe for this creation:
 
Papers:  White cs, Black cs, Paper Pizazz dp
Image:  Sassy Studio Designs
Accessories:  Spectrum Noir alcohol markers, TH black distress marker, Spellbinder Floral Ovals, Spellbinder Classic Ovals, Cheery Lynn Designs B165 Lace Corner Deco E, Cheery Lynn Designs DL112 Exotic Butterflies Small, Memento Angel Pink ink, Fiskars swivel craft knife, Sakura Quickie Glue Pen, Deco Art Glamour dust 'crystal', 

Items listed in RED were purchased through Joan's Gardens.

Friday, June 7, 2013

Cheery Lynn Designs SUMMER BLAST Challenge

Hello everyone!

Well the weekend is here and I have a busy one but before all the fun gets started I wanted to be sure to get my FIRST card posted for the SUMMER BLAST challenge over at Cheery Lynn Designs.

This week's challenge at Cheery Lynn Designs is to use Red, White & Blue!  
Well ... I think I have that part covered!  LOL!!
I have used Cheery Lynn Designs Fanciful Flourish Small, Exotic butterflies and Birthday dies.

Hope you like my design and thanks for stopping by today!

Other challenges:
Bearly Mine #89 - Dies and/or Punches
Creative Card Crew - Punches and/or Dies

AS ALWAYS . . .