
Hello Everyone!
I've been making tissue box covers for several years now and they have become quite a good seller at my craft shows. I actually have repeat customers who buy them every year for gift giving! When I started making these, I used the instructions I found on Splitcoast Stamper HERE. (If you are not a paying member of SCS, you won't be able to see the link). But over time, I have modified it a bit and it seems to work the best for me.
This is a LONG POST but I have taken the time to photograph each step so hopefully it will make it easier for you. I know a video would have been faster BUT I don't know how to do a video so you're stuck with photos LOL. Hope you find this useful and helpful!
Supplies Needed:
This is a LONG POST but I have taken the time to photograph each step so hopefully it will make it easier for you. I know a video would have been faster BUT I don't know how to do a video so you're stuck with photos LOL. Hope you find this useful and helpful!
Supplies Needed:
- Box of tissues
THREE sheets of card stock for Base & Lid - Two 5 1/8” x 9 1/2” pieces of card stock (base) - Kleenex brand
OR
- Two 5 1/4" x 9 1/2" pieces of card stock (base) - Puffs brand
- One 6 9/16” square piece of card stock (lid)
One 12x12 sheet of Patterned Paper for decorative Panels - Four 4 1/4” x 4” pieces of patterned paper (base layers)
- Four 4 1/2” x ¾” pieces of patterned paper (lid side layers)
- One 4 1/2” square piece of patterned paper (top layer)
Additional supplies needed: - Scoring tool
- Glue or strong double face tape
- Scissors
- Cutting dies or shape templates
- Die cutting machine
- Additional card stock, stamps, die cuts, punches and other embellishments as desired
TISSUE BOX COVER BASE & LID

Cut your corners as shown below
for gluing together to create the lid
(BUT DON'T PUT LID TOGETHER YET!!)
We will have to die cut the opening for the tissues to pop through first ...

DESIGNER (PATTERNED) PAPER
I have figured out over time the best way to cut my designer paper
so that I can get all my pieces out of ONE sheet of 12x12 paper.
I have created you a template below ...
TIP: If you are using directional paper, you will have to be careful which direction your pattern is going before making your first cut.
Take note ... your first cut (left to right) is at 4 1/4" ... your second cut is at 4 1/2" ... what is left (xxx) is not used.
(IF you have any questions, feel free to email me ... my email is in my sidebar.)

4 BOX SIDE PANELS
Three pieces from your first cut strip ... then after cutting your LID from the second cut panel (4 1/2 x 4 1/2) you next cut will be at 4" and be sure to turn it to the 4 1/2" side and cut to 4 1/4" ... this will give you the 4th panel you need for your box.

1 LID

4 LID SIDE PANELS

ASSEMBLY
To adhere my lid panel and side panels, I use a good glue ...
my preference is Art Glitter Glue. This way when we get around to die cutting
the opening on our lid, the paper will be evenly adhered.
Set this aside to dry while you put your box panels together.
(DON'T PUT LID TOGETHER YET!!)

On my box panels, I use a strong double sided tape (I use a Scotch Tape Gun).
BUT, before adhering to my card stock panels, I have found it very beneficial to lay my decorative panels in position first. Since these panels are only a 1/4" difference in size, it's very easy to get them going the wrong way (ask me how I know! LOL). Lay each piece so the longest length (4 1/4") goes left to right.
AND, be sure your 1/2" scored sides are on the same side. This is the strip where you will tape them together to make your box. If they are not on the same side, your decorative panels will be two on the top and two on the bottom! NOT WHAT YOU WANT!! LOL

Once your decorative panels are adhered, put a piece of strong 2 sided tape (I use Scor-Tape) along those 1/2" ends.

Adhere the first two sides together ...

The the other two sides ...

And here's your BOX!

To adhere my lid panel and side panels, I use a good glue ...
my preference is Art Glitter Glue. This way when we get around to die cutting
the opening on our lid, the paper will be evenly adhered.
Set this aside to dry while you put your box panels together.
(DON'T PUT LID TOGETHER YET!!)

On my box panels, I use a strong double sided tape (I use a Scotch Tape Gun).
BUT, before adhering to my card stock panels, I have found it very beneficial to lay my decorative panels in position first. Since these panels are only a 1/4" difference in size, it's very easy to get them going the wrong way (ask me how I know! LOL). Lay each piece so the longest length (4 1/4") goes left to right.
AND, be sure your 1/2" scored sides are on the same side. This is the strip where you will tape them together to make your box. If they are not on the same side, your decorative panels will be two on the top and two on the bottom! NOT WHAT YOU WANT!! LOL

Once your decorative panels are adhered, put a piece of strong 2 sided tape (I use Scor-Tape) along those 1/2" ends.

Adhere the first two sides together ...

The the other two sides ...

And here's your BOX!

BOX IS DONE ... ONTO THE LID
Because I make so many of these, I have designated these dies strictly for my tissue box cover lids. I have various other oval dies that I can use for my cards and these are actually the FIRST die sets I ever purchased. Like a lot of us, when Spellbinder came out with these Nestabillities Squares, Rectangles, Circles & Ovals ... many of us just HAD TO HAVE THEM.

I have used a smaller classic oval & a little larger scallop oval to create my decorative panel for the top of the lid opening. The 'next size up' classical oval die is used to cut the opening in the lid itself.
The card stock panel that is left from cutting your 6-9/16" lid works perfectly for die cutting your decorative oval panel. I usually cut a couple and have them hanging around for future.
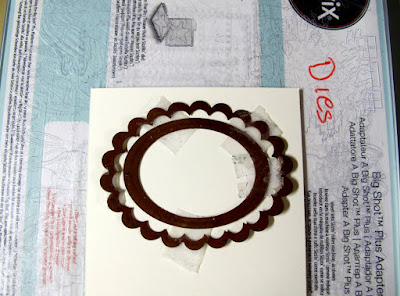 TIP: The center pop out can be used for sentiment panels for your cards.

Be sure your slightly larger oval is centered on your lid before cutting.
And, depending on the pattern of your paper, you might choose to have the oval one way or another.

Now it's time to GLUE your decorative oval around the opening in your lid. Be sure to keep the glue closer to the outside edge of your decorative oval.


This is why you want to keep your glue closer to the outside edge of your decorative oval ... this also gives you a little 'play' room in case your oval cut in the lid is a little 'whompist' you can make the adjustment with your decorative panel.

Glue your lid corners together and VIOLA!!

Your Tissue Box Cover is complete!
Now comes the fun of decorating it with flowers, butterflies, etc. depending on the theme of your paper. During the holidays I simply add pretty Stickles around the scallops of the opening decorative panel and everyone seems quite happy with that!
I have decorated them quite simply and I've also decorated with lace, flowers & pearls! The sky's the limit!!

Because I make so many of these, I have designated these dies strictly for my tissue box cover lids. I have various other oval dies that I can use for my cards and these are actually the FIRST die sets I ever purchased. Like a lot of us, when Spellbinder came out with these Nestabillities Squares, Rectangles, Circles & Ovals ... many of us just HAD TO HAVE THEM.

I have used a smaller classic oval & a little larger scallop oval to create my decorative panel for the top of the lid opening. The 'next size up' classical oval die is used to cut the opening in the lid itself.
The card stock panel that is left from cutting your 6-9/16" lid works perfectly for die cutting your decorative oval panel. I usually cut a couple and have them hanging around for future.


Be sure your slightly larger oval is centered on your lid before cutting.
And, depending on the pattern of your paper, you might choose to have the oval one way or another.

Now it's time to GLUE your decorative oval around the opening in your lid. Be sure to keep the glue closer to the outside edge of your decorative oval.


This is why you want to keep your glue closer to the outside edge of your decorative oval ... this also gives you a little 'play' room in case your oval cut in the lid is a little 'whompist' you can make the adjustment with your decorative panel.

Glue your lid corners together and VIOLA!!

Your Tissue Box Cover is complete!
Now comes the fun of decorating it with flowers, butterflies, etc. depending on the theme of your paper. During the holidays I simply add pretty Stickles around the scallops of the opening decorative panel and everyone seems quite happy with that!
I have decorated them quite simply and I've also decorated with lace, flowers & pearls! The sky's the limit!!

Since I will be keeping this 'sample' for myself, I simply added a few little
goodies that were laying on my worktable to adorn the top. Had a few other pieces & parts that needed colored so quickly did that and adorned the sides of my box too. Hope you like it.
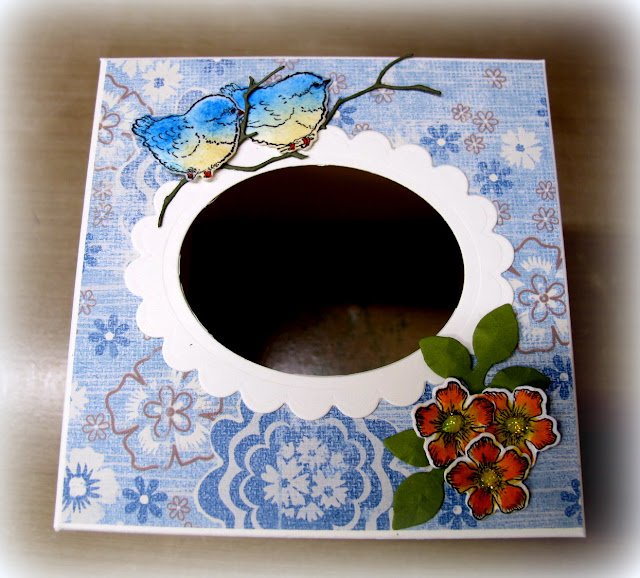

goodies that were laying on my worktable to adorn the top. Had a few other pieces & parts that needed colored so quickly did that and adorned the sides of my box too. Hope you like it.


If you decide to make a few of these, I would LOVE to see them.
Please leave me a comment below and I will pop right over to see your designs!
Thanks for sticking with me and I hope you have found this post helpful!
As always ...

Please leave me a comment below and I will pop right over to see your designs!
Thanks for sticking with me and I hope you have found this post helpful!
As always ...


