ATTENTION PLEASE

** FYI **
Our LOVE THOSE PRETTY PAPERS blog has been hacked and we've had to start a new blog ... you can still enter our October challenge at the new blog. Here's the link: Love Those Pretty Papers
Showing posts with label Gift. Show all posts

Saturday, August 16, 2014

Quick Treat Pack Tutorial

Happy Weekend Everyone!
I was blessed to be able to link up once again with some old High School girl pals last evening for dinner and of course I couldn't go empty handed!  Just wished I had not waited until Thursday afternoon to come up with an idea!  LOL!

But before I share my idea with you, I'd like to share a photo of 'the gals'!  And what a wonderful group of ladies it is!  HOW FABULOUS that each time we get together a few more school mates join in ... last evening there were 12 of us and another half dozen that wanted to come but had prior commitments!  I just think this is so awesome after 40+ years of being out of school!  So many stories to tell ... what wonderful fun!  The evening just flew by!

Don't they look FABULOUS??
I am SO blessed to call all of these ladies my friends!
 Each one is an inspiration to me in one way or another! 
 Girl Friends are THE BEST!!!

Okay back to my project!  Here are the little treat packs I made for my gal pals!!

Anyways ... I had one of these little 'gift card/treat' packets sitting on one of the drawer units at my workstation and a light bulb went off in my head!  I thought, those could be made up rather quickly and since I have an entire bag of Hershey Nuggets on the shelf waiting to be used for the Nugget Boxes I make for my craft shows ... why not create these little treat packets as an after dinner treat!

I thought I'd quickly take a few photos along the way so if you ever have this happen you would have a QUICK & CUTE gift to hand out to your friends too!  

You will need:
1 - 12x12 sheet of decorative paper (single or double sided)
Ribbon
Scissors
Corner Rounder
Scoring Tool
Adhesive
Candy


You can make THREE packets from one sheet of 12x12 paper!

Step 1:  Cut your 12x12 paper at the 6 3/4" length, then cut into three 4" panels.
Step 2:  From the leftover, cut a 3" x 12" strip ... then cut that strip into 2" pieces (6)
Step 3:  Score your 3" x 2" panels every 1/2" and fold in accordion fashion

Step 4:  Adhere one end of the accordion folded gusset panel (making sure the decorative side faces OUTWARD if single sided pattern) and adhere to each side of your packet panel.

Step 5:  Add a strip of adhesive to the TOP of each gusset ... fold INWARD to create the packet
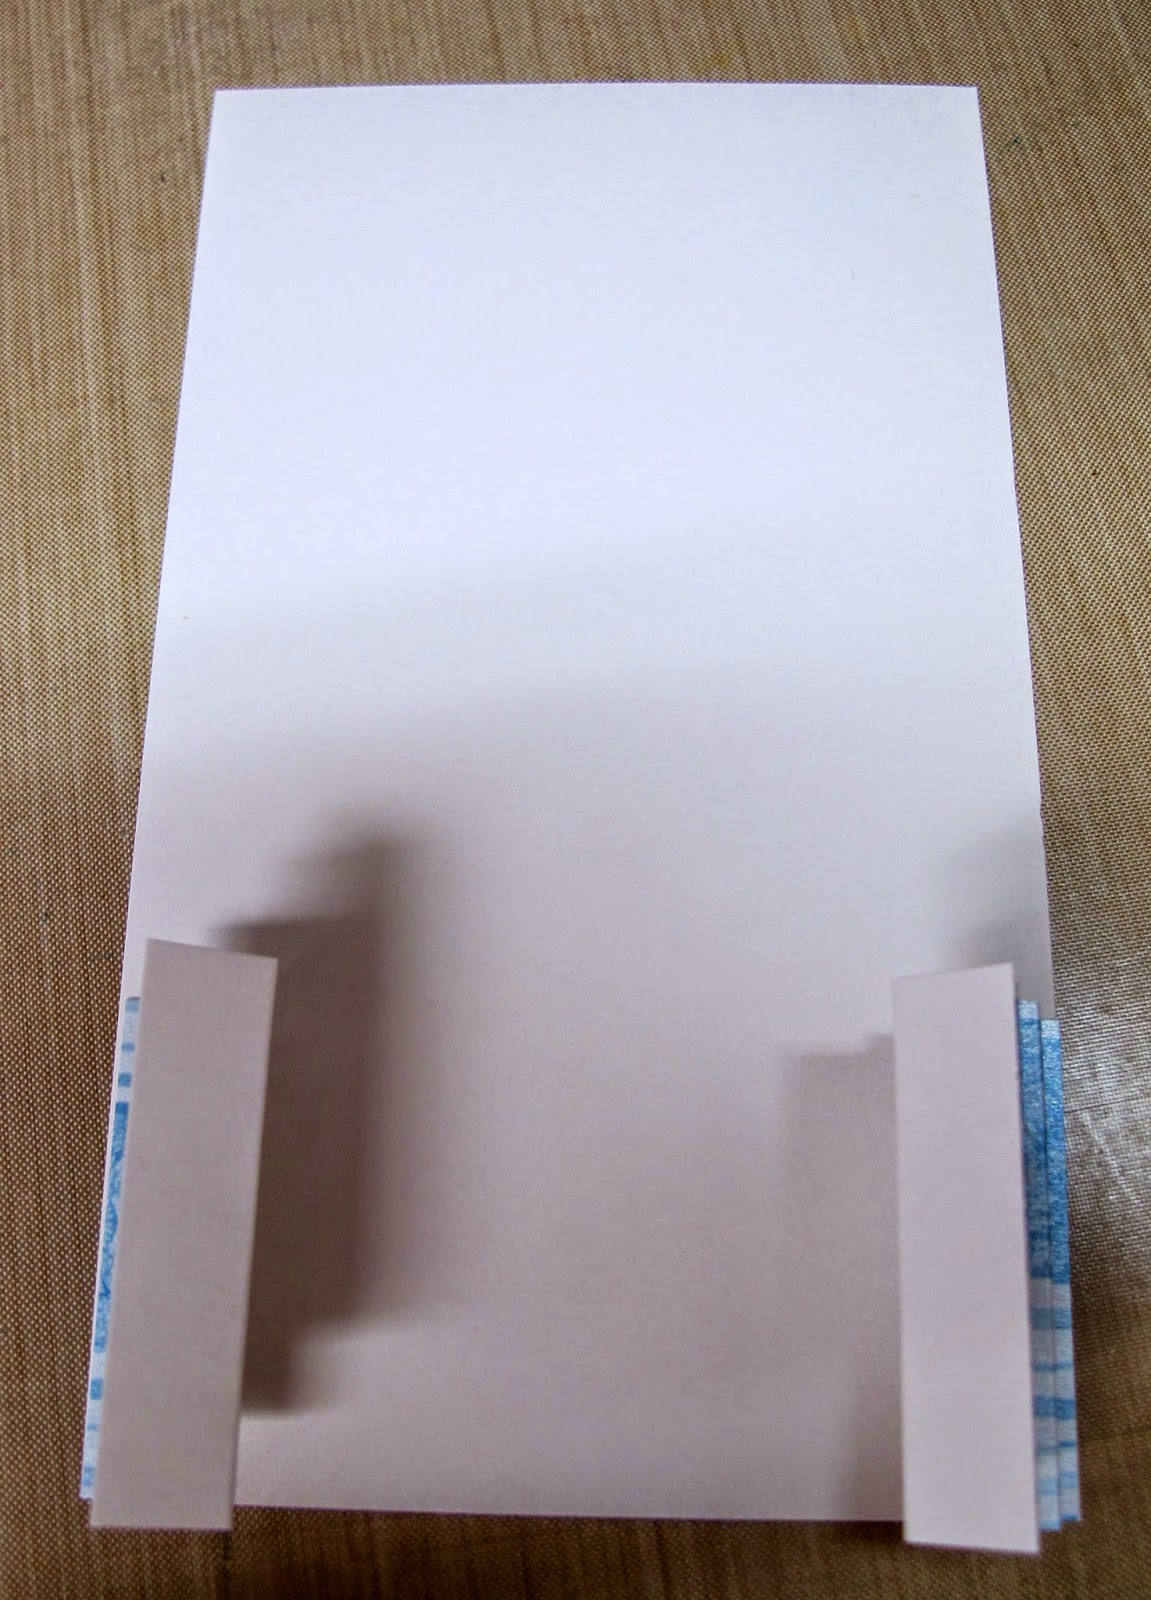
Step 6:  (option) Round the corner on the LID portion of the packet.

 Step 7:  Fill with the goodies of your choice

Step 8:  Use Velcro tab closures or simply tie closed with a pretty ribbon as I have.

A few challenges to share in:
Brown Sugar Challenge - Anything Goes
Crafts 4 Eternity - Something Old (design paper is at least 5 years old)

I hope you've enjoyed this little project/tutorial!
The girls LOVED them and I was so happy to put a 'chocolate' smile on each of their faces!  LOL!
Enjoy the rest of your weekend!
As always . . .

Friday, August 15, 2014

A snack while you wait ...

HAPPY FRIDAY ALL!
WOW!  Can you believe it's the end of yet another week???
Where has the summer gone ... kids are starting back to school ... home canning season is in full swing and you know what will be flying here in NE Ohio before we know it!  YIKES!!

I have a fun little 'giftie' idea for you today.  Hope you like it!


I have to admit, I've had this idea swimming around in my head but when I saw it similarly done over on Heidi Blankenship's Blog 'Embellished Dreams', I knew I just had to 'get it done' and shared!  Heidi used product from  The Stamp Simply Ribbon Store and Graphic45 papers . . . 

I have used product from the Crafty Secrets Store 'Crafty Vintage Girl' and the product I used today is the Digital Barber Shop Kit #D-116.  There are SO MANY options available at the CS store that you could use for a project like this.  My container is simply a clear A6 card box which I've purchased through clearbags.com.  I have these clear boxes in various sizes ... did you know you can actually mail your dimensional cards in these boxes?  Yep ... costs typically around $2 to mail via USPS.  I've inserted the digital paper into a Word document to resize it the length I needed for around the box.  Printed & fussy cut the ephemera then added a little 'manly' string, fall leaf button and VIOLA!  

I guess I'll be handing this box of almonds to hubby next time I cut his hair!  Afterall, I did steal borrow the almonds from his stash for my project! LOL!  He commented the other day that he didn't realize he had been eating so many almonds ... ssshhh!  Don't tell him where they disappeared to!  LOL!

Here are a few challenges I'd like to share in today .  .  .
The Crafter's Cafe Challenge - Anything But a Card
All Crafts Aug/Sept Challenge - Anything But a Card
Whoopsi Daisy Challenge - Fussy Cutting

Before I go, I want to share the news about the wonderful sale Sandy has going on right now in the shop.  She has assembled a fantastic goodie box of Summer themed stamps, journal booklets, Vintage Cuts, Creative Scraps and more at an amazing price!  Look at all the beautiful materials you get for just $19.95 plus $4.95 shipping:


You can click on this photo to get an even better look at all these beautiful projects.  There's even a beautiful album included so you can scrap your summer memories with ease.  Here's a list:

https://blogger.googleusercontent.com/img/b/R29vZ2xl/AVvXsEiumizX0uGA87gWMfH35Sp1JTVOBpY-T7lh1SVn2Aw7oXqbXvPi3KwZU1QrDS9rRzbdqW3c-KxqRJAR7KSnbyRcZViXlbKhWvZT4VgXZHT97aZrMh0aDOnonlmJITbAFs-sZTZNMtQ4PaZu/s1600/CS_Super_Summer_Pack.jpg 
You can order as many of these super summer sale kits as you'd like.  They'll make great birthday and Christmas gifts for all your crafty friends.  The link to finding these in the online store is Summer Super Pack Blowout.  No code is necessary, just click on the link to order.


 Thanks so much for stopping by!
Have a FABULOUS weekend and I'll see you back here next week!
As always . . .

Friday, December 7, 2012

Another handy little gift idea . . .

Hello blogging friends!
I'm here today to share with you a handy little gift idea I first saw done by Deb Felts (With A Stamp & A Song) over on Paper Craft Planet and couldn't wait to give them a try.

As you can see, I've made a whole basket full of them to have on hand throughout the holidays ... just in case I need a quick gift ... and of course for my hair dresser, waitresses at Bob Evans that we see each weekend and for the young teen girls in the neighborhood.  Just a little token of my appreciation!

I've tweaked the measurements a bit from Deb because the emery boards I purchased at Sally's Beauty Supply were a little longer than the one Deb created with.  So ... here we go!

You will need the following:
  1. Emery Boards
  2. Two sided designer paper ( I've used Graphic45 Christmas 8x8 dp)
  3. Scor-Tape (you choice of strong adhesive)
  4. Front embellishment of your choice (I've used a JustRite Christmas set & Spellbinder scallop circles)
  5. Circle punch
  6. Crimper (optional)

I have made my sleeves 6 3/4" long by 3" wide.  
By using 8x8 paper, I first cut the LENGTH (6 3/4") ... then cut it across at 6".  That left me with a 2" panel which I can use for my matching belly band.

Cut your 6" sleeve in half giving you TWO sleeves which will be 3" x 6 3/4".

Using your 2" panel, cut it into TWO 3" panels to use for the belly band.

Next you will SCORE the length of your sleeves & belly band pieces at 1", 1 1/4", 2 1/4" & 2 1/2".

In the above photo I have marked where you will place your hole punch to cut out your notch.  As you can see, it will between the two inside score lines.


Next you will use scor-tape to adhere/make your sleeve.  (sorry ... I forgot to take a photo of this step so I took one back apart to show you.)  You will place your scor-tape to the outside of the narrow panel then gently bring them together to create the sleeve.


  Place a small bit of adhesive in the bottom.  Gently pleat the sides and press the bottom together to adhere.  Crimp the edge, if desired.

 Lastly you will make your belly band, place it around the sleeve & adhere.  
Then you are ready to embellish to your hearts desire.  I chose to keep them simple by stamping out my JustRite sentiment onto white cardstock, die cutting with a Spellbinder scallop circle die and adhering to the front of the belly band.  You can go simple or super fancy ... choice is yours!
 

I hope you've enjoyed this little gift idea tutorial and will give it a try.  If you do, PLEASE let me know in a comment ... I'd LOVE to come see what you've created!


Here's a peek at the ones I made for my daughter to hand out to her clients with her company logo on the front.  (Hubby's idea!)   OH... and how about making them for stocking stuffers ... what fun!

Well, I'd better get busy ... still have a lot of decorating to do before my big party on the 16th (really dragging my feet this year for some reason!) and I haven't even started putting together and addressing my own personal Christmas cards!  Eeeks ... times a flyin'!

Here's a few challenge I'd like to enter into:
C.R.A.F.T. - Christmas
Charisma Card Challenge - Christmasy
 Delightful Challenges - All About Christmas
Creative Cutting Room - Anything Goes Using Graphic45
Little Miss Muffet Challenge - Tags or Gifts
Paper Crafting Journey - Any Christmas Paper Projects
PaperPlay Challenge - Christmas is Coming
Sarah Hurley Challenge - Christmas

THANKS SO MUCH for stopping by and for all your kind comments on my creations!  You have no idea how much it means to me!  God Love Ya for taking the time to brighten my day!

As always . . .

Tuesday, December 4, 2012

Crafty Secrets GOODIE Box . . .

Welcome back my friends!
Yesterday I promised to share another Crafty Secrets creation I made recently after I got my tree decorated ... well, as you can see, I didn't get back into my crafting cave last night ... one thing led to another and after decorating the tree, I decorated the mantle ... of course had to vacuum & clean everything before I could even start to decorate!  So I'm FINALLY here TODAY to share this cute project with you.

Before we get started, I wanted to remind you of the 12 Days of Christmas going on over at Shelly's Images!  I was your hostess yesterday and again today.  PLEASE pop over and Write A Letter to Santa (Day 3) and also check out the cute gift card holder tutorial I shared today (Day 4).  Oh of course you'll want to play along on Days 1 & 2 events ... then pop in each day for more fun games, tutorials, challenges & FREEBIES!!  I hope I'll see you there!

OKAY ... back to today's Crafty Secrets GOODIE BOX!

This is so much fun and with the new Crafty Secrets CDs and printable products, your creativity can go CRAZY!!!   For this cute little goodie box I have used the downloadable sheets called "Christmas Dolls & Accessories" for only $2.95!  What a deal!!

You really need to check out all the AMAZING digital papers & images available through Crafty Secrets!  All links will be listed at the end of this post but please be sure to check out their **NEW** online store called CRAFTY VINTAGE GIRL for all the digital printables/downloads that you've seen me create with over the past couple of weeks!

Here's a quick overview of how I made this cute little gift item.

I have these clear boxes for my card sets in both A2 size & A6 size.  For today's project, I have used the A6 size.  I have purchased these through clearbags.com ... they come in a variety of sizes.

I've printed & cut a piece of the Crafty Secrets design paper from the DP-07 Vintage Christmas Papers downloadable collection for my backing inside the box.  The cocoa packets, marshmallows and M&M's came from my pantry.


Now to start decorating the front of the box.  The first step is to print out the Christmas Doll & Accessories Sheet onto cardstock.  I use Picasa3 on my computer for photo manipulation ... it's free online & really easy to use.  Once I printed the sheets, I got busy with my Fiskars swivel craft knife and cut out the images I wanted to place on the front of my box.

For the lower background panels I first cut a a strip of white 12x12 paper and tore the edge to look like snow.  Next I layered various scraps of CS design paper I had laying around for earlier projects (including the left over piece of holly branch).  The ran a strip of red satin ribbon around the entire box and adhered in the back.
 
The cute little dog was adhered to the box then the little girl (which her jammies on) was POPPED UP to make it look like her doggie was standing by her side.  Lastly I placed the goodies in the box and VIOLA!  A tag & bow is all it needs to become a special little treat for someone special!

Isn't she just the CUTEST!  Takes me back to my childhood when my sisters & I used to play with cut out dress up dolls for hours!!!  What wonderful memories these images evoke for me!!

A few other challenges I'd like to share this creation with are:
Flourishes - An Altered Christmas
Scrap-Creations - Anything But A Card
Loves Rubber Stamps - Anything Goes
Papertake Weekly Challenge - Anything Goes (Bonus-Gift for Christmas)
Through The Craft Room Door - Anything Goes
Top Tip Tuesday - Christmas (Tip: never throw Christmas scraps away ... they are just perfect for this sort of project where you only need a few complimentary panels.)
Tuesday Alchemy - Anything But A Card
The Crafty Bloggers Network - Anything Goes
Crafty Boots - Anything Goes

Critter Sketch Challenge Blog - Anything Goes Christmas
 Hooked on Crafts Challenge - Christmas
 House of Gilli - Anything Goes
Lexi's Creations - Christmas
Totally Stampalicious - Anything But A Card
Tammy's Scrapin' Corner - Anything Christmas
UnstampaBelles - Christmas (no stamps)
Anything But A Card Challenge #7 -  Always Anything But A Card
The Cupcake Craftroom - Anything for Christmas
 Natalie & Amy Challenge - Christmas or Winter inspired 
Oozak - Anything Goes + RED
Unique Crafters Challenge Blog - All About Christmas 


That's it for me today!  I hope you've enjoyed this little goodie box tutorial and will give it a try!
Hubby is upstairs wrapping presents ... guess I'd better go give him a hand!

Thanks so much for stopping and as always!