Monday, November 5, 2012

Crafty Secrets DT Challenge & Nov Linky Party

Hello my friends!
It's time for a new LINKY PARTY at Crafty Secrets!

Join Our Linky Party 1st Monday Each Month 
with $50.00 Random Winner !
 Crafty Secrets have been busy little beavers.  You'll want to be sure and pop over to the Heartwarming Vintage blog to see all the new things they have available and also hear about many other new things that are still in the works.  Why not subscribe to our newsletter so you don't miss any of the excitement! 

Today's Linky Party theme is:
CHRISTMAS
 and I've been playing with a few of the new Digital Christmas papers & images to create this multi-fold card which will be a special Christmas card for my Mom this year!  She loves vintage as much as I do and since she "doesn't do the internet" and won't see this post, it will be a surprise!

This is the front of the card in 'closed' position.  I've started out with one of the beautiful digital papers which will be available on the new Christmas CD and this particular sheet is called 'Santa Baby'.   I have scaled down its size in order to use it as my A6 card front.  Here is a view from the front as you open the card . . .
Each page of this multi-fold card utilizes 'papers' from this new Christmas CD either in the form of background or the entire page itself!  I also used images from our Christmas Images & Journal Notes Booklet, Christmas Memories Stickers, and Winter Wonderland Vintage Cuts.   The only items used that were not Crafty Secrets were Stickles, ribbon, lace, and a few die cut snowflakes / flourishes.

(turn it over and this is what you will see . . .)
 I have no doubt this card will be sitting on my mother's mantle LONG AFTER Christmas is over!  I think she's going to just LOVE all the beautiful detail in these papers and images.

REMEMBER ... TODAY begins Crafty Secrets monthly Linky Party for November!   So, please be sure to pop over to the Heartwarming Vintage blog  to check out all the new sets, see the beautiful samples the DT girls have been creating, and leave a comment there to get in on a chance to win a $50 Crafty Secrets Gift Certificate. 

Please Visit Our Design Team Blogs !
 Don't forget ...  ANYONE can play along in the linky party with us and we'd sure love to have you join in the fun!  All you have to do it create something using Crafty Secrets Products , post it and link up on the Heartwarming Vintage blog.

Here are a few qualifying challenges I'd also like to link this creation to:
Challenges 4 Everybody - Anything Goes
The Corrosive Challenge - Know when to Fold 'Em
 Eclectic Ellapu Challenge - It's a Vintage Thing
Gingerloft Challenge - No Coloring Allowed
The Crafty Pad - Anything Goes

In hopes of making it easier for you, here is a list of our
Websites, Gallery & Store
 See you at the Party!!!

OH  WAIT ... before I go ... I just spotted this while checking out other challenges to play! 
This awesome Crafty Secrets image awarded me a Top Pix over at Great Impressions Challenge last month!  How fabulous is that!  Here is their comment . . .


Darlene
"Wowzers Darlene!  Could you please come tie all my bows? (lol!)
Your card is perfection!  The colors are gorgeous and I love how your sentiment
touches on the flowers.  Your scalloped edge tucked below that amazing bow is
a wonderful extra element too!  Congrats on being my Top Pix!"

Okay ... NOW I'm done talking!  
Sorry it was such a long post and thanks for hanging in there with me!! 


Sunday, November 4, 2012

2012 Craft Show was a SUCCESS!

Happy Sunday fellow bloggers!  
I feel so much better, now that I've had a good nights sleep and the pressures of the crafts shows are behind me!  If you follow my blog you have seen some of the goodies I've made to share & sell this year and I'm thrilled to report it was a HUGE success!  There are 150+ vendors at this show and I think they had a record number of people come through the doors yesterday!  I actually DOUBLED my sales from last year ... how awesome is that!


This is my 4th year participating in this craft show and each year has gotten better & better!  Of course, I think my display and products have gotten better & better too!
I've learned that segregating products works best for me.
Everyday cards are together on the left, separated by categories in the plastic media boxes so they can thumb through them ...
specialty items/fancy fold cards, kids card kits are in the middle along with advertising custom made Monogram Card Sets
 and Christmas gift card holders, money holders, Hershey bar pouch stocking stuffers, Christmas Cards (individual & sets), as well as all the tissue box covers are on the right and down the other table.

My best sellers this year were:
Hershey Bar Pouches
Tissue Box Covers
Money Holders (both Christmas & Wedding)
Everyday cards: Birthday, Sympathy & Baby

I wish I had made more Hershey Bar Pouches but you just never know if they will sell or if you're going to have to eat all those candy bars before the expiration date!  LOL!  This year I could have sold three times as many ... I'll keep that in mind for next year!

I have to give a big shout out to my friend Kim Bradfield who came and sat with me all day!  There were times when there were people the whole way around the table looking and asking questions and I don't know what I would have done without her help!  THANKS SO MUCH GIRLFRIEND!!!

I was also pleased to see my crafting friend Lana Edwards (Blest With Stamps) was able to secure a space for this years show!  We were quite far away from each other but visited each others booths through out the day to see how things were going.  Lana forgot her camera so I grabbed a quick photo for her before the show got started.  
Lana's work is gorgeous and her display looked AMAZING!!!  
Lana is my friend who got me involved in going to the Goodwill/Thrift Shop looking for old items that we can challenge each other to alter.  Here are a few of the altering challenges we have done in the past ... Clock ... Jewelry Box ... Mirror.  She tells me she had a successful day also and is looking forward to next years show.  Way to go girlfriend!!

Well, that's about it for me today!  Now I need to get my cave back in order ... yikes!  That's going to take awhile ... I have stuff EVERY WHERE!!  LOL!!  But before I go, I want to share with you a photo of the head of cauliflower Mark & I found at the local indoor farmer's market this morning ... this thing is HUGE ... (have no clue what I'm going to do with all of it), but it was too beautiful to pass up.  AND, they were ALL this size ... WOW!  Cauliflower on steroids!  LOL!


Hubby said we needed a helicopter full of Marines to get this thing home!
(hence this photo with his remote control Marine Helicopter ... you know how it is ... anything to keep hubby happy!  TeeHee!)  Okay ... now I need to go clean & separate this thing ... I wonder, CAN YOU FREEZE CAULIFLOWER?  Guess I'll have to google that one!

Have a wonderful day everyone and as always, thanks so much for taking the time to stop by and say hello!
Looks like it's going to be a dry day ... maybe I can get my outside work FINISHED!  Although I think shoes, jacket & a hat might be required (I don't wear shoes till it snows ... I'm a flip-flop kind of gal).
ENJOY!

Friday, November 2, 2012

TUTORIAL - Wedding Money Holders

Hello Dear Readers and Happy Friday!
I'm as ready as I'm going to be for tomorrow's craft show and since I had a request to share the way I created a few of my craft show items, I thought I'd share one with you today (others to follow).

Here are the easy steps to create a Wedding Money Holder like this one:


Items used for this creation:
  • One (1) 8 1/2 x 11 sheet of white cardstock cut 8" x 8" square (reserved cut piece for bellyband)
  • Two (2) pieces of design paper - (1) cut 7 3/4" x 2 1/4" and (1) cut 7 3/4" x 1 3/4" (front panels) 
  • Scrap of Red Cardstock to die cut flourish
  • Border Punch - I used Martha Stewart Doily Lace punch
  • Adhesive to attach designer panels
  • 1/8" Scor Tape (or Red Line Tape)
  • Gold Pilot Marker
  • Congratulations Stamp & Versafine Black Ink
  • Embellishments of your choosing - I used Cheery Lynn Designs SM Fanciful Flourish (B117S), Reflections Handmade Florals and Diamond Stickles

Cut your base cardstock at 8" square ...
Score at 2" and 5 1/2"
Your designer paper panels will be cut
7 3/4 x 2 1/4"
and
7 3/4" x 1 3/4"
Remember to save your cut off cardstock piece for your bellyband.

Since you will have WHITE against WHITE on the inside of your money holder, I like to use a gold or silver Pilot Marker to EDGE the money holding panel.  You simply lay your cardstock on a scrap piece of paper and starting at top edge of your panel gently drag your marker down to make a simple defining edge line.


To seal your ends on the money holder panel, I find Scor Tape works great.  You can of course use any adhesive you prefer but try to keep it narrow so the money/check fits without a problem.


Once you have sealed your inside money panel, you are ready to create your Belly Band from the scrap of paper left over from cutting your base holder.
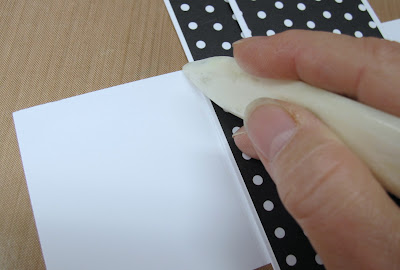
I don't like for the band to be too tight so I chose to lay it under my holder and mark with my bone folder where I want my score lines then took it over to my Scor Pal and did my scoring.  


Now lets make that belly band pretty!
I wanted my fancy cut band to match up in the back so I found this way worked perfectly.
After scoring my belly band, I laid my SCORED line right at the end of my punch and began punching.
  Being sure to line up my dots so I got a nice even cut the whole way down.

Next, I FLIPPED OVER my panel and lined it up the same way I did the first side ... this way they were sure to match up in the back ... side to side.


Once you adhere the belly band together in the back, you are ready to adorn the front in what ever style you'd like.  Here I chose to use a simple Flourish, a Paper Rose and a touch of glitter using Diamond Stickles.  Of course it is safer to add your Stickles to your flourish and let it dry ... BEFORE you put it on your band ... but to save time this morning, I free handed the Stickles AFTER I adhered it to the band.

Add your paper flower and VIOLA!
I used Aleene's Tacky Glue for the flower and  Art Glitter (dries clear) glue for the flourish.


So, there you have it!  It's really a very simple design that you can gently adorn or you can GO CRAZY with embellishment ... totally up to you!!  Here are a couple other holders I have ready for the show:


For this one, I made TWO different belly bands. 
That way it can be used either as a Wedding card or as a 50th Anniversary card!
 AND, on this last sample, I did a little extra.  I made a HOMEMADE flower using McGill Star Lily Punch (P/N 64511) and also a matching envelope (legal size white envelope).  The sentiment on this card is from the new JustRite Clear stamp set called Large Fancy Sentiments (CR-03815).


I hope you have enjoyed this tutorial and samples I have created this week.
I will be back soon with tutorials on the Hershey Bar Pouches I made for this show and also a requested tutorial on the Zig-Zag card.  So please come back soon!

In the meantime, have a FABULOUS day/weekend and know I appreciate each and every one of you!!

Qualifying Challenges:
4 Crafty Chicks #114: A Day to Remember
 Craft Us Crazy #29 - Black as primary color and/or party theme
DL.ART - Anything Goes
Forever Friends - Anything Goes
 Simply Create  - Anything Goes
One Crazy Stamper - Anything Goes
 The House that Stamps Built DCC1024 - Anything other than a Card
The Paper Shelter #88 - Anything Goes
Simon Says Stamps - No Square Cards


Thursday, November 1, 2012

OKAY ... I think I'm ready!

Hello my friends!
I 'THINK' I'm ready for Saturday's craft show ... at least I hope so!  With doing 2 craft shows in a 3 week period, it kind of put the crunch on me to replace those things that sold well at the first show (i.e. tissue box holders, birthday cards, baby cards).  So, with hubby's help I think I'm all set.  Now just need to look over things one more time and PACK IT UP!

My husband doesn't usually get involved in my crafting but he generously spent a few hours cutting paper for all the tissue box covers and Hershey Bar Pouches over the past couple of days.  
HUGE HELP!!

Here are the 'everyday' tissue box covers I made yesterday and finished decorating today.


Something else that was pointed out to me at the last show was that I didn't have any Baby Boy cards left ... so of course I jumped right on that too.  Here's what I came up with quickly.


 Since I already had this bunny colored and in my stash ... I decided to whip up a Baby Girl card too.


OKAY ... I think I'm ready!

On a separate note,  
this time LAST week was absolutely beautiful here in NE Ohio.  
The temperatures were in the 70s and we were enjoying an Indian Summer.
Here are a couple photos I snapped while we were enjoying the last days on the deck!

 One week later and after the wind & rain from Hurricane Sandy ...
Trees are bare and the skies are gloomy  (took this lower photo about an hour ago)!

 
And, I was so thrilled to see the Bacopa in this pot rebloom (even though the Fountain Grass has seen better days, LOL) on our deck ... 

But again ... the wind & rain has taken it's toll on this planter too.  
Time to take it apart and store it till next spring.
Afterall, it is November!


Okay ... that's it for me!  
I'm tired and need to get out of the "cave" for awhile.  Thanks so much for stopping by and for always encouraging me with your kind comments!

Shelly's Images Challenge

It's time for another fun challenge over at Shelly's Images and today's a uniquely fun one ... 
it's called ROLL 'EM.

Here's how it's played and I sure hope you'll come join in the fun!
(Use the Random.org number generator to pick your products, roll at least three times)
1 – Use FLOWERS of some sort
2 – 2 Layers
3 – BLING
4 – Ribbon/Trim/Twine or Lace
5 – Distressing
6 – Embossing
7 – Digital Image
8 – 3 Buttons
9 – NO Patterned Paper
0 – Kraft Paper


The numbers I rolled were 1 (use flowers of some sort), 2 (two layers) & 7 (digital image).

The Shelly's Images digi we (the team) are featuring today is called "FALL FENCE".  Please be sure to check out my team mates creations and leave them some love ... they are a very creative group of ladies!  I have used 2 layers of DCWV design paper, Prima flowers and of course our featured digi image.  Coloring was done with Prismacolor Markers and Stampendous diamond dots were used for the flower centers.  The 'greenery' was created using Marianne LR0157 die.

This is such a FUN way to create, and by randomly spinning for the numbers, a lot of the decisions have been made for you!  Now you can just have fun creating your masterpiece!!

Please be sure to check out Shelly's Images Store ... she has a wide variety of images and has also begun offering PRE COLORED IMAGES ... they are FABULOUSLY colored and makes card making a snap!  Be sure to check it out!

Here are a few other fun challenges this creation qualifies for:
Crafting for All Seasons - Falling Leaves
Scrapalicious USA - Happy Fall Y'all

Thanks so much for your visit and please come join in our fun!  Can't wait to see what you create!