ATTENTION PLEASE

** FYI **
Our LOVE THOSE PRETTY PAPERS blog has been hacked and we've had to start a new blog ... you can still enter our October challenge at the new blog. Here's the link: Love Those Pretty Papers

Monday, October 7, 2013

Crafty Secrets OCTOBER LINKY PARTY & DT Challenge

A new month ...

Hello my friends and yes it's time once again for you to gather your Crafty Secrets/Heartwarming Vintage items together and get creative for a new Linky Party.  You will have ALL WEEK to create & share with us your creation for a chance to win $50 in product from the Crafty Vintage Girl Shoppe!

Today the design team will be sharing a variety of projects with you to hopefully inspire you to 'Give It A Whirl' ... and many will be very helpful by sharing a tutorial.  Here's what I have to share today ...

As many of you know I've been working on items for my upcoming Craft Show and I've already shared a lot of those with you.  
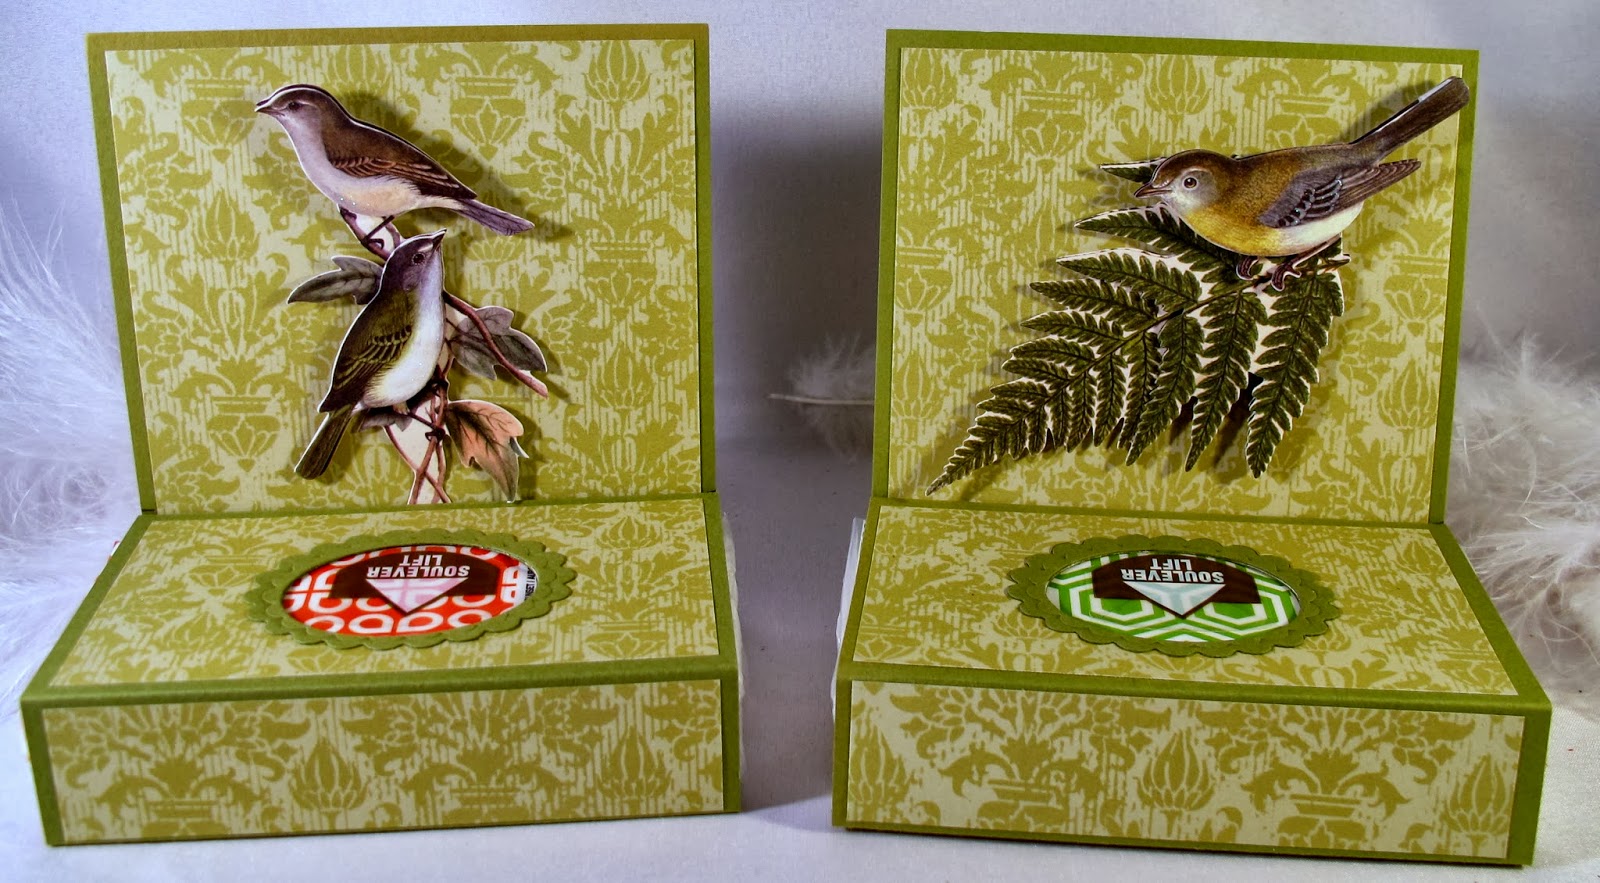
One of those items is the KLEENEX TRAVEL PACK holder.
I've taken it one step further and printed my own designer paper from the wonderful collection available at Crafty Vintage Girl.  This link will take you directly to all the amazing digital papers available.


Quick, Easy & oh so cute!
Let me step you through the process!

STEP 1:  Print your paper.  I have printed one side with a print and the other side with a more muted pattern that matches.  This way I can reverse the paper to make 2 different holders.
CUT your 8 1/2" x 11 card stock into 2 panels (each 4 1/4" x 11")
SCORE your panel at 1/2", 3", 4" and 6 1/2"


After scoring, fold into shape so you see where your top panel (where tissues pop through) is located.  It will be that panel where you will need to PUNCH or DIE CUT your opening for the tissues.

Step 2:  I die cut my opening using one of the smaller Spellbinder Classic dies.  You can use an oval punch if you have one available.


You can stop with just this opening but I like to make a panel to dress up that opening by stacking a step larger scallop Spellbinder oval die onto a coordinating cardstock like this:

Step 3:  Before putting together your holder, you will want to attach this decorative opening panel as well as any sponging, embossing or additional decorative panels you may want to add.


Step 4:  On the 1/2" scored end panel you will want to attach a strip of strong adhesive like Scor Tape or Red Line Tape to hold your box together.  To be sure your top panel is positioned properly and can house the pack of travel Kleenex tissues, I came up with this little  

TIP:  I lay my paper down on my measuring board (you can use a ruler for this step) with the bottom score line of the top panel on a number ... then put a pencil mark 1" above that score line on either side.

This way, when I fold my 'box' up to be attached I know exactly where it needs to go to be the right size opening for the Kleenex pack.


 ANOTHER TIP:  You must use KLEENEX BRAND travel pack tissues for this project because they are the only brand I have found so far that opens from the TOP and not from the end! 

 KEEP IN MIND 
Not only is this a fabulous everyday project and gift idea, but it can also be a fun addition to your desk during holiday time ...  the change in seasons ...  there's an endless list of themes you could make these for!
How about for HALLOWEEN?

 Again I have printed out my own double sided design paper.  This time I've used a couple of the beautiful digital papers from the DP-04 Halloween Papers that can be seen & purchased HERE at the Crafty Vintage Girl Shoppe.


Crafty Secrets also has a wide variety of Halloween Ephemera available for your creations.  Here I've used their Bat and created my own sentiment.  What fun!

Well that's it for me today!  Thanks for sticking with me through this rather long step-by-step and please leave me a comment (and your email address) if you have any questions that I can help you with on this project.  It's really pretty easy and how nice that you can TWO out of ONE sheet of card stock.  

OOoops ... I just happened to remember ... if you are using solid color card stock for the base of your holder, you will need decorative panels for the front & back of the top panel as well as for the top (where tissue pop through) and 1" front panels.  
Here are the dimensions you'll need for those decorative panels.  Out of one 12x12 sheet you can decorate THREE holders.
Cut design paper 4" x 12" for each holder.
Front & Back Panels - (2) 4" x 4 1/4"
Top Panel - (1) 4" x 2 1/4"
Lower Front Panel - (1) 4" x 3/8"

You'll also want to be sure and check out what the rest of the design team has created for you!
FABULOUS tips/tricks and tutorials!

OKAY ... NOW I'M DONE!  LOL!!
Thanks again and as always . . .

Sunday, October 6, 2013

Our Beautiful World Challenge - October

Good Evening!

When I saw the new challenge over at Our Beautiful World, I couldn't help but think that what my day consisted of was one of the things that OCTOBER (their new challenge theme) meant to me ... and that is HOME CANNING!

DILL GREEN TOMATOES w/RED PEPPER & GARLIC

 Come late September, early October, the local growers and Farmer's Markets are filled with lots of wonderful homegrown vegetables and fruits.  And, if you live in the suburbs as I do now ... that's the way to go if you want to do some home canning but don't have the room (or permission) for a garden of your own.  (Sssshhh don't tell anyone, but I do sneak 3 or 4 tomato plants into my flower garden so the tomatoes used here are my own! LOL!)  There's nothing better in the cold of winter than some wonder home canned products that remind you of the warmer summer/fall seasons.
 
PICCALILLI 

Nearly every year hubby & I 'put up' (technical term for canning, LOL) an old family recipe favorite called Piccalilli.  This year we only did one and half batches since the tomatoes weren't really as good or as readily available this year as they've been in years past. 

We also tried a couple of new recipes this year ...
Dill Green Tomatoes with Red Peppers and Garlic
and
Pickled Green Tomatoes with Red Peppers and Onions

We will see how those turn out and mark the recipe accordingly for future use.

I think it's time to get off my feet ... sit and watch the end of the football games with hubby and call it a night!
Thanks for stopping by and be sure to check out the fabulous challenge!  You will be so inspired and in awe of some the amazing photos from AROUND THE WORLD ... and the matching stories are awesome!


Please stop back tomorrow when I'll have a new project & tutorial for the new October LINKY PARTY at Crafty Secrets.  


My Besties Challenge

Good Morning All!

This is going to be a very quick post as I have a busy day of stuffing jars with green tomatoes & onions (LOL ... canning Piccalilli) but I wanted to share my card for the My Besties UK Challenge before the deadline.

The challenge is a color challenge using  these colors (what fun) ...


Well, I just grabbed one of my cute Besties images ... this one's called MILLIE MAE ... and started coloring with these colors in mind.  Here's what I came up with:


What do you think?  Isn't she adorable?
I had some scraps of design paper laying on my desk so that's what I used to create my background.  My base panel is the reverse side of a Halloween sheet I printed using Crafty Secrets Halloween paper image files ... the burlap is paper from JoAnn Fabrics.  The verse is from Verve and the flowers are various companies.  Orange Stickles adorns the flower center as well as the flower centers on my Besties image.

A few other challenges:
2 Sisters Challenge - Fall Fun
Allsorts Challenge - Autumn Colors
CMC Copic Challenge #78 - Fall Colors
Di's Digi Designs - Show Off Your Coloring Skills
Challenges & Candies - Colors of Autumn
Crafts for Eternity Recipe Challenge - Color Challenge (Cinnamon)

Polkadoodles - Autumn
QKR Stampede - Fall Colors
Stampin with the Dragon - Yellow
Simply Create Too - Fall/Autumn

Hope you like my creation and now I'd better get moving!  Those jars aren't going to fill themselves!  LOL!  Happy Day to you all!


Saturday, October 5, 2013

Joan's Gardens Challenge and MY GIRLS ...

Hello Everyone!

Hope you're having a fabulous day!  
This morning was taken up with getting all my green tomatoes & onions sliced and put in pots with salt so they can sit over night in preparation for making this years Piccalilli.  I'm down to only a few pints so we definitely needed to get more canned this year!

I do have a card to share with you for the current challenge going on over at Joan's Gardens, but first I just had to share a photo my daughter & granddaughter posted on FB this morning.  

I just love this photo!!
My girls are sharing a 'Girl's Day Out' and hopping around to all the fabulous Farmer's Markets in their area.  As you can see, (all dressed in PINK), they are great supporters of Breast Cancer Awareness and even Morgan's little Jack Russell Terrier (Lylla) is getting in on the act!   I hope they have a fun day and find lots of goodies!!

Thanks for letting me show off MY GIRLS (beaming with pride)! 

Now onto the challenge card!
At Joan's Gardens this week, the requirements are:
  • Purple and Green
  • Torn Edges
  • Layers
  • You must use a product sold at Joan's Gardens. 


  •  

    I created this card quite quickly (so BUSY these days!) ... so the first thing I did was go through my design papers (including scraps) that were purple and green to use for my background.   I've had this fabulous Sassy Studio Designs image colored up and just waiting to be used and today's the day!  I've used my spectrum noir alcohol marker for my coloring.


    I've torn the edges on the 2 layer panels behind my 'witch'.  So glad Joan came up with this idea ... I NEVER think to tear my papers and it's such an easy technique to give your card a different textured look!  The items I've used that were purchased from Joan are the Green Kaiser Pearls and the Cheery Lynn Designs B149 'Cuties 1' die.  This die is actually to be used to roll & make a flower but I decided to just use it as a border element.

    Well I seem to be having printer difficulties PLUS I've somehow hit some wrong keys on my keyboard which has reduced the size of my text in Blogger to teenie tiny and it's quite difficult to type up a post when you can hardly see the words your typing!  I have NO CLUE what keys I hit but if anyone know how I can get it back to normal, PLEASE LET ME KNOW!!!  (before I go blind! LOL!)

    A few other challenges:
    The Sweet Pea Stampers - Purple Power
     Paper Pretties Color Challenge - Purple, Green & Orange

    Thanks for stopping by and enjoy your weekend!
    As always . . .

    Friday, October 4, 2013

    Shabby Tea Room

    Good Evening All!

    It's nearly bedtime here at the Pavlick household and it's been a very busy day, but before retiring, I wanted to share a card with you that I made for the current challenge at The Shabby Tea Room.  My friend Diane (Nellie's Nest) is guest designer there this week and she has inspired me to play along!

    This week's challenge is 'Oh My Pumpkin' using this image as inspiration.

      
     Heidi asks that you create a card or project inspired by the photo AND INCLUDE BURLAP and/or TWINE AND A PUMPKIN(S).

    Well here's what I came up with using an image from the Crafty Secrets Halloween Booklet of Images & Journal Notes.


    The 'burlap' background paper is from JoAnn's and the orange square of burlap is ACTUALLY burlap ... also from JoAnn's.  The large leaf is a silk leaf and the other leaves are made from paper and a Die-Namics leaf die (mftstamps.com).  A GinaK sentiment and raffia bow finish my creation

    I hope you like my creation and are inspired to join in the fun!

    A few other challenges:
    Rogue Redhead Challenge - Autumn Colors
    Challenges and Candies - Colors of Autumn
    Crafts for Eternity Recipe Challenge - Color Challenge (Cinnamon)

     Polkadoodles - Autumn
    QKR Stampede - Fall Colors
    Simply Create Too - Fall/Autumn

    That's it for me tonight ... it is officially bedtime and I'm really looking forward to 'climbing between the sheets' tonight!  Another busy day ahead of me tomorrow.  

    Thanks for stopping by and as always ...

    Thursday, October 3, 2013

    INSPIRATION challenge at Paper Crafting Corner

    Hello my friends ...

    I'm off to Pennsylvania early in the morning to have breakfast with some of my 1st cousins.  As you know, I come from a very large family and over the past year or so, it was decided we'd try and get together for breakfast the 1st Friday of each month for anyone who was available.  Luckily this month I'm available and look forward to seeing many of them again!

    Since I knew I'd be getting on the highway early (1-1/2 hour drive) I wanted to share with you the card I made for the new Papercrafting Inspiration: Magazing Monday Challenge Week 25

    Here is our inspirational Magazine Cover for this week:

    Papercrafting Inspiration: Magazine Mondays - Week Twenty-Five Inspiration Piece (image)

    Even though there are several different ideas that immediately came into my head, my eye was of course drawn to the suitcase.  And with a suitcase comes travel ...

    So here's what came together for me.

    Aren't these images awesome!  They come from a sheet of vintage images called 'Life's Journey' by Magenta (www.magentastyle.com).   Other than the vintage style (which I love), the thing that drew me to these images was the suitcases with the name Darlington on them.  My home town (and where I'm headed in the morning) is Darlington, PA.

    I rummaged through some of my vintage style design papers and came up with this worldly patterned paper and the post card was actually cut from another vintage 12x12 paper.  I've distressed the edges with Tim Holtz TeaDye ink and even curled a couple corners to give it a more aged appeal.

    The verse on the forefront image says:  "Life is either a daring adventure or nothing!"

    I hope you've enjoyed my card today and please come join in the inspirational fun at Paper Crafter's Corner.  It's amazing to see what different people see in the same image! And I might add, this challenge has certainly helped me to 'think outside the box'!

    Thanks so much for stopping by and as always ...

    Shelly's Images October Challenge

    Morning All!

    WOW!  I still can't believe we are already into the month of October!!  That white stuff will be flying long before I'm ready!!  Eeeekkks!

    With the start of a new month, that means it's time for the new monthly challenge over at Shelly's Images Blog.  This month we have a photo inspiration for you.

    TTT Challenge Theme - Fall Inspiration Photo

    Isn't this a beautiful, peaceful photo ... I'd like to just jump in and take a walk down this road!!
    But, back to reality!  
    Here's what I've created using not just one but two of Shelly's Images ... 
    We have several squirrels in our back woods and they are very busy right now collecting nuts (and burying them in my yard) for the winter so I thought it would be fun to add these guys to my card.

    I used WORD to create this little scene.  That gave me the availability of sitting one squirrel on the fence and reversing the direction on the other one to sit on the ground at the corner.  Here in Ohio, we have not only gray squirrels but red squirrels and even black squirrels.

    A few additional challenges I'd like to enter into:
    Creative Moments - Autumn/Anything Goes
    The House that Stamps Built - Happy Fall Ya'll
    Little Red Wagon - Use a Fence
    Papercraft Star - photo inspiration

    Addicted to Stamps & More
     Tuesday Throwdown - Colors of Fall

     I hope you'll come join in our challenge fun this month!
    Thanks SO MUCH for stopping by today!
    As always . . .
    Recipe:
    Papers -  Scraps of  Green, Mustard, Orange, & Red cardstock for leaves, White cs, Savvi 'Peel & Stick' Autumn design sheet (background)
    Stamp/Ink - Serendipity/Versafine Onyx
    Accessories - Spectrum Noir alcohol markers, Die-namics 'royal leaves' die, PunchBunch flower making kit (flat tweezers used to curl leaves), Art Glitter glue 


    Wednesday, October 2, 2013

    TOGETHER . . .

    Hello my friends ...

    Earlier this week I requested your help in choosing a photo that most depicted the word 'TOGETHER' ... which is the challenge word over at OUR BEAUTIFUL WORLD blog


     ... from the 5 photos I shared with you (you can see the others HERE if you didn't get a chance to participate). 
    And the overall selected photo was:


    This adorable photo of the liter of Jack Russell Terrier puppies from which my granddaughter Morgan picked her loving little LYLLA  (farthest right and the runt of the liter).

    Lylla is a very happy & loved little dog and is VERY attached to Morgan.  I am not a dog lover (sorry) but I must admit even I have fallen in love with this quick moving, bouncy, happy, just wants to be loved pup!  Lylla is less than 6 months old but has the personality of a grown dog. 

    Since you all loved this photo ... here's a few more that will warm your heart!

    (where Morgan goes ... Lylla goes!)


     Like I said ... Anyone who knows me KNOWS I am NOT a dog lover ... but I must admit Lylla is different ... she's cute & funny and I just can't help myself ... hence, look who's holding Lylla!  LOL!!

    Thanks so much to my friends and followers for helping me decide which photo best suited this fun, inspiring challenge.  Oh, and by the way ... the second most selected photo was the photo of my daughter & granddaughter TOGETHER kayaking.

    Hope you are having a good day and thanks so much for stopping by.
    Please stop back again tomorrow when I'll be sharing the new OCTOBER CHALLENGE at Shelly's Images.  It's going to be FUN and EASY ... you'll certainly want to play along!!

    As always ...

    Taking a break from Craft Show crafting . . .

     . . . and playing along in a couple of challenges.

    Good Afternoon All!

    Today I've stepped away from my craft show crafting to create a fun card for The Bestie Challenge which is WINGS and ANYTHING GOES (please include a Bestie). Well, after coloring/cutting my image, I took at peek at Paper Playful in hopes of finding a sketch I could base my card on.  

    Luckily, I found the sketch at Tuesday Morning Sketches that I thought might work well.  I did have to turn it on it's side and switch the embellishment to the other side.  But I think you can still see the 'sketch' in my creation.

    So here it is ... what do you think? 

    Isn't she cute!  Her name is 'Old Socks Sallie' and I've used one of my favorite color combos ... pink/purple.  Sherri Baldy has some FABULOUS new 'winged' images available in her store but since I don't have any (yet) I had to improvise and add wings to little Miss Sallie!


    Her wings are actually butterfly wings from the Cheery Lynn Designs (DL160) Large Lace Faerie Queen w/Angel Wing die set. 

    I turned this card into a little girls birthday card because this adorable image just reminded me of a little girl playing dress up and all little girls like flowers & butterflies

    A few additional challenges:
    Crafty Sentiments Designs - Favorite Technique or Color (color-pink/purple)
    Creative Craft Challenge - Anything Goes
    LEJ Designs - Things with Wings

    Thanks so much for stopping by!  
    I guess I'd better get back to Craft Show crafting if I'm going to have enough goodies to sell.  PLUS, next week I'll be making my fall trip out to see my crafting friends at Joan's Gardens in Liberty (near South Bend) Indiana.  I'm so looking forward to seeing these ladies again!  We have such a good time together.

    Till next time ...
    and As Always ...

    Recipe:
    Papers:  White cs, Pink cs, Graphic45 6x6 patterns & solids 'Secret Garden' design paper
    Stamp/Ink:  Amuse Stamp/Versafine Onyx ink
    Accessories:  Spectrum Noir alcohol markers, Cheery Lynn Designs (DL160) Large Lace Faerie Queen w/Angel Wing die, xPress it foam mounting tape, Prima flowers, purple Stickles, MS floral vine border punch  


    Tuesday, October 1, 2013

    Inspired by others . . .

    Good Morning Everyone!

    How's your week going so far?
    My mojo was lacking a bit yesterday so today I'm really trying to 'get something accomplished'!

    A few days back, I made mention of another type of 'tissue box cover' I was working on and I was inspired when I saw THIS POST over on Patricia St. Martin's  (Rubber Stamping Is My Game) blog.  I thought it would be a great little new item for my upcoming craft shows and although I didn't get as FANCY as Pat ... I think that these would be wonderful little gift items.

    Here's Pat's ... just to show you how wonderfully adorable you can make these little covers:
    For someone special 2013

    and here are some of the ones I've been working on ...


    K&Company has some wonderful packages of 3d butterflies & birds that I thought would be a nice little touch for the front.  I also die cut a few Impression Obsession die #058-N 'Love Birds' for some of them.
    Here are a few more I finished this morning.

     I also figured out the packaging on them for the show.
    I try to have each thing individually packaged to help keep them clean and nice looking.

    I discovered that once they are adhered to make the 'box' for the Kleenex Travel Pack to go into, they will lay down flat.  Which makes for easy storage.  I also discovered that by doing this, they fit nicely inside the clear sleeves I use for my A6 size cards.  

    So, for each one, I have folded it down... slid it into the sleeve... added the Kleenex Travel Pack in the back, then sealed it closed.

    Pretty easy peasy and cute too!

    If you make these, be sure to use KLEENEX brand travel packs because they are the only ones I've seen so far that open from the top.  The others open from the end and won't work on this project.

    Well ... that's it for me at the moment!
    Need to go make lunch and get ready for a Webinar.
    Catch you later!