Something new to share today!
It's time once again for the Monthly Linky Party at Crafty Secrets Heartwarming Vintage Blog and the DT is doing something a little different today. We are EACH making a project and a tutorial with all the HOW TO's! How cool is that. You'll want to be sure and pop over to each blog and check them out! Their blog links are listed at the bottom of this post.
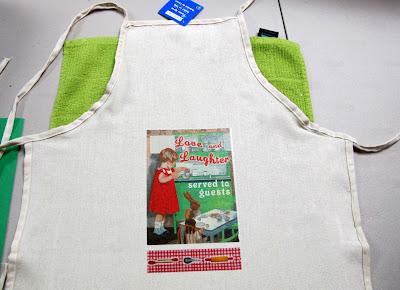
Now, here's a little project I've been wanting to do for the 2 little neighbor girls (ages 10 & 8). They help their mom in the kitchen and I thought it would be fun to make them an apron to wear while they were being "Mother's Little Helpers" and the cute Crafty Secrets Digital Cooking Printable Sheet - DPS14 available at the Crafty Vintage Girl Store, will work PERFECTLY!!
In my local Michael's, I found these fun lightweight canvas aprons for $2.99 each.
Then I headed over to Staples and purchased a pack of Fabric Transfers.
Using Microsoft Word, here are the steps I took to create my iron-ons.
I started with a blank Word document,
I clicked INSERT ... PICTURE ...
located my Crafty Secrets Kitchen Printable file on my computer and selected it.
Now I only wanted the picture of the little girl in the kitchen with her 'friends' so I CROPPED the image down to encompass only what I wanted for the front of the apron. I could have cropped off the red gingham border at the bottom of the photo but I decided I liked how it looked and kept it.
Once you click in the white part of your page, it will keep ONLY the area you have selected.
Since I wanted to make TWO aprons, I copied & pasted the image ... then rotated (using the green ball) & stretched the image (from the corner to keep the aspect ratio) to fit half the size of my transfer sheet and repeated it again with the second image.
Now I have the two images I want, ready to print onto one sheet of Transfer Paper.
HELPFUL HINT: When printing 'transfers' ... remember you want it to be REVERSED from 'normal' printing so the words/image will come out in the correct orientation once ironed on your garment. If you computer doesn't have a T-Shirt Transfer print option available, you may have to REVERSE the image yourself before running through regular printing.
Most computers have that option available to you in when you do your Print set up. As you can see in the photo below ... my options are in the Printer Properties-Quick Setup ... Media Type.
Even though the wording on my image don't appear reversed on my print preview . . .
. . . as long as you have the media set to T-shirt Transfer, it will print out in the reverse.
Now I'm ready to cut & iron-on. Just follow the instructions on your transfer paper packaging for iron the images onto your apron, tote bag or whatever item you choose to create using these FABULOUS Crafty Secrets images.
Like I said earlier ... there are 2 little girls in this family, so of course I had to make them each their own personalized apron. I hope they enjoy them! I know I enjoyed making them ... what fun!
And here are my lovely little neighbor girls ... Olivia & Emily Adkins!
Well, that's it for today! I hope you enjoyed my little tutorial and will give this a try. The possibilities and projects are endless when you have a computer/printer and fabulous images & designs from Crafty Secrets! Remember ... each of the DT members has a project tutorial for you today ... here's a link to their blogs for more inspiration:
Well, that's it for today! I hope you enjoyed my little tutorial and will give this a try. The possibilities and projects are endless when you have a computer/printer and fabulous images & designs from Crafty Secrets! Remember ... each of the DT members has a project tutorial for you today ... here's a link to their blogs for more inspiration:
Before I leave you today I wanted to be sure you were aware of the BIG SALE that is going on until Wednesday, May 8th at 11:59 P.M. at our Crafty Vintage Girl Store. You'll want to pop in and check it out!
Thanks for stopping by ... have a great day ... and as always . . .
Thanks for stopping by ... have a great day ... and as always . . .


Oh love the possibilities thanks for showing how easy this is Darlene. It is great you can make the picture so big and to be able to personalize it make it so special. Great job to you and your lovely models.
ReplyDeleteCindy
HOW ADORABLE!!! Lucky girls! Super tutorial Darlene! Fantastic all around!
ReplyDeletewow whos just too darn clever ..you!!!!! clever lady and arnt these just fabulous love them ...hugs sassyxxxxxxxxxxx
ReplyDeleteThanks for the excellent tutorial Darlene and your models and the aprons look really adorable! Your instructions will inspire others to give image transfer a try and the possibilities are endless when you imagine T-shirts, pillows, gift bags and other goodies.
ReplyDeleteThanks for sharing
Sandy
What a sweet idea for young cooks!
ReplyDeleteThese turned out so cute!!
ReplyDeleteThis comment has been removed by a blog administrator.
ReplyDeleteDarlene,
ReplyDeleteOh my gosh, your tutorial is awesome and the aprons are so very cute - as are your girls!!
These are adorable!! What a fun idea!! Thanks for the great tutorial Dar!! HUGS :)
ReplyDeleteSuper fabulous Darlene!! Love it!! I need one of those!!! :)
ReplyDeletehugs....
Super cute Dar...what lucky little girls to have "you"!!! A great tutorial, too!! Best wishes and hugs from Michiana!!!
ReplyDeleteYour aprons turned out great. The images are so fun.
ReplyDeleteThey look awesome Mom! The girls sure are growing fast.
ReplyDelete