Hello everyone and Happy Monday to you!
With today being the 1st Monday of the month, that means it's time for the
Today our DT Challenge theme is:
CALENDARS
In case you missed the Crafty Secrets blog post in early December (found HERE), our generous leader, Sandy offered free 2014 printable calendars in 2 different styles and some helpful hints on using them. Be sure to check it out!
Now that you have a 'calendar' to use ... why not join in our fun and help inspire all of us with your calendar creations!
My first creation (yes! I have 2 for you today...) is a birthday card for my Mom who will turn 84 on January 27th.
 |
| Inside |
- First I picked a background paper from the Digital - Radiant Paper Collection and sized it to 6" x 4.25" which is what my background size would be for an A-6 size card.
- Next I inserted the free printable calendar sheet and cropped it down to only the January calendar.
- With January being a winter month, I thought Mom would like these cute little kids from the Digital - Winter Wishes collection.
- To spell out MOM, I used the (new coming soon) alphabet digital letters. There are other alphabet letters available in the store presently (i.e. Top Hat Stamp Set) which would work beautifully also.
- Next I wanted a little corner embellishment and chose the floral flourishes from Digital - Rosy Wishes. Once my card front was to my liking, I printed it and did a little hand coloring on the flourishes with alcohol markers.
* * * * * * *
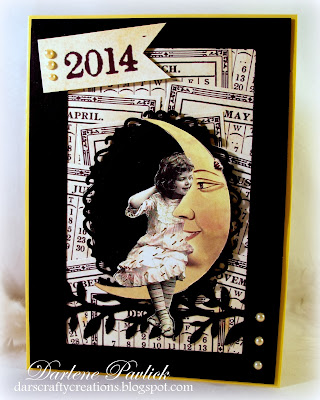
For my second creation I've utilized the entire 2014 calendar sheet.
(WARNING ... PHOTO HEAVY POST)
Using each calendar month to create the background was my intention ... HOWEVER, framing it was really a FLUKE ... don't you love it when a plan comes together from a mistake or mishap? I originally intended to mat it with the black cs but the card stock was a little heavy so I decided to cut the excess out of the middle to reduce the weight of the overall card. While 'pulling my pieces' together, I laid the cut out panel on top of the calendar background and really liked how it looked ... Viola! Change of plans! LOL!
Here are the quick steps for making the background ...
I think the photos pretty well explain the process of making this background.
My background panel is 6" x 4 1/4" and my card base is 6 1/4" x 4 1/2".
You can decorate the front with whatever you wish!
I chose to fussy cut this cute image from the Crafty Secrets 'Altered Fairies' Creative Scraps sheet and pop it up on to an oval cut using a Spellbinder 'Oval Floral' die.
Oh, and the tree branch was cut out of the scrap piece of black using the Martha Stewart 'vine trim' border punch.
IF you have ANY QUESTIONS, please feel free to leave me a comment.
OKAY now it's YOUR turn!
You'll have one week to play along so be sure to pop on over to the Crafty Secrets Blog and
post any sample you have created using ANY Crafty Secrets product(s)
and receive a $6.00 coupon. You can enter up to 4 samples to increase
your chance to win the $50 gift card but only one $6.00 coupon can be
sent.
Need more inspiration you say?
Well check out what my amazing team mates have created ...
- Kathy Clement - Team Leader
- Vicki Chrisman
- Michele Kovack - See 295+ Gallery!
- Rebekah Faries
- Sheila Rumney
- Elizabeth (I love rubber) on Splitcoast
- Cherry Nelson
- JULIE CAMPBELL - Alumni (YEAH! glad you're with us today!)
Happy Crafting and Happy Day to each of you!
Thanks for stopping by and as always ...


Hi Darlene!! Happy New Year and all the best to you and yours in 2014!! I hope all is well!! This calendar post is fabulous!! We have had snowy weather so lots of shovelling and its VERY cold here!! Love all your recent creations!! Missing you!!
ReplyDeleteHey Dar! Wow! These cards are fantastic. Love everything about them. You are such an inspiration.
ReplyDeleteOh, Darlene...I love both of these fabulous cards, but the 2nd one is just off the charts! I love, love, love the way you created your background with the cut out calendar bits, and the black frame is so perfect. I love a good happy accident! Great photo tutorial, too! Thanks for sharing these wonderful projects with us!
ReplyDeleteIt shows you have to travel through life with your eyes wide open...there in front of you could be the perfect unplanned creation! I like both of your cards but the 2nd one is wonderful. Thanks for sharing.
ReplyDeleteHappy New Year!
Fantastic projects but adore how you have framed all those calendar images; very clever.
ReplyDeleteBeautiful creations, Darlene! Sorry I haven't been by for so long--life's pretty busy when your whole family is home with you all day every day! (it's a good thing--just not much of my own time!) Thanks for your visit today--hope your New Year is fabulous and filled with every good thing--and you can come visit any time (it's going to be in the 70's today!) Stay warm & toasty, my friend!
ReplyDeleteOH... awesome idea for a background too! Love it! Super cute!
ReplyDeleteDarlene, I love the layering calendar effect! What a great idea! Beautiful projects. Thanks for sharing.
ReplyDeleteHi Darlene, both of your cards are wonderful but I agree - I wouldn't have thought about layering the months and it's so perfect - it should be a piece of paper! REALLY, it's such a great idea Thank you for sharing!
ReplyDeleteSandy