ATTENTION PLEASE

** FYI **
Our LOVE THOSE PRETTY PAPERS blog has been hacked and we've had to start a new blog ... you can still enter our October challenge at the new blog. Here's the link: Love Those Pretty Papers

Monday, November 11, 2013

Jingle Bells, Jingle Bells ... OMG am I singing Christmas Carols already???

Good Afternoon Friends!

Would you believe they are calling for a couple of inches of snow here in NE Ohio tonight!  YIKES!  I'm not ready!  But, since I'm already working on Christmas Cards and humming Christmas Carols ... 
Maybe I'm more ready than I thought!  LOL!

I had a request for a few sets of Christmas cards, 
so I thought I'd share what I've been working on ...


  AND


I found both of these images over on Pinterest as free printables and I just love the 'vintage' Santa and think my customer will too.  Since I was able to fit 4 images on a page and printed 2 sheets ... that left me with 2 additional cards to create outside the 'sets'.

Here are the 2 'extra image' cards I created with my first Santa ...
(Click on any image to enlarge.)


 And, here are the two from the 2nd Santa ...

Can you see the sparkle on Rudolph's nose, around the image matting and under the row Martha Stewart border punch row of trees/snowmen?


I have used my new Heartfelt Creations HCPC 3557 Christmas Poinsettia PreCut Set and Coordinating Sun Kissed Fleur Die for my flower.  The greenery was created using another new (to me) die from Cottage Cutz #506 Ivy.
A little extra touch of sparkle has been added to this card as well, using Red & Diamond Stickles.

A few challenges I'd like to enter into are:
Addicted to Stamps Challenge - Punches & Dies (stamps used for inside verses)
Challenge 4 Everybody #33 - Anything Goes
Hobby Cutz #24 - Winter Wonderland and/or Glitter-Sparkle
Scribble & Scrap - Anything Goes
2 Sisters Challenge - Christmas Sparkle
Crafty Calendar Challenge - All things Christmas (entry #2)
Sister Act Card Challenge - Anything Goes

Thanks so much everyone for stopping by today and I hope you're having a FABULOUS week!!
Stay warm (or cool depending where you are, lol) and as always ...

Friday, November 8, 2013

WOW! What a challenge!!!

Hello my friends ... can you believe it's FRIDAY again already?
Where is the time going?

Anyways ... before I run out of time, 
I wanted to play along in the new PaperCrafter's Corner Magazine Monday Challenge.
Check out the magazine cover inspiration for this week ...

Papercrafting Inspiration: Magazine Mondays-Week Twenty-Nine Inspiration Piece (image)

WOW!  What grabbed your eye first?
THAT is typically how I play this fun challenge (won't you come join us???).

The first thing to catch my eye is the cover in the bottom right corner ...
The colors ... the butterfly ...
So, with that in mind, I reached for my ALCOHOL INKS and got busy!


I wish you could see this IRL ... it is SO PRETTY!
The alcohol inks have been applied to GLOSSY paper so they have such a beautiful shine to them.
For the butterflies I 'patted' the inks onto the paper and for my background (using the same applicator filled with the various inks) I 'swirled' across the paper.

It has been so long since I've played with my alcohol inks ... this was the PERFECT opportunity to blow the dust off and play!

I do hope you'll come join in this challenge.  
It is a TRUE INSPIRATION to see all the different and amazing creations this fun group comes up with using the exact same magazine cover.  AND for me, it's a plus because it truly makes me THINK about doing something different and as unique (hopefully) as the magazine covers themselves.

Have a great day ... and a fabulous weekend ahead!
As always ...
Thanks so much for stopping by and ...


Papers:  white cs, glossy white cs, black cs
Accessories:  Tim Holtz Adirondack alcohol inks (Stream, Wild Plum, Butterscotch), Tim Holtz applicator with felt pads, Spellbinder Nestabilities 'Fleur De Lis Squares', Cheery Lynn Designs (DL161) Small Lace Faerie Queen w/Angel Wing die, purple gem, scallop decorative scissors


Thursday, November 7, 2013

Joan's Gardens Challenge

Good Afternoon my friends!
Yep ... I have a second post for you today!

Today begins a new challenge over at Joan's Gardens and she's really been giving me some awesome, creative, new techniques to play with lately and I'm really thrilled with how today's card came together!  
What do you think?

Now, how cute is this!
And,  I would have never thought to use the NEGATIVE of a die cut!!!
(looks like I'd better start digging through my paper trash)
Yep ... that was one of the requirements for this week's challenge!

Here's the entire requirement list:


  • Use Red, white and a hint of Green
  • Use the negative of a die cut
  • Use snowflakes (any kind works)
  • You must use a product sold at Joan's Gardens.  Also, mention that you are doing the card/project for Joan's Gardens Challenge. It would be nice if you would add this link to your post: www.atjoansgardens.com

  • Would you believe, all the pieces to this card were pieces I had laying on my work table from other projects I was making for my craft shows that I didn't use.  
    LOL ... it was like when you make dinner from whatever you have left over in the fridge!

    My cute image is one from the Crafty Secrets Christmas Booklet that I had cut to use on Hershey Bar pouches.  The 'Merry Christmas' sentiment is from the Cheery Lynn Designs (B186) die set.  I had several cut in different colors that I've been using for various projects.   My white background panel has been embossed using the Cuttlebug snowflake embossing folder.

    For my NEGATIVE panel, I die cut a piece of white cardstock with the Cheery Lynn Designs (B148) Holly Flourish then glued it down to a piece of green cardstock.

    How about those cute little gingerbread people ... they were actually fussy cut from a scrap piece of Martha Stewart design paper that was used for another Hershey Bar pouch and one was
    popped up using x-Press It Foam Mounting Tape.

    A couple other things used on this creation are green & waterfall Stickles, two different Martha Stewart snowflake punches and holiday rik-rak from Michaels.

    Thanks so much for taking a peek and I hope you'll come join in on 
    Joan's Gardens weekly challenges!  AND, there's a PRIZE to the winner!
    (items in RED were purchased through Joan's Gardens)

    A few additional challenges:
     Fab 'n' Funky Challenge - Traditional Christmas Colors
    Inky Impressions - Dies and Punches
    The Paper Shelter #136 - Winter Fun (Christmas Shopping)
    Stampavie & More - Die Cut Embellishment
     Holly Jolly Christmas - Traditional Colors
    Created With Love - Christmas Reds and Greens
    C.R.A.F.T. Challenge #232 - Christmas

    ONE MORE THING BEFORE YOU GO ...

    Just wanted to share with you the first Teddy Bear purchase I made for granddaughter, Morgan's 
    Christmas Teddy Bear Drive for Akron Children's Hospital and now Pittsburgh Children's Hospital.
    (read more on Facebook HERE)
    If you follow my blog, you know that all the proceeds from last week's craft show is going towards 'teddy bears for the kids' and this is just the first 'installment'!!  We still have $400+ to spend ... yeah! BUT, we need 700 bears so if you are able to help, please drop me an email/comment.

    ** Three more bears are on their way from Amazon.com purchased with my winnings over on the "A Look Through My Eyes" blog for the Angela Holt Designs Blog Hop recently.

    ** Sandy Redburn (owner of Crafty Secrets) has also donated money towards the purchase of teddy bears!

    Thanks so much everyone!
    Now I'd better get back to crafting ...
    I got a call today for some 'special' creations ... I'd better put my thinking cap on for this one!
    As always . . .

    Shelly's Images Challenge

    Good Morning All!

    It's time for a new monthly challenge over at Shelly's Images 
    and our November Challenge is:

    GIVING THANKS!

    What are you thankful for today?
    I think I am most thankful for my wonderful husband and amazing family!  
    Without them my life would have no meaning!

    Using Shelly's 'Thanks' image.

    I just love the colors of Fall and this fun image by Shelly worked out perfectly for my very FALL THANK YOU card!  I've embossed the background with a Cuttlebug embossing folder and was actually using up some left over leaves/bow that were on my worktable.  Coloring was done with Spectrum Noir alcohol markers and a little fussy cutting I felt was required to really make this sentiment POP!

    With Thanksgiving only a few weeks away, I also wanted to make a card to send to dear friends of ours so
     I decided to use two more of Shelly's Images ... Pilgrim Girl and Thanks Sentiment 2.


    This image was also colored with Spectrum Noir alcohol markers.  I chose to mat my image on extra long black cardstock, the simply wrapped, twisted & tied in a bow two narrow satin ribbons for my embellishment.   Viola!  Card complete!

    A few additional challenges:
    Crafting for all Seasons Challenge - Autumn Colors
    Crafty Creations Challenge #247 - Autumn Colors
    Divas By Design - Use A Digi
    Cuttin and Stampin Challenge #44 - Giving Thanks
     Scrap Creations - Giving Thanks
    Victorine Stamps #71 - Fall/Thanksgiving
    2 Creative Chicks #8 - Thanksgiving

    I hope you'll come join in our GIVING THANKS challenge at Shelly's Images!  Remember, you have the ENTIRE MONTH OF NOVEMBER to play along with a chance of winning FREE Shelly's Images.

    See you there!
    As always ...

    Wednesday, November 6, 2013

    Trees, Trees, Trees

    Happy Hump Day All!

    Well I'm finally rested up from last weekend's craft show and with a sympathy card request in mind, today I decided to play along with the latest challenge over at CRAFT A SCENE.  
    As my title reflects, the challenge theme is Trees, Trees, Trees.


    When I am in need of a masculine card, I typically turn to my Stampscape stamps.
    That's exactly what I've done here ... I will list all products used at the end of this post.

    And, speaking of trees, we have so many beautiful trees turning color right now in our neighborhood and here is a 5 year old maple hubby & I planted in our back yard.  It is one of the last to turn color and it's just amazing to watch it transform through the fall.
    If all goes as planned, I will be back in a week or so with the FINAL color transformation photo of this same tree. It's just gorgeous when it's in Full Color.


    With Winter upon us, the squirrels in my small back woods have been extremely busy stocking up for the cold days ahead.  And if the amount of nuts, etc. they've been burying in my backyard is an indication of what the temperatures and duration of the coming winter will be ... OH DEAR!  We are in for a long, cold winter!  brrrrr!

    I snapped this photo just an hour ago looking out through my kitchen sliding glass door.  Sorry it's not the greatest ... still getting used to taking photos with my phone!  Anyways ... these THREE guys were busy scarfing up the sunflower seeds that landed on the ground when Mr. BlueJay (too heavy for the plate he was perched upon) on the one side of the plate feeder and knocked it down.

    Here are a few additional challenges:
    Crafty Sentiment Designs - For the Guys
    Loves Rubber Stamps - Anything Goes
    Papertake Weekly -  Anything Goes
    Sweet Stamps - Nature
    Twisted Tuesday Challenge - Anything Goes

    Thanks so much for stopping by today!
    I hope you're having a FABULOUS DAY!
    As always . . .

    Papers:  Medium Blue card stock, Kraft card stock, Black card stock
    Stamps:  Stampscapes Lakeside Reflections Lg. (051G), Pine Row (150E),  The Stamp Pad Co. (sentiment)
    Ink:  Versafine Onyx, SU River Rock (inside)
    Accessories:  Spectrum Noir alcohol markers, Gelly Roll White (faux stitching), Offray dark brown satin ribbon

    Monday, November 4, 2013

    SFC4413 - Hip To Be Square

    Hello my friends ... I'm back once again to share with you the new challenge over at Squigglefly!

    (Please scroll down for the November Crafty Secrets Linky Party-DT Challenge)

    Today it's the Hobbyist turn to share fun & inspiration with you so please be sure to pop over and see what my team mates have created for you!  And then, of course, come join in the fun!


    For my card I have combined two images together in Word10 to create my focus/sentiment image.  The adorable Christmas Fairy is by Cheryl Grant Alger and this awesome sentiment called Elf Food is by a new to the group artists - Carmen Gamble.  Please be sure to check out the amazing images these ladies have for sale over at Squigglefly.  I'm sure you'll find something to fit your card making needs!

    For my background, I have actually pulled some scraps from my worktable.  As you know I've spent the past couple of weeks working on craft show projects.  My 2nd show was this past Saturday ... was an AWESOME show!  And my last show for the year is on the 30th.

    I've used the largest die in the Spellbinder  'Fleur De Lis Squares' die set for the backing on my focus image.  Coloring was done with Spectrum Noir alcohol markers and the icicles were created with the Martha Stewart icicle border punch.

    I'm really pleased with the outcome of this card and hope you like it too!

    A few additional challenges are:
    TokBobok #6 - Christmas
    Bloggers Challenge - Things with Wings
    Brown Sugar Challenge - Things with Wings
    Card Crafter's Circle #99 - Cute Cards
    Polkadoodles - Anything Goes Christmas

    Thanks so much for stopping by today and PLEASE come back again soon.
    As always ...

    Crafty Secrets November Linky Party - DT Challenge

    Happy Monday Morning my friends
    and Happy November!  

    Did you remember to turn your clocks back yesterday??

    Before I share today's creation with you, I want to express a warm welcome to a NEW MEMBER of the Crafty Secrets Design Team ...
    Cherry Nelson
    please be sure to check out her work and show her some love.

    Now ... as you know (and I have mentioned more than I'm sure you wanted to hear, lol) I have spent a lot of time lately working on projects for the Fall Craft Shows I participate in.  I may have shared this with you last year (didn't take time to look back) but hopefully you won't mind me sharing this project/tutorial with you once again.  These were a huge hit at the craft show I did this past weekend ... they make wonderful stocking stuffers.  
    I'm talking about Hershey Bar Pouches.  Crafty Secrets has some AWESOME Christmas images and digital papers available that work perfectly for this project.  Here's a few of the ones I made for the show:

    Let's get started!
    HERSHEY BAR POUCH TUTORIAL

    Products you will need:

    STEP 1:
    Cut your base pouch card stock 7 1/2" x 6 1/2"
    Laying your cardstock on your scoring board with the 6 1/2" side along the top ... score at 3" and 6" ... this leaves 1/2" along the end for the closure.


    STEP 2:
    Along the bottom and the 1/2" panel, place a strong adhesive such as Scor-Tape or Red Line Tape.
    You can either adhere your pocket together now ... or wait until you've added your decorative front panel.

     STEP 3:
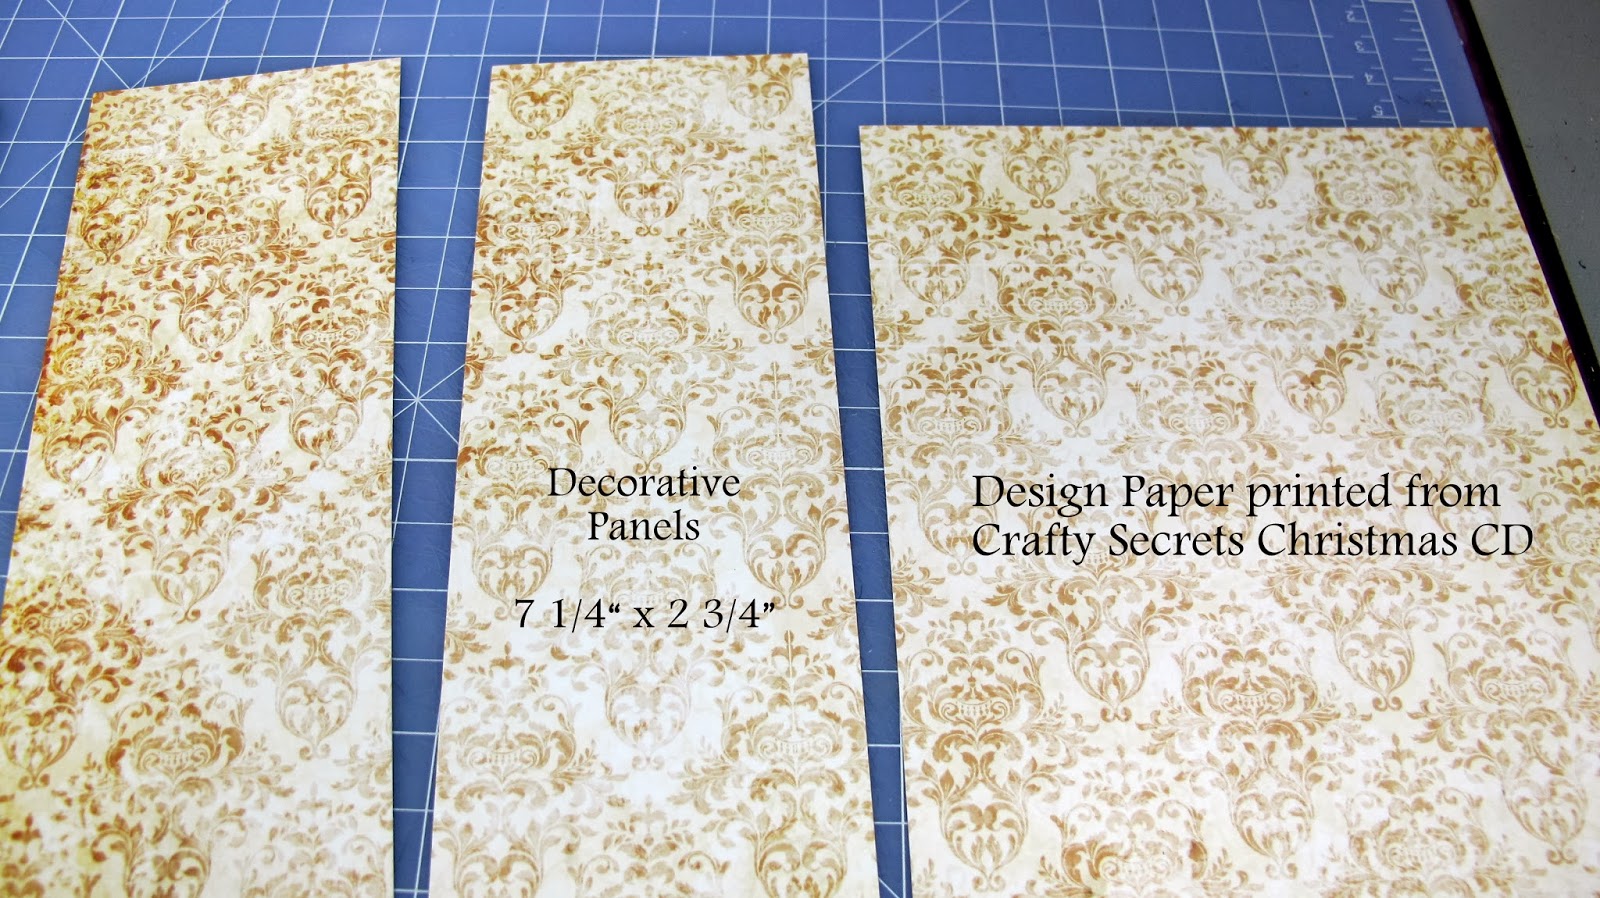
    I have printed my own design paper using one of the many beautiful selections available
    You can chose to decorate both sides or just the front ... choice is yours!
    The decorative panel is cut at 7 1/4" x 2 3/4".


    STEP 4:
    Next you will need a hole at the top for your ribbon.  You can use what ever circle or slot punch you have available.  I've used a 1/2" circle punch but a slot punch works great too.  Be sure not to punch the hole too close to the top or it will tear through when you are tying your Hershey Bar inside.

    STEP 5:
    Cut your ribbon at 30".  
    I have used organza ribbon but you can use what ever ribbon you like best.
    Run it through both holes ... one side to the other.  

    STEP 6:
    After decorating the front of your pouch ... as plain or fancy as you'd like,

    slip the Hershey bar inside (between the layers of ribbon) and push down to the bottom of the pouch.

    FINAL STEP:
    Tie a bow on the top.
    Pull up with the bow/ribbon to expose the hidden Hershey Bar inside.
    These pouches are great fun to create and with all the amazing images/sentiments and papers available at Crafty Vintage Girl, there is no end the fun themes, designs you can create!

    How awesome would these be for your Trick or Treaters on Halloween (that is if you don't get 200 kids like I do ... lol).

    Even an awesome Masculine treat for that special guy in your life or even your husband ... LOL I'm kidding ... just seeing if you're still with me!  LOL!

    Well, that's it for me today!
    I hope you'll give this fun project a try and if you do, drop me a comment or email letting me know.  I'd love to visit your blog and see what you've created!

    A few additional challenges:
    613 Avenue Create #44 - Anything Goes no Twist
     Challenges 4 Everybody # 32 - Anything Goes
    A Gem of A Challenge - Christmas is Coming
    Allsorts Challenge - Christmas Cheer
    Crafty Calendar Challenge - All Things Christmas


    And, don't forget to check out the AMAZING creation/tutorial my team mates have to share with you!  Here are their links:
    Vicki Chrisman Design Team Leader
    Cherry Nelson  - New DT Member!

    Until next time and as always ...

    Sunday, November 3, 2013

    FABULOUS Craft Show ... QUICHE Recipe and a HUGE THANKS!

    Happy Sunday Afternoon My Friends!

    WOW!  What an amazing craft show yesterday!
    As I shared in my last post, I made the decision to donate all my proceeds from yesterday's show to my granddaughter, Morgan's Christmas Teddy Bear Drive for Akron Children's Hospital.  She needs 400 teddy bears to be handed out to the children on Christmas Eve.
    (More information about this cause can be seen on FB ... here's the link.)

    This was my table set up for the show ... lots of goodies to be purchased!

     One of my big sellers yesterday were my Tissue Box Covers.  You can see a tutorial on this wonderful project on my blog post HERE.

    I had a variety of themes for this show:
    Christmas ... Breast Cancer ... Dogs ... Cats ... Monkeys ... Horses ... Music ... Sports ... Baby ... Dancing ... Kitchen ... to name just a few!

    Yesterday, A VARIETY sold ... no one theme in particular!


    On this end of my table, I shared a few new items this year.  My BIGGEST SELLER were my Hershey Nugget Boxes ... 8 nuggets in each box. (Here are past posts about this project ... HERE and HERE.)  I had made 66 and came back home with only 6!  I could have sold more if I had made more Christmas theme.   Half of what I made were for Christmas but they sold out fast ... I also had some stamped for "Teacher's Treat" and others that were everyday!

    This year I decided to put all my novelty items on the FRONT table and my cases of cards on the SIDE table.

    I'm always amazed at the fact that I have 'repeat' customers come back for my cards every year and their comments are so heart warming!

    I also had Tags, Kleenex Travel Pack holders (tutorial post HERE), Kids Kard Kits, Bargain Bag (older cards from my stash that I sold 10 cards for $5 ... sight unseen), Hershey Bar Pouches [ANOTHER BIG SELLER ... sold out ... 22 made].

    WOW!  Like I said ... it was a FABULOUS DAY!
    Now, are you ready to hear how much money we made to go towards buying bears for the 
    Christmas Teddy Bear Drive???

    *** DRUM ROLL PLEASE ***

    $550.00

    Can you believe that!  How wonderful ... people opened their hearts and their wallets for this cause and I (we) can't thank them enough!  This will truly help put a dent in the need for 400 bears!  WOW!  I am still in shock ... what a blessing!!!  God Bless You All!!

    On another subject ...
    The other day I shared this photo of the awesome Quiche my hubby made us for dinner (I was busy crafting for the show ... no time to cook ... LOL).  Well, I've had several requests for the recipe and since he kind of MADE IT UP using a couple other recipes and ideas of his own, it took him a little time to put it down on paper.  Since he was 'home alone' yesterday, he got it put together for me and I'd like to share it with you!

    Easy “Cleaning Out the Refrigerator” Quiche

    I used a combination of cauliflower and broccoli florets, red onion, mushrooms and bacon, as well as, a combination of shredded provolone-mozzarella and shredded cheddar cheese because that was what was in the refrigerator.  But any combination of veggies and cheeses (swiss, cheddar, gruyere) should work just as well, pick what you like.

    Ingredients:
    Cauliflower and broccoli florets (approx. 4 cups)
    8 slices bacon (approx. 6 ounces)
    4 ounces mushrooms, thinly sliced
    Chopped red onion (approx. 1/2 cup)
    1 clove garlic, minced
    1-1/2 cups of milk
    1-1/2 cups of shredded cheese
    4 eggs, beaten
    2 tablespoon butter
    2 tablespoons freshly grated Parmesan cheese
    Salt and pepper to taste

    Directions
    Preheat oven to 350 degrees F.
    Briefly steam the cauliflower and broccoli (approx.1 to 2 minutes) and set aside to dry.
    Fry the bacon until just crisp. Transfer to paper towels to drain.
    Sauté the red onions and mushrooms in the bacon drippings until the onions are tender and the mushrooms start to brown.  Add the garlic and remove from heat, cool slightly.
    Brush a 9-inch glass pie pan with the butter and sprinkle evenly with the grated Parmesan.
    Arrange the cauliflower and broccoli in the bottom of pan and sprinkle with salt and pepper, to taste.  There should be enough to cover the entire bottom.
    Layer the red onions and mushrooms on top of the cauliflower and broccoli and top with the crumbled bacon. 
    In a large glass measuring cup or bowl, whisk together the milk and eggs and season with salt, and pepper to taste. Blend in the shredded cheese and pour the mixture over the fillings.  Shake the pan as needed to ensure that the custard mixture is evenly distributed,
    Bake in a 350 degree oven for about 50 minutes or until the quiche is just set in the center and the top is golden brown.  ENJOY!

    So there ya have it!
    Thanks so much for stopping by today ... hope you're enjoying your weekend and again
    THANK YOU
    to anyone and all who are helping provide teddy bears for the children of Akron Children's Hospital this year!
    As always ...

    Friday, November 1, 2013

    GIVING BACK ... *** U P D A T E ***

    Good Evening All ...

    While packing up all my paper craft goodies for tomorrow's BIG craft show at the local high school, 
    I came up with a grand idea!  

    So, I quickly typed up this flier ... placed it in a frame and it will be sitting on my head table at tomorrow's show ... here's what it says:


    If you are interested in making a donation of cash towards the purchase of a new teddy bear or sending along a teddy bear (any size) ... I will be sure it goes in the donation box allocated for Akron Children's Hospital.

    Morgan is also collecting for the Pittsburgh Children's Hospital.  
    I am SO PROUD of her for doing this and want to help however I can.

    Best get back to packing up my car.  
    It's a very EARLY start tomorrow morning.

    *** UPDATE ***

    Yesterday's craft show was AMAZING and WONDERFUL!  So many generous people and they all stopped at my table!  LOL!!

    I'm proud to announce we sold $550 worth of paper craft items and it will all be going towards buying bears for this wonderful cause my granddaughter is sponsoring!!

    I'm thrilled to tell you we also had a monetary donation from Crafty Secrets!

    And WAIT there's more!  I won last week's blog hop for Angela Holtz Designs, over on Deb's Blog ... which is a $20 Amazon Gift Card and YEP that too will go towards the purchase of more teddy bears!  AWESOME!!!


    Thanks for stopping by and wish me luck tomorrow!!
    As always . . .