
Hi everyone!
I've been having SO MUCH fun with the newest digital line at Crafty Secrets. It's their new SEWING line and there are so many wonderful papers, printables, ephemera and much, much more, that you'll want to pop right over to the Crafty Vintage Girl shoppe and check it out for yourself!
 |
| All page photos at bottom of this post. |
Recently a friend of mine (thanks Judy - Back Porch Crafts by Judy) was showing me how she had folded double sided 12x12 size papers to create a FABULOUS pocket book. While playing with those papers a light bulb came on in my head and I thought ... why can't I print out the beautiful papers from Craft Secrets and make a smaller version of this pocket book ... so I DID and would like to share the book & tutorial with you today and hopefully you will be inspired to give it a try!
(CLICK ON ANY PHOTO TO ENLARGE)
STEP 1: CREATING THE PAGES
I decided to have 5 pages in my book so I printed out 5 different paper patterns from the Digital - Sewing Papers -DP-07 plus one more sheet to use on my front & back chipboard covers.
- After printing my papers, I cut the 8 1/2" side to an even 8" just to make the measurements easier.
- Score vertically at the half way point (4") and crease well with your bone folder.
- Then turn your paper and score again at the horizontal half way point (5 1/2") and again a quarter of the way up from the bottom of your page at (2 3/4").
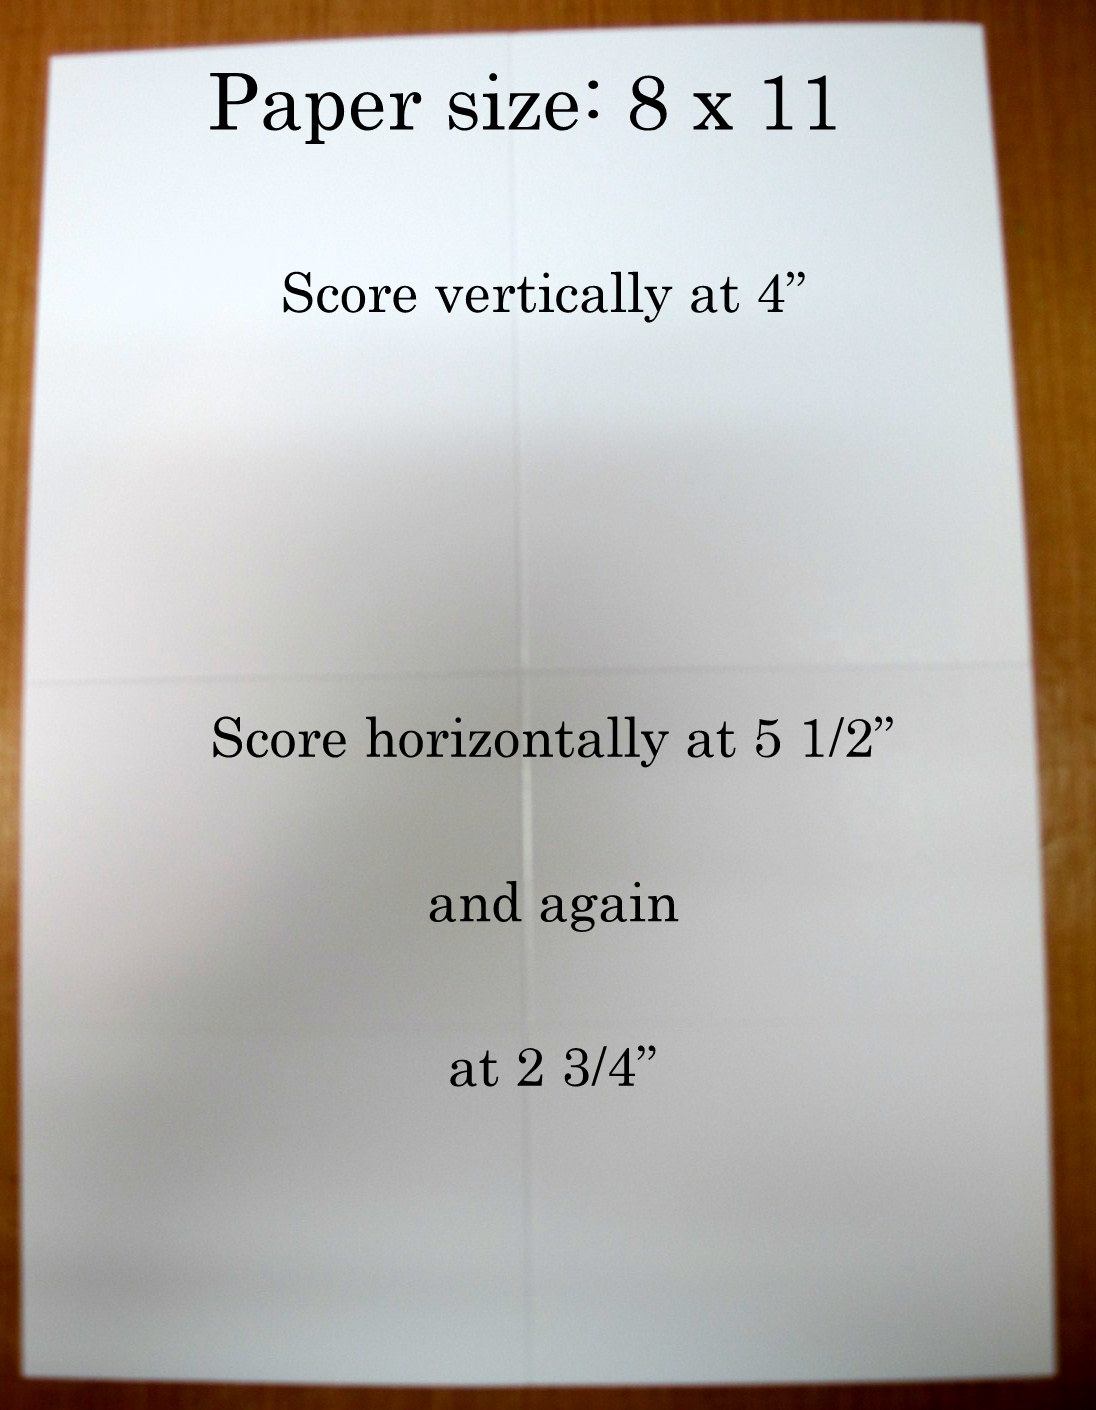
Be sure to FOLD & CREASE each score line very well.
- Now, turn your paper over so the print side is facing you ... fold the bottom up to the top (crease on the half way score line) then fold back down at the 1/4 score line and crease again.

This next step is a little tricky but once you get it you just repeat it on each page.
This step will create a DOUBLE pocket on the left side of our book
(you can do both sides if you'd like).
- On the lower quarter portion of your pocket page, fold down from the left top corner to the bottom to create a triangle (as shown below). Crease WELL with your bone folder.

Now lift that flap back up and 'turn inside out' to form the double pocket and crease well.

(side view)

(looking from the bottom up view)

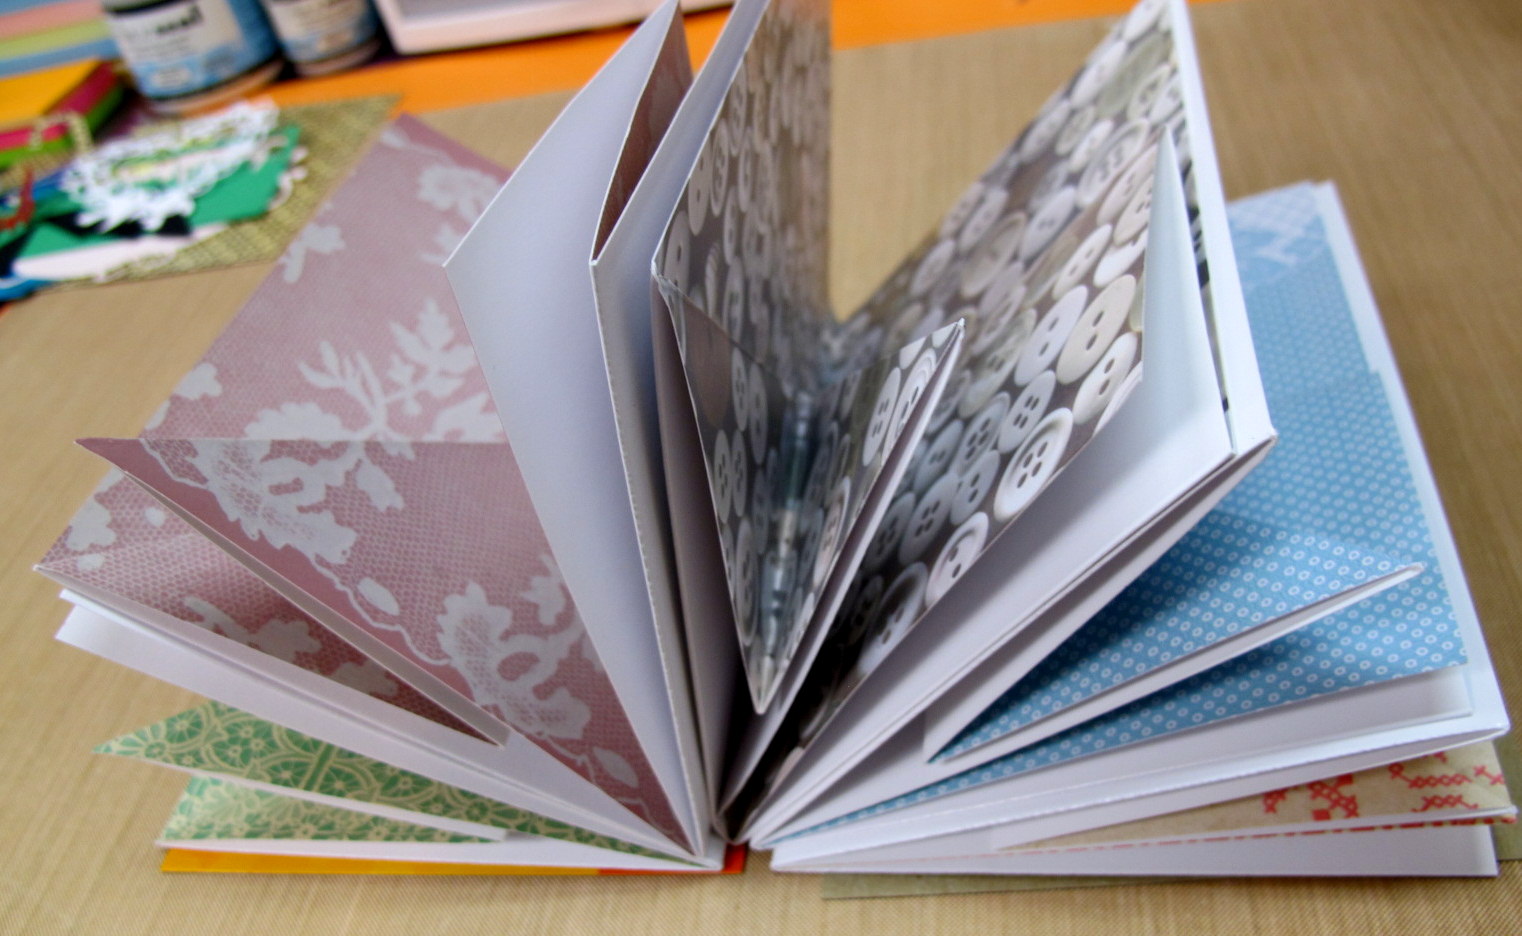
Here are the pages all folded (not taped yet) for my book.
- After you have your paper folded to create the pocket, you will want to use a strong adhesive like Scor-Tape or RedLine Tape to adhere the bottom panel (as shown below) . . .

- As well as the full single pocket end on the right side of your book pages. I didn't think to do that until I had my pages all put together ... DUH! LOL!

STEP 2: BUILD YOUR BOOK, COVERS & CLOSURE
I save all the heavy duty cardboard from things like cereal boxes or in this case, a large pack of Puffs Basic Tissues from the Wholesale Club! The work perfectly for making covers for this type of project.
I have kept the PRINTED side to be taped down to my pages and used the cardboard side to cover for my front/back covers. After choosing/printing the digital paper I wanted to use, I cut it to 8 x 11" ... then cut it in half ... then in half again to give me my 5 1/2 x 4" panels. (And of course this leaves me two additional panels for the covers on another pocket book.)


Time to put our 'pages' together to create our 'book'.

Using a strong tape (I've used Scor-tape) adhere the 'back' of one page to the 'front' of another. Be sure you have all your pockets at the bottom of your book when adhering your pages together or you will have a problem (ask me how I know ... teehee!).

This is what your 'book' will look like once adhered together.

Now it's time to put on our cover & ribbon closures
- Cut your ribbon 'triple' the length of your front/back covers to allow length for tying. In this case, I have used TWO strips, each 24" long.
- Measure a quarter of the way down from the top & up from the bottom and draw a line on the INSIDE of your cover.

- Place a strip of Scor-tape the length of each marked line.

Below photo is the BACK COVER of your book.
- Position your ribbon (leaving the length for tying) on your adhesive strips.
- Then position adhesive strips around the outside perimeter of your cover.
- Adhere to the BACK of the LAST page of your book.

Below photo is the FRONT COVER of your book.
- Position a strip of adhesive a 1/4 of the way down from the top & up from the bottom and adhere your closure ribbons,
- Place adhesive strips around the perimeter of the FRONT cover and position/adhere to the front of the first page of your book.

This is what it will look like once your covers have been attached.


NOW THE FUN BEGINS!
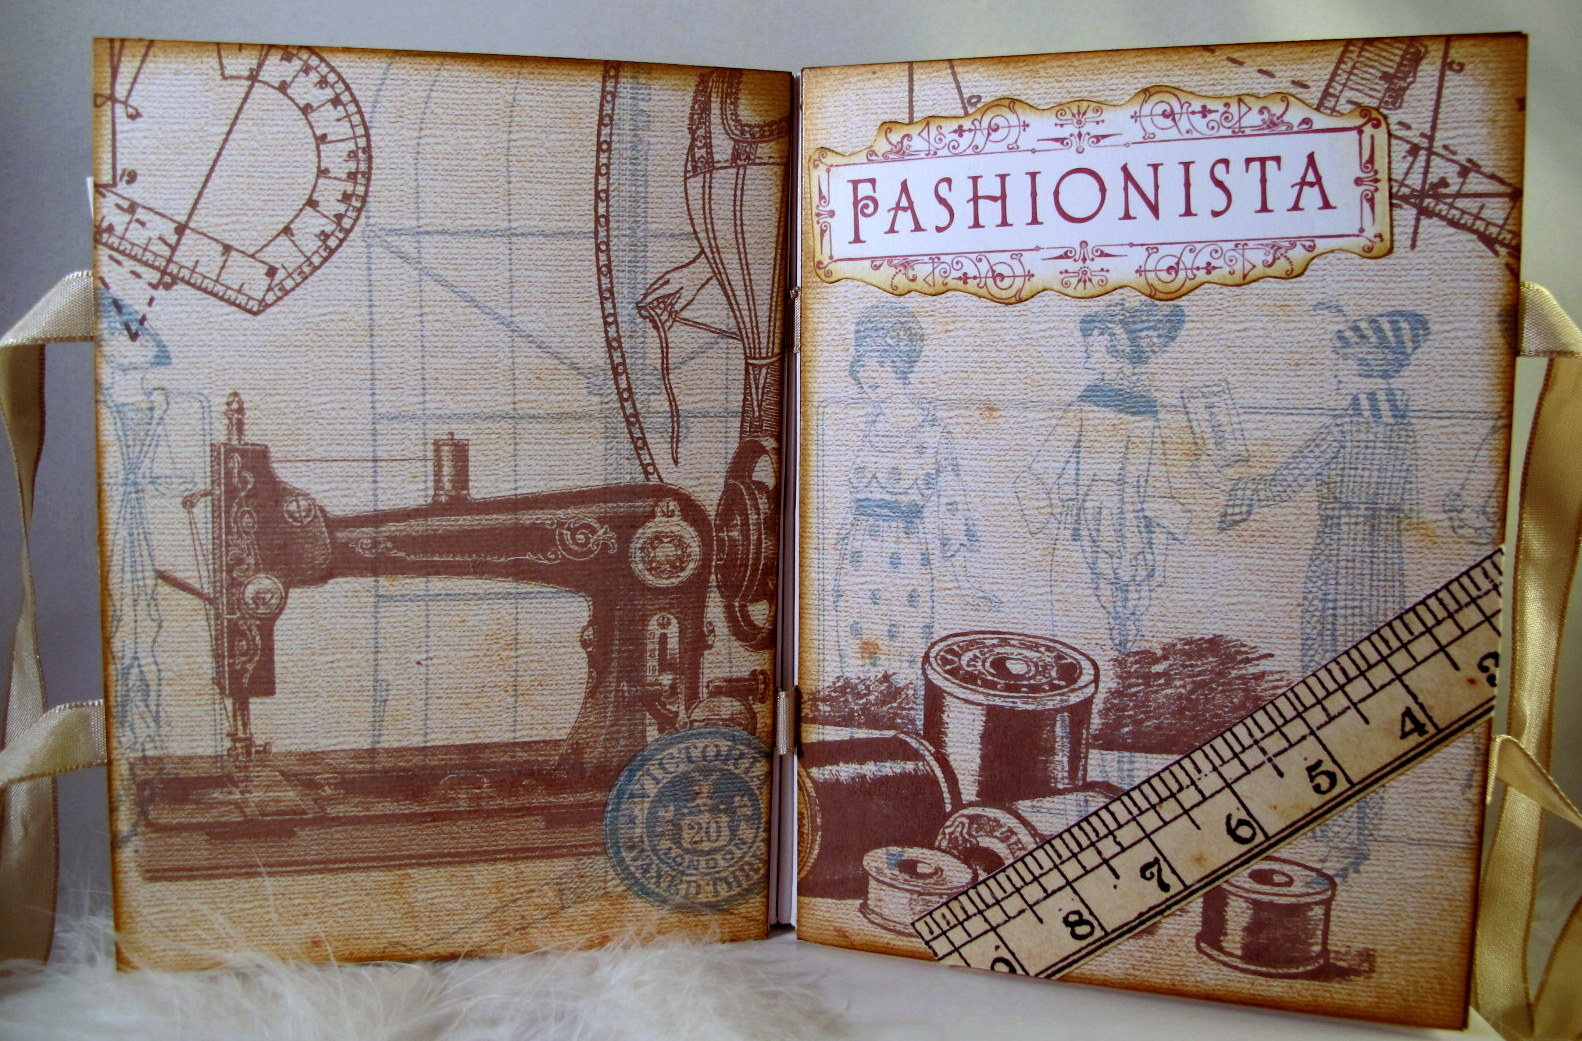
This new sewing line offers SO MANY wonderful ephemera that you can add to your book as well as you can add your own touches with lace, ribbon, stick pins ... the possibilities are endless. Below are the pages of my book using items from various files in this sewing collection. If you need specific details please leave me a comment and I will get you an answer.


Thanks so much for stopping by today and I hope you've enjoyed this project/tutorial.
Here are a few other challenges I'd like to enter into:
Our Creative Corner - Fashion & Style
Hotshot Craft - Anything but a Card
Jellypark Challenge - It's About a Book
Craft-room Challenge - In the Library
Party Time Tuesday - Anything But a Card
Through the Craftroom Door - Anything Goes
Tuesday Throwdown - Fancy Folds
Artistic Inspirations - Anything Goes
Craftin Desert Divas Linky Party - Use buttons
The Crafty Bloggers Network - Anything Goes
Mema's Crafts - April Anything Goes
Mygrafico - Anything Goes
UnstampaBelles - Anything but a Card
AS ALWAYS . . .


Fabulous book, Thanks for the tutorial. Thanks for linking up with Craft It up & Link It Up
ReplyDeleteHave a great day.
Hugs Nana
♥ My Crafting Channel ♥
♥ 2 Creavtive Chicks ♥
Wow! That is just wonderful. Such pretty papers. Thanks for joining us at Craftin Desert Divas "Button" Linky Party. Hope you will join us again.
ReplyDeleteTara
Oh wow this is just awesome. You tutorial is amazing and its such a wonderful gift idea. Loving the vintage sewing theme. Thank you so much for all the time and effort you put into the tutorial and sharing it with your bloggy friends. Xxx
ReplyDeleteHugs Desíre {Doing Life}
That looks so awesome. Just love it.
ReplyDeleteHugs Miranda
Pkay, this is waaaaaaay too cool!!! Love the papers and all the Crafty Secrets "stuff"....you mmake it look so easy, so easy that I just got all my papers folded and ready to adhere...but the rest will take me awhile I'm sure...thanks for sharing the tutorial..and nice talking with you today...hope you found the book!!
ReplyDeleteand I can't spell...lol
ReplyDeleteWow this is wonderful and I am definitely going to give it a try! Your book is gorgeous and I am so glad you stopped by Mema's Craft and shared this with us.
ReplyDeleteHugs
Lesia
Don't forget to enter the giveaway if you haven't already and of course if you'd like.
Wow, fantastic book you made, I will look more closly how you made it later! =)
ReplyDeleteHugs, Elenor
Love, love, love this!!! I sew and I just think this little book is darling!
ReplyDeletePam
scrap-n-sewgranny.blogspot.com
Oh wow, this is fantastic, I love how you've done this, and will try to give it a go! The papers are gorgeous, btw. Thanks for joining in with our "In The Library" theme over at the Craft-Room.
ReplyDeleteMaria x
Those are some fancy folds. I will have to try this one. Thanks for playing with us at Tuesday Throwdown this week.
ReplyDeleteA lovely project and a great easy-to-follow tutorial. Thanks for sharing with us at Unstampabelles.
ReplyDeleteLove your project! The decorations are so pretty. It reminds me of the star books I used to make. Thanks for playing along with us at PTT.
ReplyDeleteKim - PTT DT
Delightful book, jam packed with wonderful things to discover and admire. Thank you for the tutorial and thank you for sharing with us at Craft-Room Challenge XOXO Zoe
ReplyDeleteCool book, Dar! Thanks for the fab tutorial. Love the papers you've used. Hugs from FL
ReplyDeleteAbsolutely fabulous. Thank you for showing us how to make it - I will give it a go. Thank you for joining us at Craft Room challenge.
ReplyDeletexxx Hazel.
absolutely love it! great tutorial!
ReplyDeletehugs :)
This is one amazing project! I love every detail and must try it. Thank you so much for sharing your fantastic work with us at TTCRD this week.
ReplyDeleteWow Darlene. What a fabulous card,and the tutorial is much appreciated and I for one will be giving this a try. Thanks for Sharing. Hugs Rita xx
ReplyDeleteWhat a gorgeous project! I love all the details and the selection of papers. Thanks for playing along with us at Our Creative Corner this week!
ReplyDeleteStunning every bit of it. TFS the tutorial.
ReplyDeleteHow fun! Thanks for the great step out. Fab design, and your finished product is wonderful.
ReplyDeletethese are great little fun books to make, and yours is a beauty, thanks for sharing with us at the craft room challenge, debi x
ReplyDeleteThis is one amazing project! Stunning design. Great tutorial. Thanks so much for sharing with us at OCC this week.
ReplyDeleteThis is amazing!!! Thanks for the great tutorial! A lot going on here lately but I wanted to stop by and say Hi to my sweet sweet friend : )
ReplyDeleteHi Darlene, yes - everyone is right, your album is AMAZING as well as all your step by step instructions and photos! I added it to our Pintrest boards and to the Blog Post I'm doing. When my computer went in for repairs this week I missed this post and we were working on some mini album journal pages to add to the Sewing CD we keep getting requests for (it will have the papers & Ephemera) - so I'm going to be sending you some more pages and think the journal ones will be great to add. Fabulous job and thanks for sharing
ReplyDeleteSandy
Wow, this is fabulous, Darlene! Great tutorial and wonderful elements.
ReplyDeleteThis album is fantastic and I do want to give it a try! Question, when you copy off the papers from Crafty Secret, what kind of paper do you use? I am assuming something a bit heavier than regular copy paper. Is there a certain brand that you use? My copier will only handle a lightweight card stock ...that is the heaviest that will go through it and most times I have used that to copy off the papers that I have used. Thanks for addressing this question. Again, a great project.
ReplyDeleteThanks so much for your kind comment and glad you like my project. Yes I have used 80# weight paper. Regular copy paper would be too light weight. There is no certain 'brand' of paper. I get my paper from a paper company here in Ohio called Hollo's and can purchase it for $1.50 a pound. But, you can get heavier weight paper anywhere from WalMart to our office supply stores like Staples. Of course you can always purchase online also. My printer has a rear feed as well as the front feed for the regular printer paper. I put my heavier papers through the rear feeder. Hope this has helped answer your questions.
DeleteThis is so adorable, Darlene! Thanks much for sharing the tutorial. I will have to try making one of these sometime.
ReplyDeleteHi Dar!
ReplyDeleteWanted to check out what's going on at CS's and there you were! This is beautiful! I want to recreate it. I am doing CTMH, but as it turns out, I am enjoying teaching way more than selling products. If CTMH doesn't last for me, I will continue to teach. Love vintage, and Crafty Secrets is my fave. Thanks for the amazing book. Great to see you!
Hugs...
Love this book, just what I've been wanting to make! Thanks for the inspiration to get going on it.
ReplyDeleteI found your blog via Pinterest and I just love this book. I am finding it a bit difficult finding my way around the site with the digital images and wondered if you could please tell me what I would need to order to make a book like yours. Is everything you have used in your book available in a downloadable form?
ReplyDeleteThanks
Chris
Hi Chris,
DeleteIf you go back to Step #1 of my tutorial, there is a link directly to where you can purchase the downloadable papers from the CS store. To find the items I've used to decorate my booklet, just do a 'search' on "sewing" once you are in the store and it will bring up all things available in that sewing category. Hope this helps and please feel free to email me at akadafney@yahoo.com with any additional questions.
Thank you Darlene :)
Delete