ATTENTION PLEASE

** FYI **
Our LOVE THOSE PRETTY PAPERS blog has been hacked and we've had to start a new blog ... you can still enter our October challenge at the new blog. Here's the link: Love Those Pretty Papers

Saturday, March 8, 2014

Easter Greetings

Happy Saturday Everyone!
This morning I finally got around to creating a card for the new challenge over at Craft Hoarders Anonymous.  The theme for this challenge is Vintage/Retro and Graphic45 is their sponsor!

Well, you know I LOVE Vintage design and Graphic45 is one of my favorite vintage style design paper companies so this challenge was right up my alley.  Although I must say, I didn't have to put a lot of effort into this card!  All the 'pieces' came from the Graphic45 'Sweet Sentiments' and 'Secret Garden' 8x8 paper packs.  A touch of gingham ribbon and pop dots was pretty much all that was required to put this card together!


How quick/easy & awesome is this!
With doing an unexpected craftshow in a couple of weeks, I'm scurrying about trying to be sure I have enough SPRING styled cards ready so I think I'll be 'whipping up' a few more of these beauties.

With all the square cuts, I wanted to add a little more dimension, so I tucked the lower corner images up underneath the focus image and POPPED up the Easter greeting panel. The gingham ribbon was tied around the 1st layer of matting and by moving the pop dots back a bit on the focus panel, it gave room to tuck in these adorable ticket panel images.

I also overlaid another one of the 'ticket' images in the upper right corner.  
What do you think?  
It has actually taken me longer to type up this post then it did to make the card!  LOL!

Here are a couple more challenges I'd like to share with:
The Outlawz Twisted Thursday Challenge - Anything Goes twist/favorite color (purple)
Your Next Stamp Challenge - Photo Inspiration
Annabelle Stamp Challenge - Color Inspiration
Sister Act Challenge - Anything Goes
Crafty Girls Challenge - Anything Goes

Thanks so much for stopping by!
Hope you have a fabulous weekend!
We have some Pittsburgh family members coming to visit and spend the night with us so I'm really looking forward to that!  Hopefully the weather will hold up for their trip over!

Friday, March 7, 2014

Crafty Secrets Easter Cards

Hello blogging friends!
Wow!  Here we are on Friday again already!  
Is time going fast or is it just me?

Today I have some Easter cards to share with you which I made using the Printable Easter Blessings Postcards by Crafty Secrets.  They are available at the Crafty Vintage Girl shoppe along with a wonderful selection of other Easter project making goodies.  Be sure to pop over and check it out!

Before I share my cards, I want to REMIND YOU of our Linky Party going on NOW on our blog HERE!
You still have a couple of days to join in the fun!  
And if by chance you don't have any of our products YET, you will find a variety of freebie links on the sidebar of our BLOG.

All you need to do is post any sample you have created using any of our products.  Every person will receive a $6.00 coupon and 1 lucky random.org winner will get a $50.00 Crafty Secrets Gift Card!  You have until 11:59 PM Mar 9 to enter. Sorry, only one $6.00 coupon per person but you can enter up to 4 samples and increase odds of winning the big prize. Don`t be shy!

Okay ... now onto the Easter cards ... here's a photo of the group.


This printable file is designed so you can print these gorgeous images, then flip the paper and print the other side with the 'postcard' print.  Yes, you could send these as actual postcards.  However, I have a craft show coming up in a couple of weeks and chose to just print the one side and make a full size card for each image.

Printable Easter Blessings Postcards Download T-35

Would you like to see a close up of each card?
I simply went through some of my design papers and selected a background pattern that I thought complimented the images.  I haven't used much in the way of embellishment ... they are so beautiful on their own, they don't need much more!  
You can click on any of the images for an even closer look!


These were very EASY PEASY to create but I think they are SO BEAUTIFUL!
I hope you're inspired to get started on YOUR Easter cards.

Thanks so much for stopping by!
I hope you have a wonderful weekend!
And please, don't forget to pop over to our BLOG and STORE!
Till next time ...

Thursday, March 6, 2014

It all about the GREEN ...

Top of the Mornin' to Ya! (AGAIN!)
I mentioned earlier that I have a couple of cards to share with you today, and they are both of the 'Irish' influence.  My hubby is Irish ... his mom (God Rest Her Soul) was 100% Irish ... her parents last names were Gallagher & McDermott ... doesn't get much more Irish than that!  LOL
Anyways ... on to my card share.

The new challenge at Joan's Gardens is to use 
Green & White, 
an Oval shape, 
an embossing folder (inked inside or not)
 and something from Joan's Gardens.

I am not a cat lover but I have several friends who are so I made this card with them in mind!  How cute is this cat family die!  It's from Cheery Lynn Designs and is #B417.  The embossing folder I used today came from Joan's Gardens and is a Sizzix Tim Holtz Alterations folder (sorry don't have the number).  I did as Joan had suggested and inked up the inside of the folder (using Memento 'bamboo leaves' ink) before running it through my embossing machine.
Other elements used on this card are:
SU print pack dp, Green polka dot grosgrain ribbon, pop dots, Green ZIG pen for faux stitching
Spellbinder classic oval dies, and JustRite 'Large Fancy Sentiments' (also from Joan's Gardens).

A few challenges to share my creation with:
Inky Chicks Challenge - Monochromatic
Ruby's Rainbow Challenge - Shades of Green + 1 other color
Crafting from the Heart #8 - Anything Goes/use dies
Perfectly Rustics Challenge - Shades of one color
Really Reasonable Ribbon Challenge - Show me the Green & Ribbon

Thanks so much for stopping by.  Have a great day!

Luck of the Irish at Shelly's Images!

It's the 1st Thursday of a new month and that means time for a new challenge at Shelly's Images.  Her challenge request is to use something that indicates Good Luck.  I have used her 'Beary Lucky' digi image for today's card and he's just over flowing with Good Luck features!  What do you think?


I've carried my green/gold plaid paper on through to the inside of my card and have used ribbon that has been on my ribbon rack for years!  I've had it for so long I don't even know where it came from originally but it sure worked perfectly on today's card!  
Beary was colored with Spectrum Noir alcohol markers and popped up with pop dots.
A little touch of flair with the Cheery Lynn Designs 'Fanciful Flourish', Gold prima flower with green Stickles center was added to bring more Good Luck!

Thanks so much for stopping by today!
I'll be back in a bit with another card to share ...
Till then ...

Wednesday, March 5, 2014

A Rose is a Rose . . .

Good Day Bloggers!
The new challenge at Classy Cards n Such is to use one of the Susan Tierney Cockburn flower dies.  Since I have a couple of these dies I was anxious to create and play along.  I have used her ROSE #658411 die set and her flower making kit.


This is not a card ... it's actually a box I made to house my baby shower gift seen HERE.   The pink rose is for a baby girl and the purple/butterflies are to match the room decor.
The large flourish in the background looks black but it's not ... it's a deep purple.
My camera really doesn't like purple ... most times wants to change it to blue!  LOL!
Here's a close up of my homemade flower ... I'm getting better at making them.


A few challenges:
Sunflowerfields Designs March Challenge - Birthday and/or Flowers (I went with flowers.)
The Doodle Garden Digistamps Challenge #1 - Anything Goes
My Creative Moments: Word Play Saturday - Swirls
Cuttin and Stampin Challenge - Butterflies are Buzzing
Fan-Tastic Tuesday Challenge #25- Anything Goes/Must be Square
Crafty My Life - Anything But a Card
The Cheerful Stamp Pad - Anything Goes
Crafting From the Heart - Anything Goes/Use Dies or Punches
Eureka Stamps #79 - Anything Goes

Thanks so much for stopping by today and I hope you'll come join in this challenge fun!
I can't wait to be inspired by the flower making of the participants ... I can use all the help I can get!  LOL!
Till next time!

Recipe:
Papers:  Kraft cs & DCWV 'Luxury Pack' (for the box), soft pink cs, lavender cs, deep purple cs
Accessories:  Cheery Lynn Designs #B117 Fanciful Flourish die, #B117S Fanciful Flourish Small, #B291 Mini Fanciful Flourish Reverse, Sizzix 'Susan's Garden' #658411 Rose die set, Sizzix 'Susan's Garden' #658437 Tool Kit, Martha Stewart butterfly punch, Flower Factory White organza ribbon, Darice 1/4" periwinkle ribbon, Lavender and Frosted Lace Stickles, Baby pin & buggy accessories from JoAnn's

Tuesday, March 4, 2014

A Tea Party with DIES R US

Good Morning Blogging Friends!
I'm so excited to share with you today, my very 1st creation as a design team member


The dies I have used on today's creation are available 
at the Dies R Us Store and In Stock now!

and

 The Polynesian Sails die set is actually 2 dies in one!  The large lacy oval and the small center circular doily type die.  They both cut out at the same time, which makes the large oval an 'open' center.  I simply laid it on my dark green card stock, traced around the oval with a pencil and cut out the oval shape to create a solid inside panel.  Then, used the center cut from this beautiful die set as my 'doily' under the teapot.  How sweet is that!

This beautiful teapot die set is also an 'outline' die set.  So, once die cut, I glued it down to my chosen design paper and did a little 'fussy cutting' to achieve my paper pieced look.  To add a little more depth and texture, I used my Spectrum Noir alcohol markers to color in the leafy pattern on the teapot/cups, the lid stem and the inside portion of the cup to give the illusion of the cups filled with a delicious cinnamon tea.

 A few qualifying challenges:
Craft-Dee BowZ March Challenge - Anything Goes with a handmade bow
Deep Ocean Challenge - Just for a Girl
Loves Rubber Stamps Challenge - Anything Goes
Papertake Weekly - Anything Goes

I hope you'll come check out this new STORE.  
They have a wide selection of dies from several different manufacturers and great prices too!
And, by all means, if you need inspiration, please pop over to our new BLOG where each day of the week, Monday through Friday, one of the DT members will be sharing a creation and description to hopefully inspire you.  From the BLOG, you can click on the photo of each DT member to go directly to their personal blogs.


Recipe:
Papers:  White cs, Forrest Green cs, Ivory cs, First Edition Paper 'Love Letters' 6x6 dp
Accessories: Cheery Lynn Designs 'Polynesian Sails Oval' #DL153, Elizabeth Craft Designs 'Teapot & Cups' #714, Pop Dots, E6000 Spray Adhesive, Wrights lace ribbon, Craft-Dee Bowz bow maker, Petaloo Tiffany Treasures gem, Fiskars swivel craft knife, Spectrum Noir alcohol markers

Monday, March 3, 2014

Crafty Secrets March Linky Party and DT Challenge

YAY!  Spring is getting closer!
Hello friends!
Welcome to a new month of crafting fun and that means it's also 
time for a new CRAFTY SECRETS LINKY PARTY and Design Team Challenge.

This month the team is focused on SPRING!  
So we will be sharing a variety of wonderful St. Patrick's Day, Easter, Gardening 
and anything else that screams SPRING creations with you though out the month of March.

My DT creation/tutorial I'd like to share is this cute 
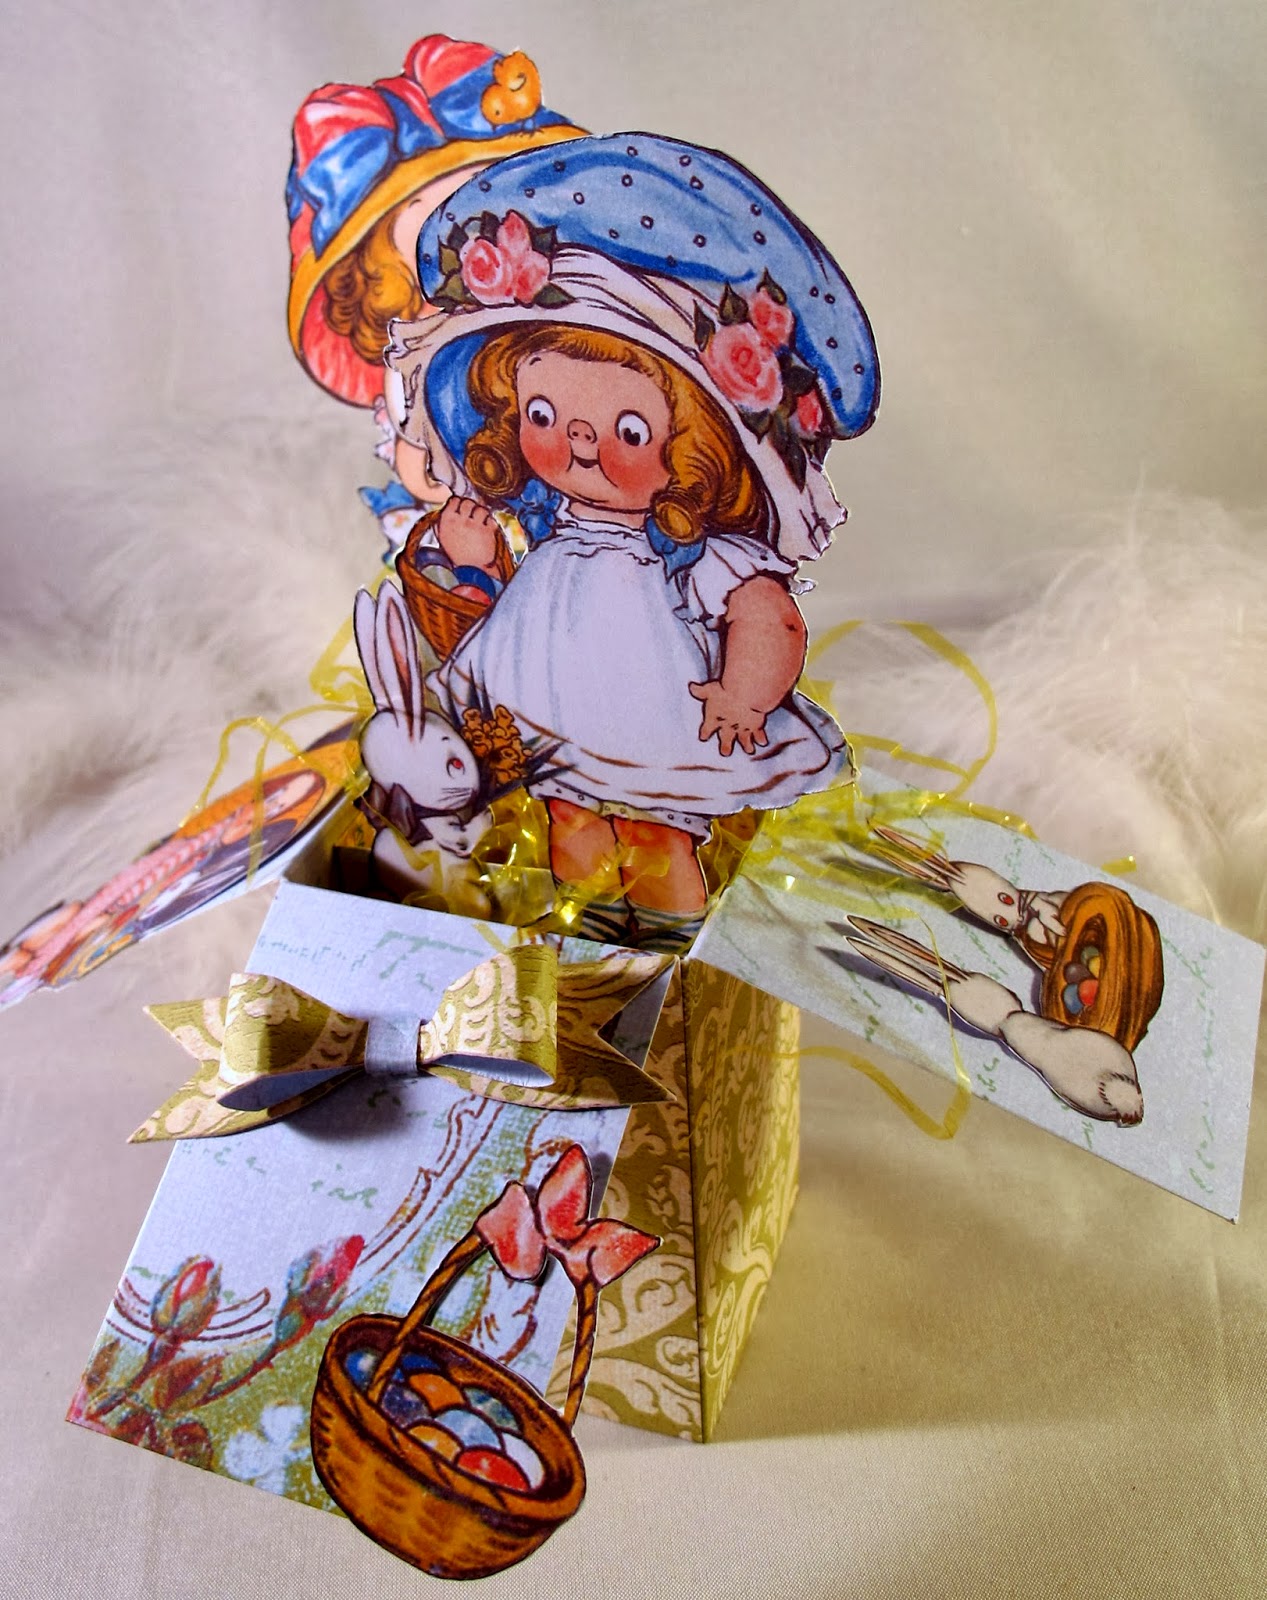
Easter 'Card in a Box' using Crafty Secrets 'Easter Cut Out Kids' and their 'Green Damask Floral' digital papers.

WARNING!  
Since I'm not set up to do video tutorials, this post will be PHOTO HEAVY!
The original instructions/video came from 

STEP 1:
Choose your paper(s).  Tina used kraft cardstock and design paper panels on her box but I decided to print out the beautiful Crafty Secrets 'Green Damask Floral' paper today.  Printing the coordinating patterns on both sides of my 100# bright white card stock.
Once printed, cut your paper 8 1/4" x 9".

STEP 2:
Score along the 9" side of your paper at 2 1/8", 4 1/4", 6 3/8" and 8 1/2".
 NEXT, turn your paper 90 degrees and score at 2 3/4"

STEP 3:
With the 8 1/4" side on top and your 2 3/4" score to the left ... 
cut your cardstock to measure 6".  Save the piece that is cut off.

From the scrap piece, measure and cut at 3 1/8" making sure to include the 'tab'.
This will give you a piece (see below) that has a 'tab' on either end.

Cut this piece in half at 1 1/8" so now you have two strips.
Each with a 'tab' at each end (see below).

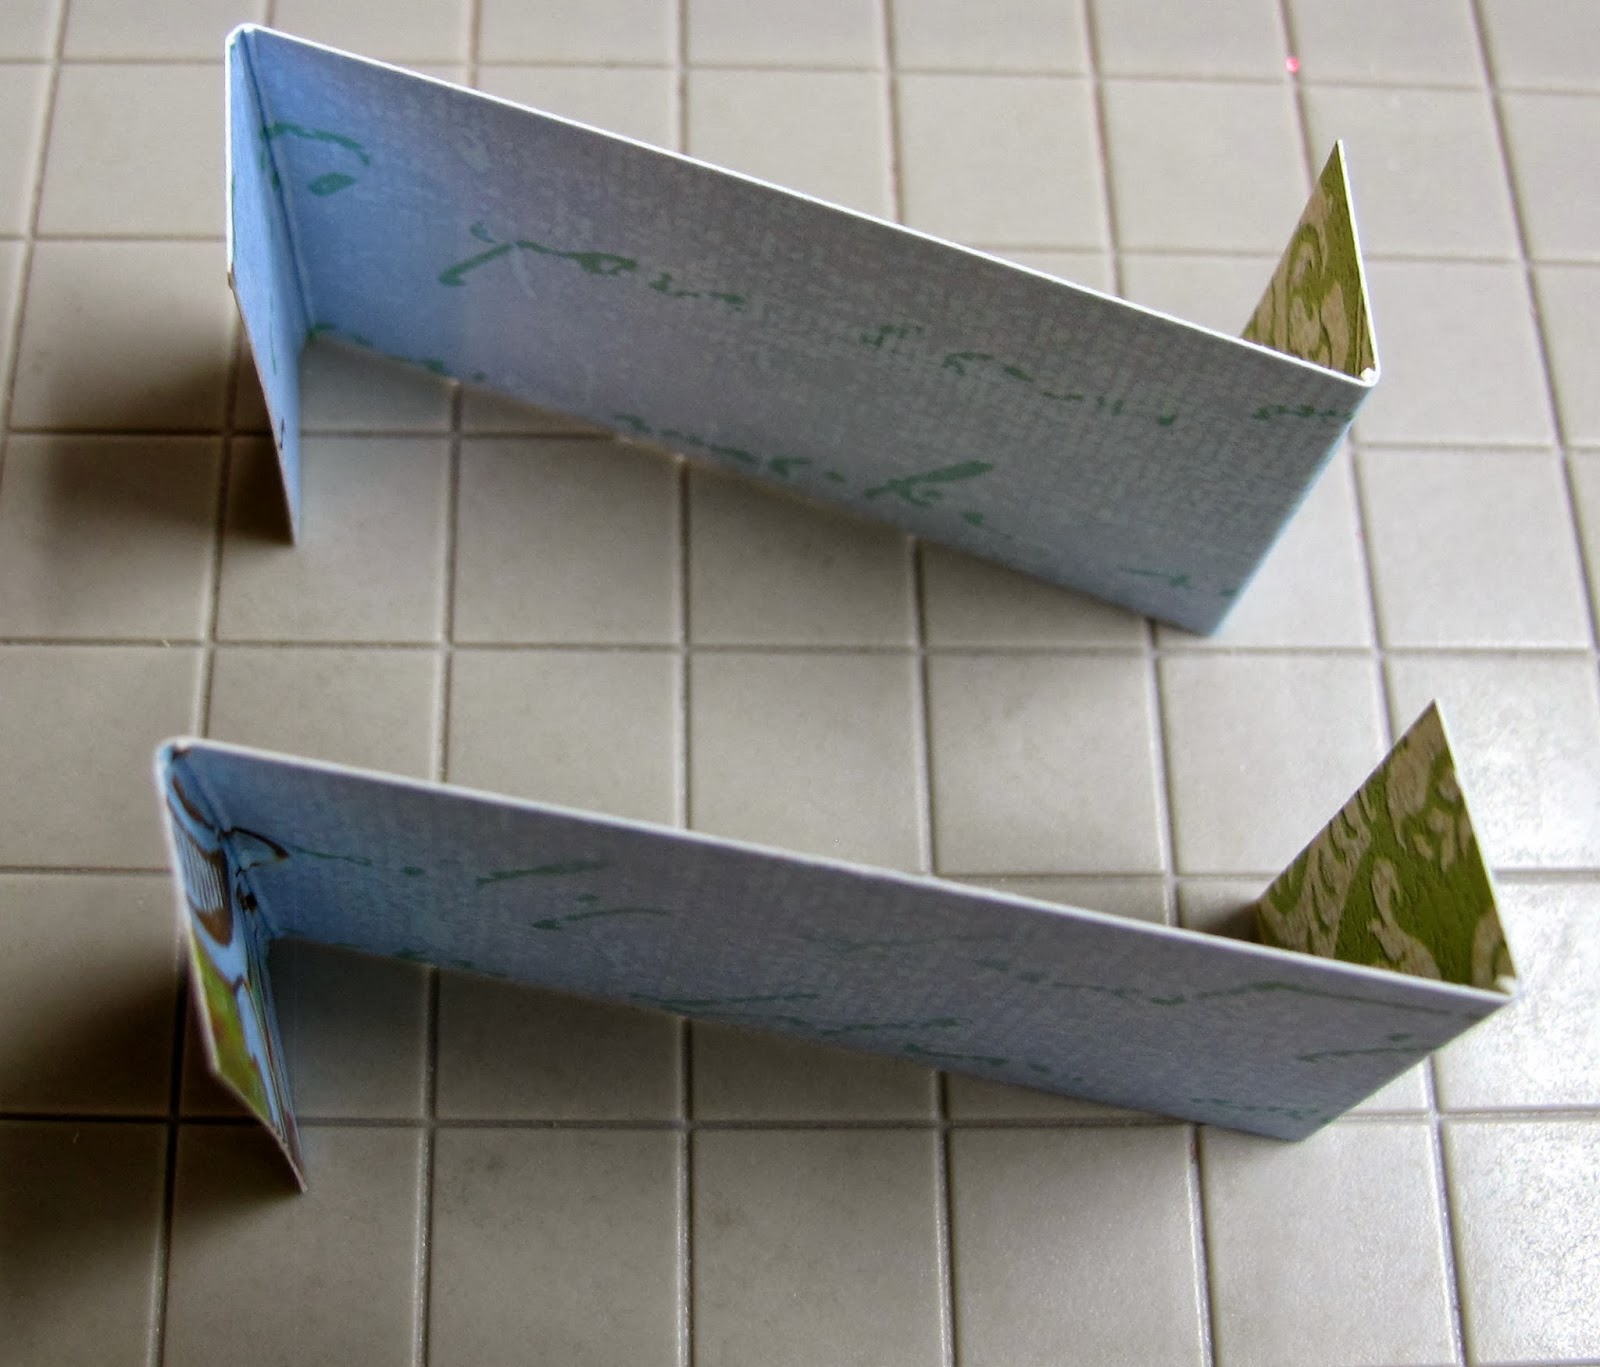
Fold 'tabs' to make a 'z' and adhere sticky strip (such as scor tape) 
to ends and set aside.

STEP 4:
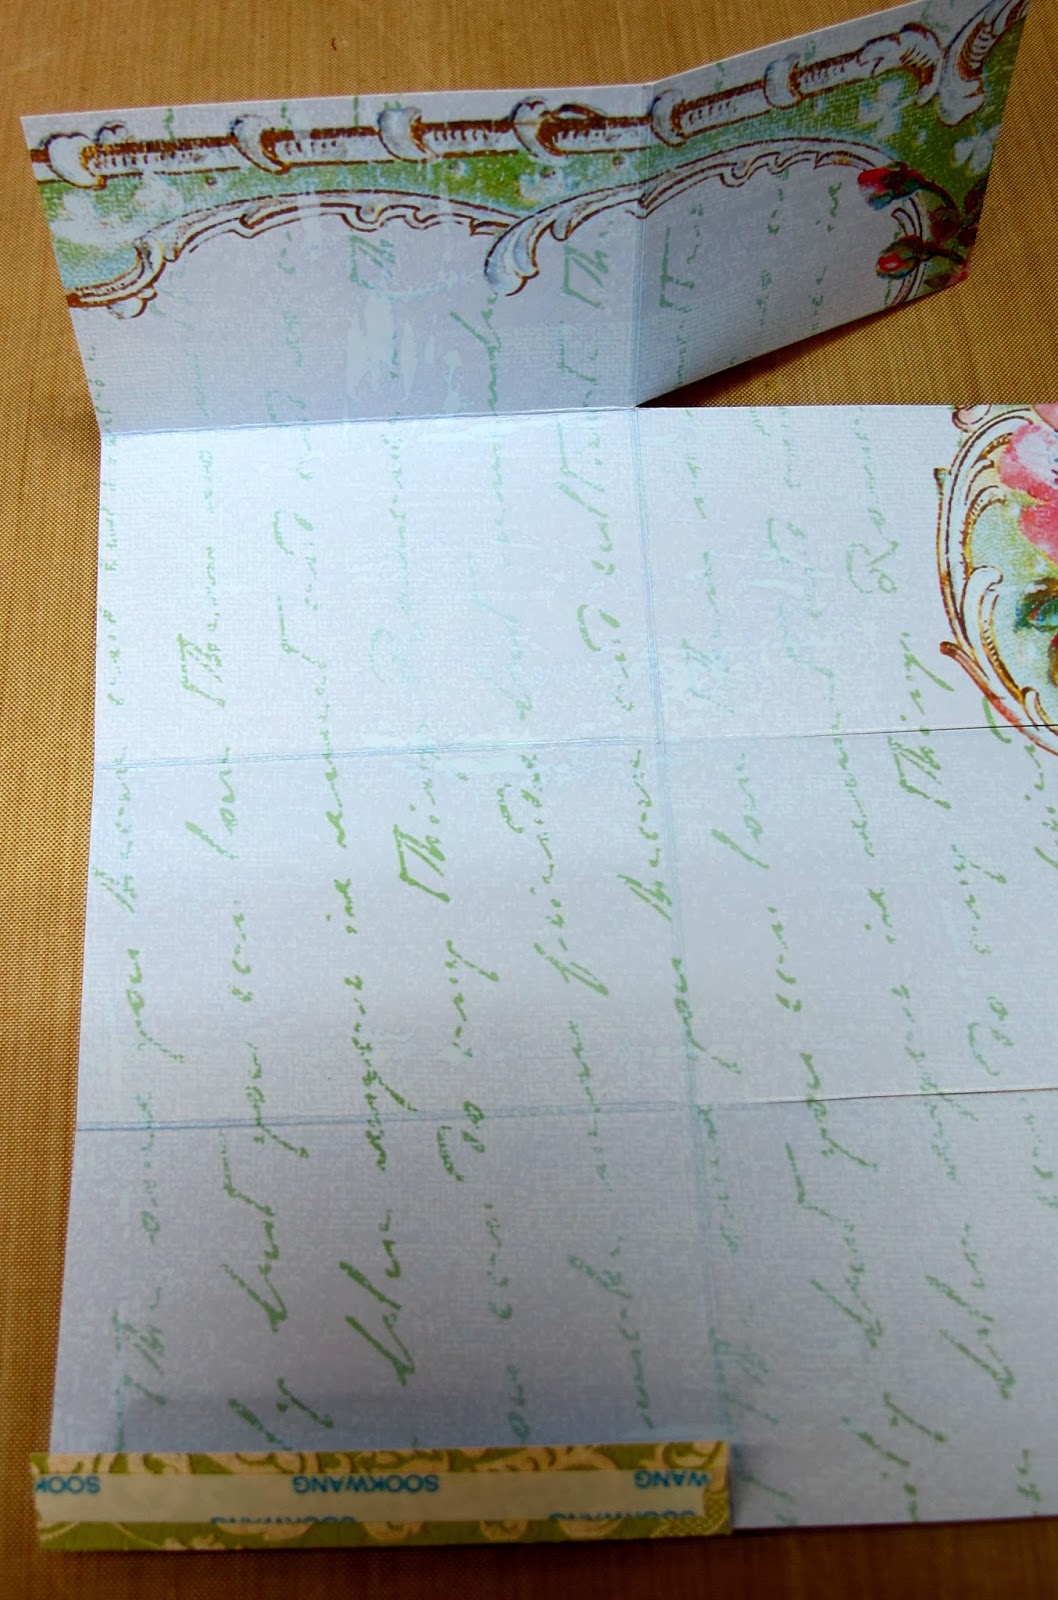
 With your main card stock position so the 2 3/4" side is at the top 
and cut along the SMALL square score lines to create the flaps.
Trim off the tiny strip that is left over, you won't need it.
(HINT:  the LONGER panels will create the box 
and the SHORTER panels will create the flaps.)

When using 2 sided papers as I am here,
you can now choose which pattern you want as the inside of your box
and which pattern you want as the outside.
I've chosen the blue inside and the green on the outside.

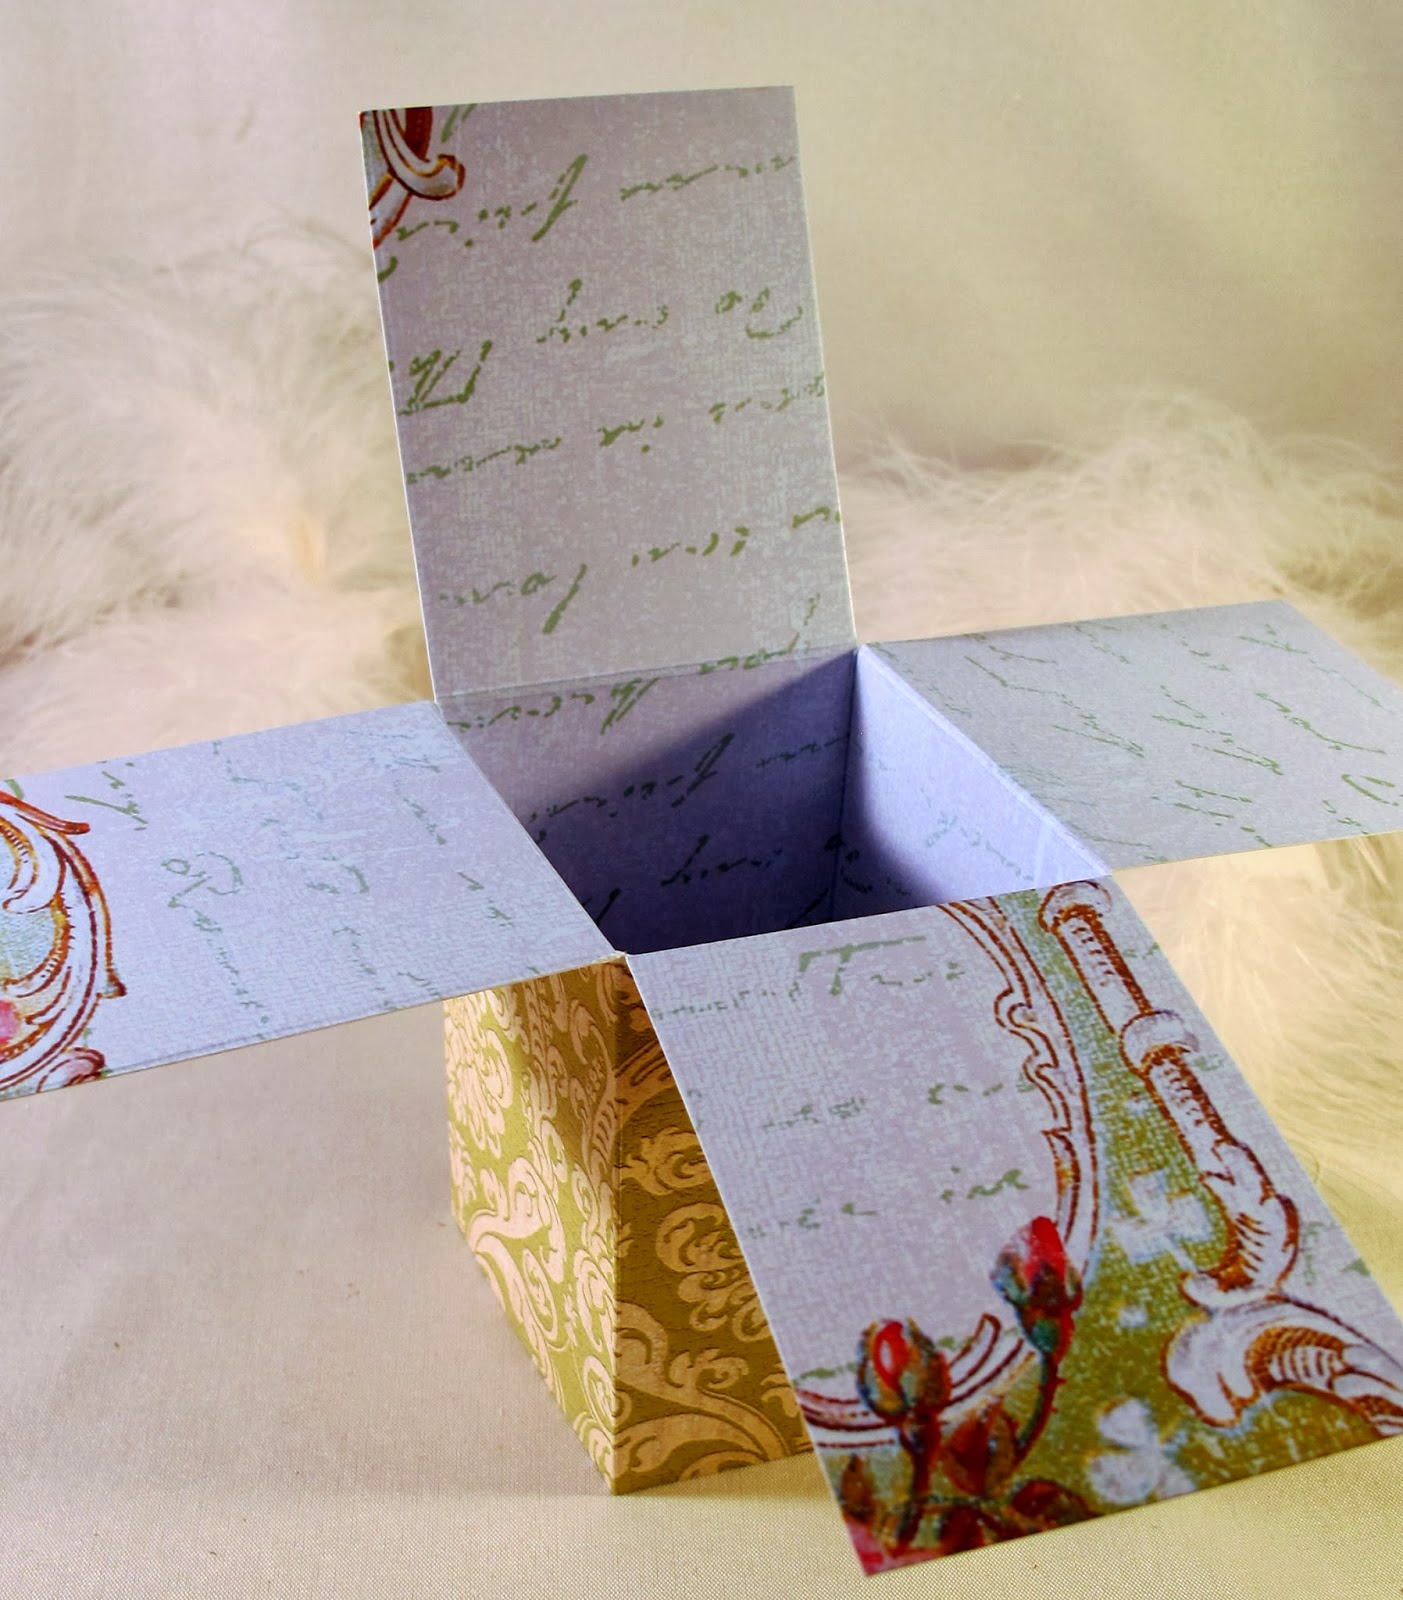
 STEP 5:
Fold on the score lines and use a strong adhesive 
(such as red line tape or scor tape) to put your box together.

 STEP 6:
For the BACK of your box, you can add a panel for writing your message.
This panel would be cut at 5 7/8" x 2".
This writing panel also gives your back panel extra strength.
I chose to use the extra piece that was cut from the full size card stock.  Since it was a little short on the side measurements, I chose to distress with Tim Holtz Tea Die ink & a sponge.

This is what your 'card in a box' will look like folded closed BEFORE decorating.


NOW COMES THE FUN PART!
DECORATING!!!

As I said at the beginning of my post, I chose to use
Crafty Secrets 'Easter Cut Out Kids' and 'Green Damask Floral' digital papers.
I actually printed out this full sheet, then began fussy cutting.

You can click on any of the images to enlarge for a closer view.


It turns out that my 'Card in a Box' will fit inside a 5x7 envelope for mailing.
Here's another peek at the finished product.
I hope you'll give it a try and please let me know if you do so I can come take a peek!

BONUS!
Did you see these darling little Printable Gift Bags?  One even has these cute kids that matches the Easter Cut Out Kids sheet that I used on my Card in a Box creation.  What fun!!!


They are so easy to print, cut and put together!


You can purchase them HERE and HERE in the Crafty Vintage Girl Shoppe!
 
OKAY ... now it's YOUR turn!
You'll have one week to play along so be sure to pop on over to the Crafty Secrets Blog and post any sample you have created using ANY Crafty Secrets product(s) and receive a $6.00 coupon. You can enter up to 4 samples to increase your chance to win the $50 gift card but only one $6.00 coupon can be sent.  

Need more inspiration and want to see more fabulous tutorials?  
Well check out what my amazing team mates have created ...

Thanks so much for stopping by today and for sticking with me to the end!
I look forward to seeing what YOU create!

Saturday, March 1, 2014

***EXCITING NEWS***

Hello Blogger Friends!

Do you love DIE CUTS as much as I do??  Well ...
I have been BUSTING AT THE SEAMS to share this news
and I've finally been given the Go Ahead!!

Are you familiar with DIES R US?
They are a company that carry DIES from a variety of fabulous companies! 
Please DO CHECK IT OUT!

Well they have started a Design Team and guess who is one of the Member?
YEP ... ME!  YAY!!


Here's a link to our new blog where each day one of the DT members will be sharing a creation with you demonstrating how you can use these fabulous dies.  
My post day will be on Tuesday .

Please pop over to our new Dies R Us Blog to meet my team mates and 
if you leave a comment on the introduction post you will have a chance to win a $10 gift certificate to the Dies R Us store. There will be a total of 10 winners!!

 Here's a sneak peek of my first creation as a designer for DIES R US!
You'll have to come back on Tuesday for all the details!


Thanks for stopping by!
You'll want to pop on over to the DRU STORE to
find the dies that you're looking for!  They have AWESOME PRICES TOO!
Remember there will be NEW INSPIRATION POSTED EACH DAY  (Monday-Friday)
over on the DRU BLOG beginning Monday (March 3rd)!

CAS (Clean and Simple)

Can you believe it?
MARCH 1st!!
(and another SNOW storm on the way ... Uuuugh!)

Anyways, since I can't go outside to plant flowers and make the yard pretty, I may as well do & share a little crafting!  And why not go OUTSIDE MY COMFORT ZONE too!  When I saw the current challenge over at Addicted to Stamps & More was CAS, I knew I just had to share one of these cards.  I think they all came together quite good especially since I don't do a lot of SIMPLE cards ... if you follow my blog you know I like layers, flowers, embellishments ...

Now THIS is as CAS a card as you can get (at least in my mind!)

I was recently commissioned to make a variety of Thank You cards for a lady who requested they be in the color scheme of the company product she's selling for.  That color scheme is Lime Green, Black and White.  (This gal is quiet the supporter ... I NEVER see her without this Lime Green color on her SOMEWHERE!  LOL)

Here's a photo I took of just a few of the other cards ...
... yep there's some pretty CAS cards in this collection!

A few other challenges to enter into:
Savvy Handmade Cards - Going Green Photo Inspiration
Delightful Challenges - Keep It Simple
Loves Rubber Stamps Challenge - Washi Tape or Faux Washi
Card Mania Challenge - Use a sentiment

Thanks so much for stopping by today!
Hope you have a fabulous weekend!  
If we get the weather they are calling for, I'll share photos with you!

Recipe:
Paper:  White cs
Stamp/Ink:  SU Elegant Greeting/Versafine Onyx
Accessories:  Queen & Co. Polka Dot Trendy Tape